INSTRUCTION SHEET

ISF:300


07-01/Rev-03

INSTALLATION INSTRUCTIONS FOR 12V LOW VOLTAGE

AND 120V REMODELER

READ AND UNDERSTAND THESE INSTRUCTIONS BEFORE INSTALLING FIXTURE

This fixture is intended for installation in accordance with National Electrical Code or Canadian Electrical

Code (as applicable) and local regulations. To ensure full compliance with local codes and regulations, check with your local electrical inspector before installation. To prevent electrical shock, turn off electricity at fuse box before proceeding.

Retain these instructions for maintenance reference.

300MR / 400MR

DIA* = CEILING CUT-OUT

300ES


301MRE - 401MRE


303MRE

300MR = 3-3/4" (95mm) Dia*

300ES = 3-3/4" (95mm) Dia*

301MRE = 3-3/4" (95mm) Dia*

303MRE = 3-3/4" (95mm) Dia*

400MR = 4-3/4" (121mm) Dia*

1" Max. ceiling thickness

401MR = 4-3/4" (121mm) Dia*

1/2" Max. ceiling thickness

1" Max. ceiling thickness


1" Max. ceiling thickness


A. CEILING:

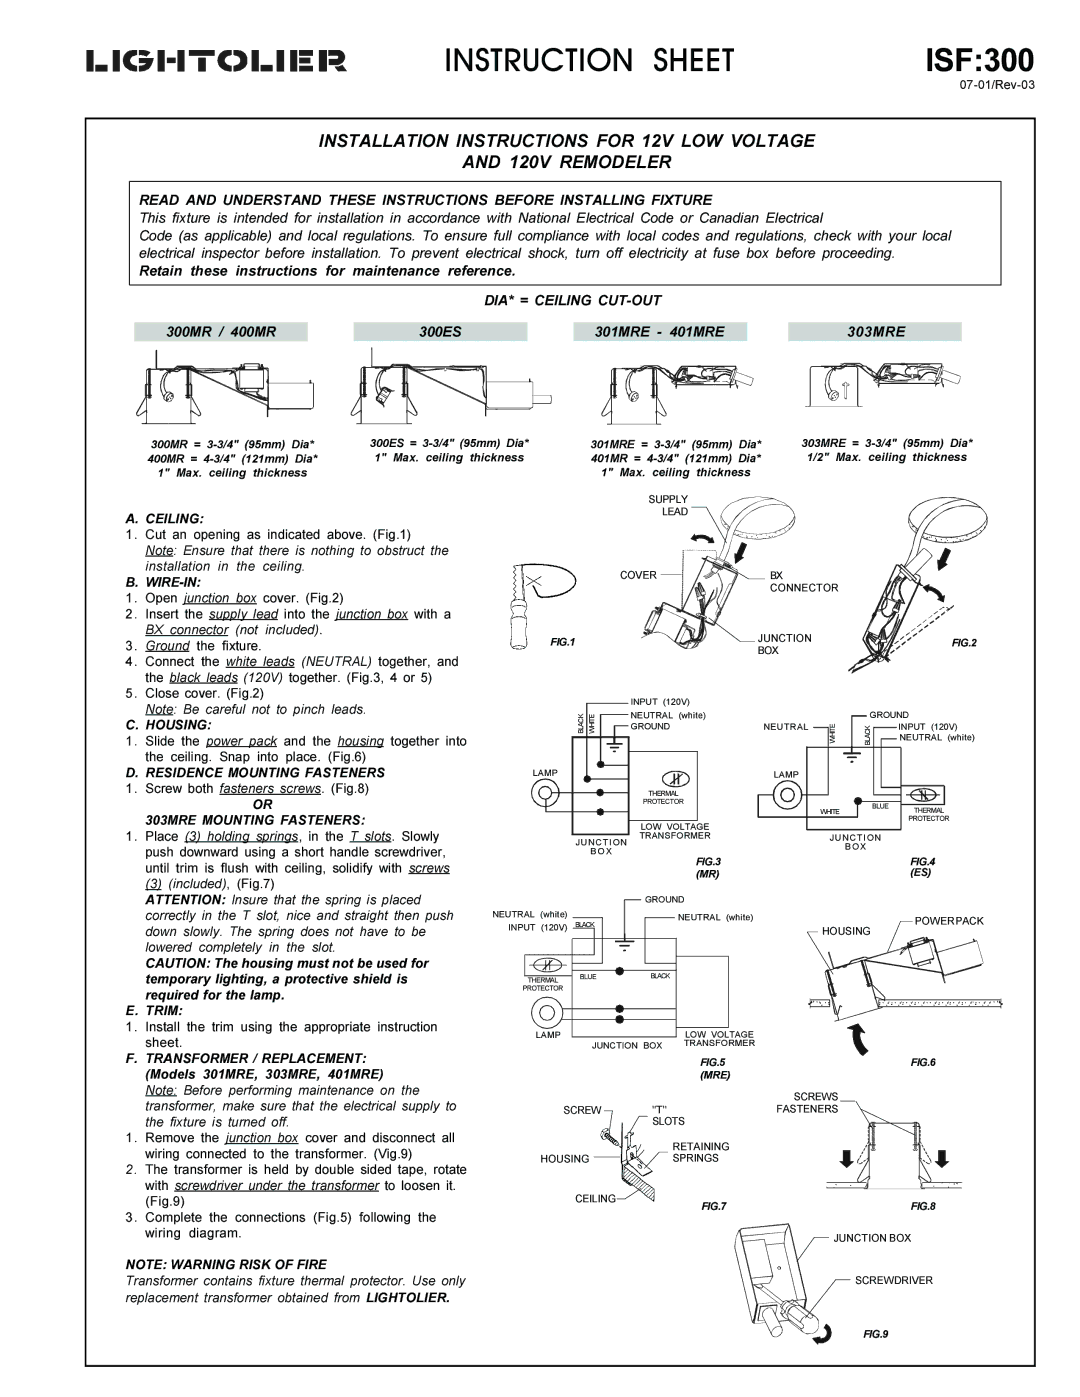
1. Cut an opening as indicated above. (Fig.1) Note: Ensure that there is nothing to obstruct the installation in the ceiling.

B. WIRE-IN:

1. Open junction box cover. (Fig.2)

2. Insert the supply lead into the junction box with a BX connector (not included).

3. Ground the fixture.

4. Connect the white leads (NEUTRAL) together, and the black leads (120V) together. (Fig.3, 4 or 5)

5. Close cover. (Fig.2)

Note: Be careful not to pinch leads.

SUPPLY


LEAD


COVER


BX


CONNECTOR


FIG.1

JUNCTION

FIG.2

BOX


INPUT (120V)


C. HOUSING:

1. Slide the power pack and the housing together into the ceiling. Snap into place. (Fig.6)

D.RESIDENCE MOUNTING FASTENERS 1. Screw both fasteners screws. (Fig.8)

OR

303MRE MOUNTING FASTENERS:

1. Place (3) holding springs, in the T slots. Slowly push downward using a short handle screwdriver, until trim is flush with ceiling, solidify with screws

(3)(included), (Fig.7)

ATTENTION: Insure that the spring is placed correctly in the T slot, nice and straight then push down slowly. The spring does not have to be lowered completely in the slot.

CAUTION: The housing must not be used for temporary lighting, a protective shield is required for the lamp.

E. TRIM:

1. Install the trim using the appropriate instruction sheet.


BLACK WHITE

NEUTRAL (white)


GROUND


NEUTRAL

LAMP


LAMP


THERMAL


PROTECTOR


LOW VOLTAGE


JUNCTION


TRANSFORMER


B O X


FIG.3


(MR)


GROUND


NEUTRAL (white)


NEUTRAL (white)


BLACK


INPUT (120V)


BLACK


THERMAL

BLUE


PROTECTOR


LAMP


LOW VOLTAGE


JUNCTION BOX

TRANSFORMER


GROUND

WHITE


BLACK


INPUT (120V)


NEUTRAL (white)


BLUE

THERMAL


WHITE


PROTECTOR

JUNCTION

BOX

FIG.4

(ES)

POWERPACK

HOUSING

F.TRANSFORMER / REPLACEMENT: (Models 301MRE, 303MRE, 401MRE) Note: Before performing maintenance on the transformer, make sure that the electrical supply to the fixture is turned off.

1. Remove the junction box cover and disconnect all wiring connected to the transformer. (Vig.9)

2. The transformer is held by double sided tape, rotate with screwdriver under the transformer to loosen it. (Fig.9)

3. Complete the connections (Fig.5) following the wiring diagram.

NOTE: WARNING RISK OF FIRE

Transformer contains fixture thermal protector. Use only replacement transformer obtained from LIGHTOLIER.


FIG.5


FIG.6


(MRE)


SCREWS

SCREW


"T"

FASTENERS


SLOTS


RETAINING


HOUSING


SPRINGS


CEILING

FIG.7


FIG.8


JUNCTION BOX


SCREWDRIVER

FIG.9

Page 1
Image 1
Lightolier ISF:300 installation instructions Ceiling, Wire-In, Housing, 303MRE Mounting Fasteners, Trim

ISF:300 specifications

The Lightolier ISF:300 is a remarkable lighting fixture known for its adaptability, efficiency, and advanced technological features. As part of the renowned Lightolier brand, which has long been synonymous with innovation in the lighting industry, the ISF:300 embodies a perfect blend of performance and aesthetic appeal.

One of the standout features of the ISF:300 is its ability to deliver superior light quality. Utilizing state-of-the-art LED technology, this fixture provides bright, uniform illumination while consuming significantly less energy compared to traditional lighting solutions. The high lumen output coupled with excellent color rendering capabilities ensures that spaces are illuminated in a way that enhances the visual environment without compromising on efficiency.

The ISF:300 is designed with versatility in mind. It offers multiple mounting options, including pendant, surface, and recessed installations, making it suitable for a variety of commercial and residential applications. This adaptability allows designers and architects to employ the fixture in different settings, from offices and retail spaces to galleries and hospitality venues.

Furthermore, the ISF:300 incorporates advanced control technologies, enabling users to manage lighting levels effectively. With options for dimming and integration with smart building systems, users can create customized lighting scenes that enhance the functionality and ambiance of their spaces. This level of control not only contributes to energy savings but also enhances user experience by allowing individuals to tailor the lighting to their preferences.

The fixture is built with durability in mind, featuring high-quality materials that withstand the test of time. Its sleek and modern design complements a wide range of interior styles, making it an aesthetically pleasing choice for any space.

Additionally, the Lightolier ISF:300 is compliant with various lighting standards and regulations, ensuring it meets the necessary energy efficiency guidelines. This commitment to sustainability resonates with today's eco-conscious consumers and businesses striving to reduce their environmental footprint.

In summary, the Lightolier ISF:300 stands out with its combination of high-quality illumination, versatility in installation, advanced control features, and durable design. These characteristics make it an ideal choice for a wide range of applications, ensuring both functionality and style in any lighting environment. Whether for commercial or residential use, the ISF:300 is a top-tier option that enhances spaces through its innovative technologies and thoughtful design.