3Gas connections

Installation & Service Manual

APPLY WRENCH TO FLANGE ONLY

WHEN FLANGE

IS USED

WHEN FLANGE IS

NOT USED

APPLY WRENCH FROM TOP OR BOTTOM OF GAS CONTROL TO EITHER SHADED AREA

1.

Turn the power “OFF” at the main disconnect switch.

2.

Turn gas valve control knob to “OFF” position.

3.

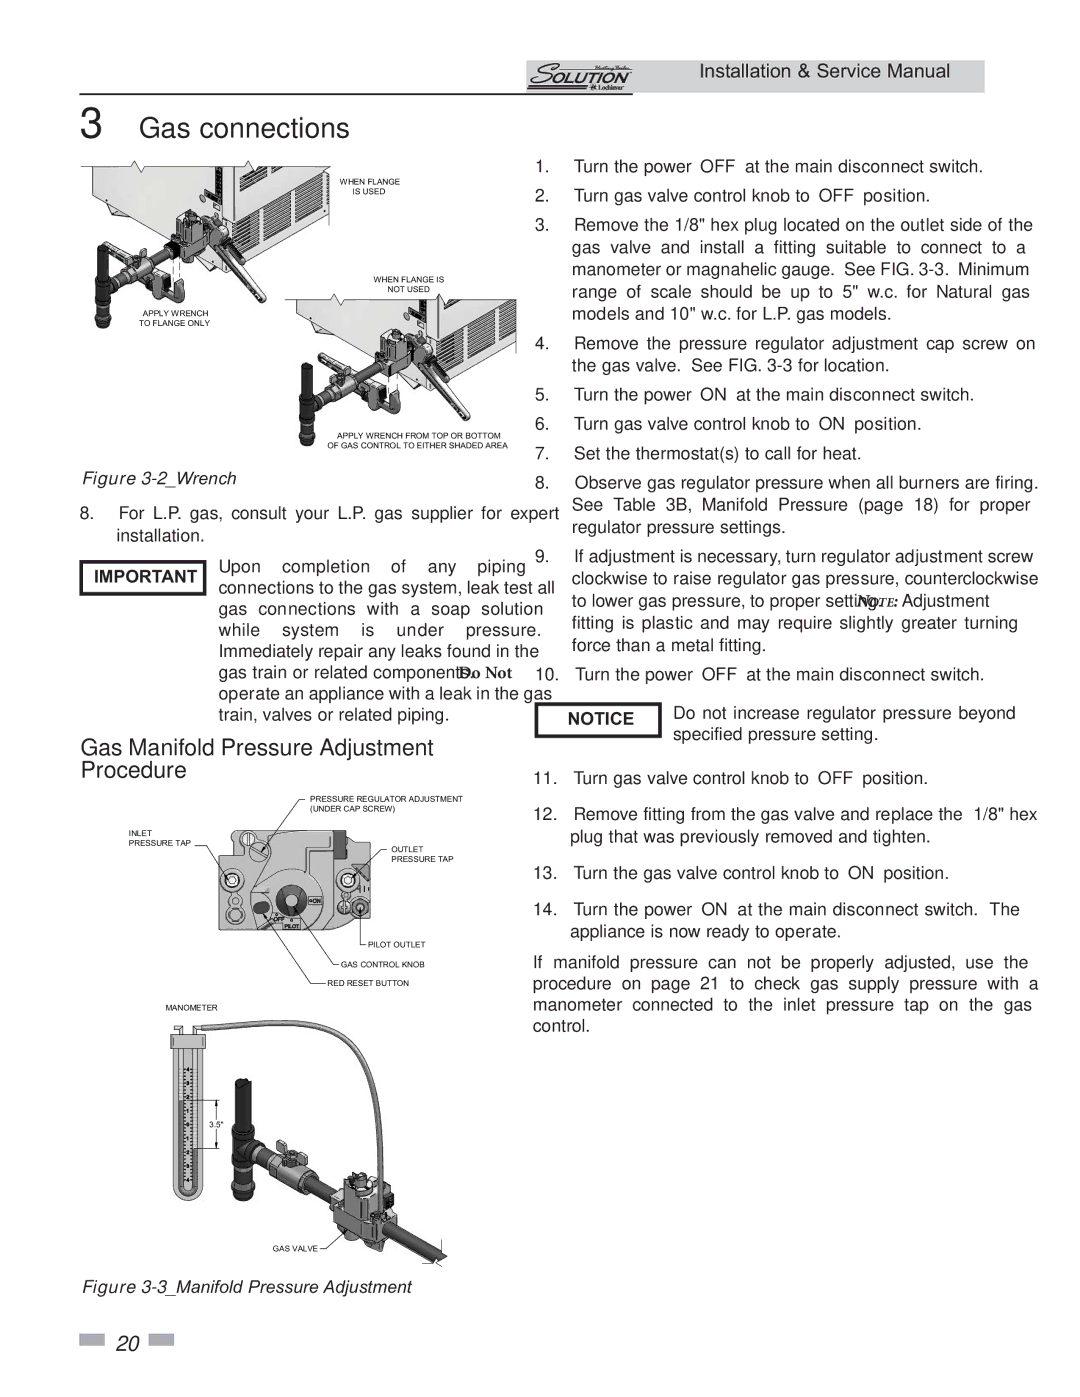
Remove the 1/8" hex plug located on the outlet side of the


gas valve and install a fitting suitable to connect to a


manometer or magnahelic gauge. See FIG. 3-3. Minimum


range of scale should be up to 5" w.c. for Natural gas


models and 10" w.c. for L.P. gas models.

4.

Remove the pressure regulator adjustment cap screw on


the gas valve. See FIG. 3-3 for location.

5.

Turn the power “ON” at the main disconnect switch.

6.

Turn gas valve control knob to “ON” position.

7.

Set the thermostat(s) to call for heat.

Figure 3-2_Wrench

8.For L.P. gas, consult your L.P. gas supplier for expert installation.

8.

Observe gas regulator pressure when all burners are firing.


See Table 3B, Manifold Pressure (page 18) for proper


regulator pressure settings.

9.

If adjustment is necessary, turn regulator adjustment screw

IMPORTANT

Upon completion of any piping connections to the gas system, leak test all gas connections with a soap solution while system is under pressure. Immediately repair any leaks found in the gas train or related components. Do Not operate an appliance with a leak in the gas train, valves or related piping.

clockwise to raise regulator gas pressure, counterclockwise

to lower gas pressure, to proper setting. NOTE: Adjustment

fitting is plastic and may require slightly greater turning

force than a metal fitting.

10. Turn the power “OFF” at the main disconnect switch.

NOTICE

Do not increase regulator pressure beyond

specified pressure setting.


Gas Manifold Pressure Adjustment Procedure

11. Turn gas valve control knob to “OFF” position.

INLET PRESSURE TAP

PRESSURE REGULATOR ADJUSTMENT (UNDER CAP SCREW)

OUTLET

PRESSURE TAP

PILOT OUTLET

12.

Remove fitting from the gas valve and replace the 1/8" hex


plug that was previously removed and tighten.

13.

Turn the gas valve control knob to “ON” position.

14.

Turn the power “ON” at the main disconnect switch. The


appliance is now ready to operate.

GAS CONTROL KNOB

RED RESET BUTTON

MANOMETER

3.5"

GAS VALVE

Figure 3-3_Manifold Pressure Adjustment

If manifold pressure can not be properly adjusted, use the procedure on page 21 to check gas supply pressure with a manometer connected to the inlet pressure tap on the gas control.

20

Page 20
Image 20
Lochinvar 45,000 - 260,000 BTU/HR service manual Gas Manifold Pressure Adjustment Procedure, 2Wrench

45,000 - 260,000 BTU/HR specifications

Lochinvar, a leader in high-efficiency heating solutions, presents the Lochinvar line of boilers, specifically the Lochinvar 45,000 - 260,000 BTU/HR models. These boilers are designed to meet a wide range of heating demands, making them ideal for residential and commercial applications alike.

One of the key features of the Lochinvar boilers is their impressive efficiency rating. Utilizing advanced condensing technology, these units can achieve efficiencies of up to 96% AFUE (Annual Fuel Utilization Efficiency). This high efficiency not only reduces fuel consumption but also lowers utility bills, making it a cost-effective solution for heating needs.

The Lochinvar boilers are equipped with a powerful heat exchanger constructed from durable stainless steel. This design not only maximizes heat transfer but also enhances the longevity of the unit. By preventing corrosion and minimizing maintenance requirements, the stainless steel heat exchanger ensures that the boiler operates at peak performance for years.

Another significant aspect of the Lochinvar boilers is their modulating burner system. This technology allows the boiler to adjust its output based on demand, ensuring that it only uses the energy necessary to maintain the desired temperature. This feature not only improves efficiency but also contributes to a more comfortable indoor environment by minimizing temperature fluctuations.

The Lochinvar series also showcases a user-friendly control interface. The advanced LCD display allows for easy monitoring and adjustment of system settings. Connectivity options are often included, providing the ability to integrate with modern building management systems for enhanced control and diagnostics.

Safety features abound in the Lochinvar models, which include built-in safeguards such as temperature and pressure relief valves, flame detection systems, and modulation cut-off to protect against overheating and other hazardous conditions.

Moreover, these boilers are designed for easy installation and maintenance. Compact dimensions and lightweight design facilitate straightforward setup, even in tight spaces. Additionally, users can take advantage of the unit’s self-diagnostic capabilities to simplify troubleshooting and reduce downtime.

In conclusion, the Lochinvar 45,000 - 260,000 BTU/HR boilers represent a pinnacle of innovation in heating technology. With high efficiency, advanced control systems, durable components, and safety features, they stand out as reliable and effective solutions for a variety of heating applications, ensuring comfort and efficiency in any environment.