Troubleshooting

Troubleshooting (cont’d.)

Error

Possible Causes

Solutions


Mouse not detected

• Mouse cable is not firmly

• Firmly connect the mouse cable to the USB port

by system

connected to the system

on the rear panel.


• Mouse is not connected to the


system


• System needs to be reset

• Power off the system (disconnect power cable).


Firmly connect a USB mouse to the USB port on the


rear panel of the system. Reconnect the power


cable to the DC 12V port on the rear panel.


• There is no picture

• Camera cables are loose or

• Check the camera video cable and connections

on selected channels

have become disconnected

• Disconnect and reconnect the cable at the system

/ camera picture is


and at the camera

not being displayed


• Try moving the camera to another channel or use


another cable


• The image on the

• Audio cables are loose or have

• Check the AUDIO connections to the DVR

DVR appears, but

been disconnected


does not have sound


• Audio channels are disabled in

• Check the Configurations: Main


the system menu

Menu>Record>Audio


• Volume on external speakers

• Increase volume on external speakers (not


(not included) is low or off

included)


New camera titles do

• New camera titles have not

• Log in to DVR Netviewer in Internet Explorer

not appear on the

been correctly saved on the

• Click Setup and then click the Title tab

system(8/16-channel

system

• If you saved your old settings, click Load File; for

only)


new settings, enter the new camera titles and click


Save file to save the settings to your PC


• Disconnect and then reconnect the power cable


from the rear panel of the system to reset and


implement the new camera title settings


• Camera display on the system

• Check the Configurations: Main


is set to numerals

Menu>Camera>Camera Title Type


I am not receiving

• Email notification is disabled

• Log in to DVR Netviewer in Internet Explorer and

email notifications


click Setup; click the Mail tab; under SMTP Status,


select On


• If using the default setting, you

• In the SMTP User field, enter your Lorex DDNS


have not entered your Lorex

user name; in the SMTP Password field, enter your


DDNS user name and password

Lorex DDNS password (you must first register for


Lorex DDNS to use email notification at the default


setting)


• Default setting is disabled, but

• If you want to use your own SMTP server, deselect


you have not entered your own

the Default box, and enter your SMTP Server


SMTP information

address, Port, User name, and Password in the


respective fields


112

Page 126
Image 126
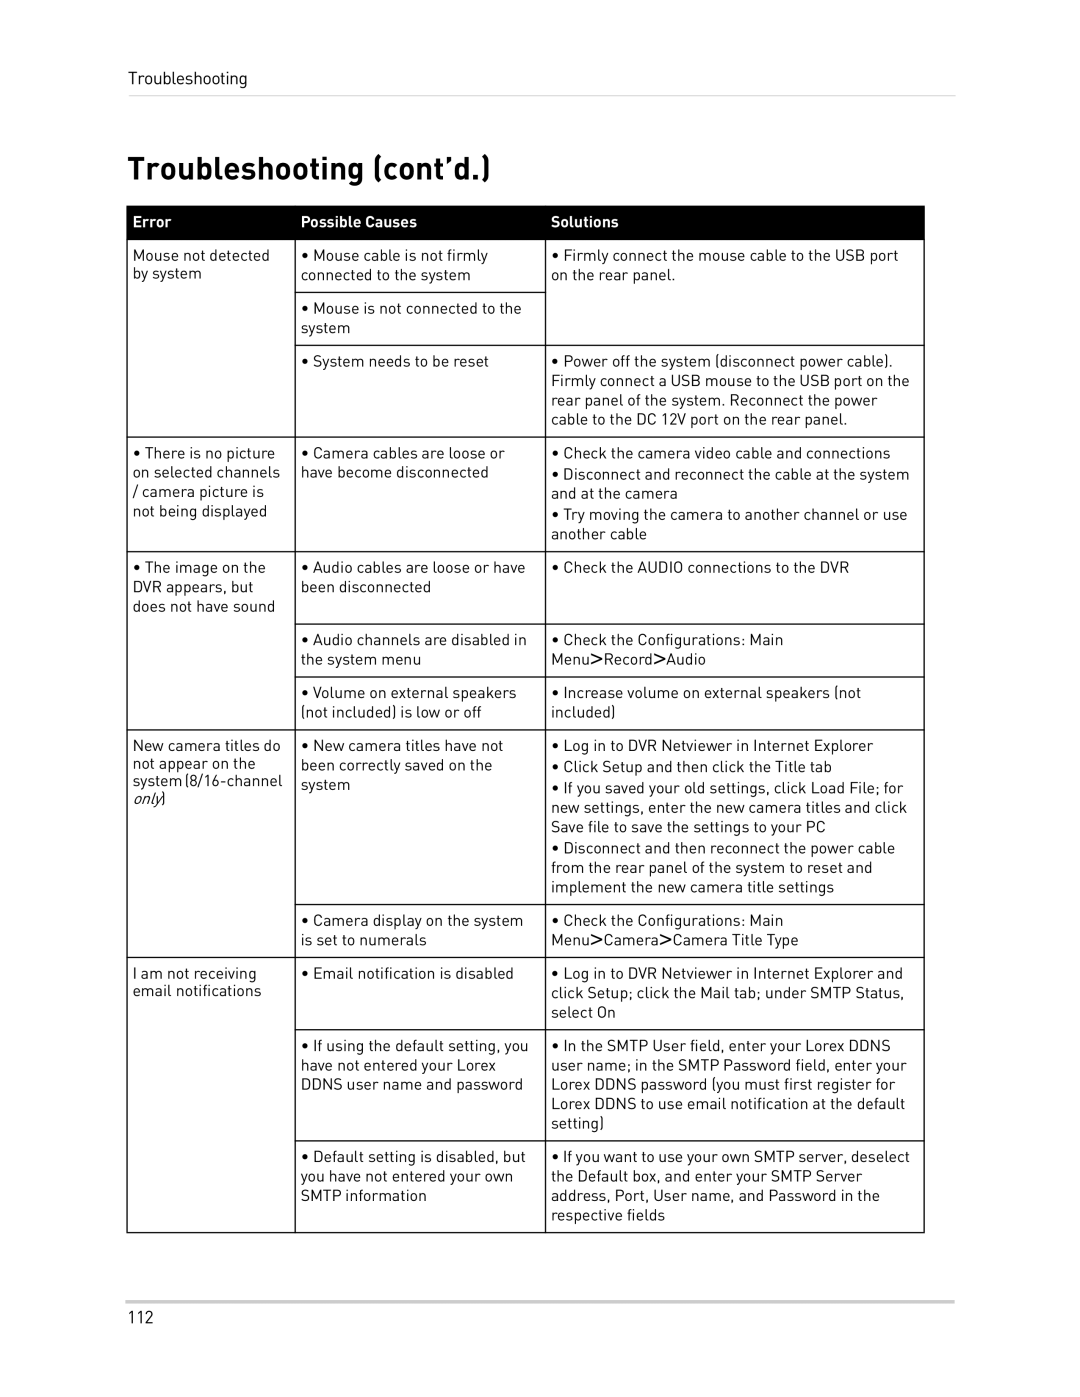
LOREX Technology LH300 Series instruction manual Troubleshooting cont’d, Only

LH300 Series specifications

LOREX Technology's LH300 Series stands as a prominent player in the world of security surveillance, designed for both residential and commercial environments. This cutting-edge series offers a comprehensive suite of features and technologies aimed at delivering robust security solutions.

At the heart of the LH300 Series is its impressive recording resolution, which reaches up to 4MP. This high-definition capability ensures that every detail is captured, providing crystal-clear footage that is crucial for identifying individuals and monitoring activities. With the ability to record at multiple resolutions, users can adjust settings based on their specific needs and available storage.

One of the standout features of the LH300 Series is its advanced night vision technology. Equipped with infrared LEDs, the series can provide clear black-and-white images in complete darkness, ensuring that security is maintained 24/7. This is particularly valuable for monitoring entry points and high-risk areas where visibility can be compromised at night.

The LH300 Series is designed for easy installation and user-friendly operation. The plug-and-play setup allows for a quick and straightforward installation process, minimizing disruptions. Additionally, the system includes a customizable interface that simplifies navigation and management of camera feeds.

Connectivity is another key aspect of the LH300 Series, which supports both wired and wireless camera options. This flexibility allows users to strategically position cameras throughout their property without the limitations of cabling. Moreover, the series features mobile app support, enabling users to monitor live feeds and recordings from their smartphones or tablets. This remote access capability provides peace of mind, allowing users to keep an eye on their property from virtually anywhere.

Storage options are equally impressive, with the ability to support large hard drives for extended recording times. The series typically includes features such as motion detection alerts, which notify users of any irregular activity, thus enhancing security measures. Users can also configure recording schedules and adjust settings based on specific security needs.

In summary, LOREX Technology's LH300 Series combines high-resolution recording, advanced night vision, flexible installation options, and user-friendly features, making it a top choice for comprehensive security solutions. Its blend of technology and practicality delivers reliable surveillance, ensuring that both residential and commercial properties are safeguarded effectively.