For Customer Assistance Call:
07MF121
7” Digital Photo Frame
Instruction Manual
Thank you for your purchase of this Magnasonic product. Please read this Instruction Manual carefully
before using product to ensure proper use. Keep this manual in a safe place for future reference.
www.magnasonic.ca
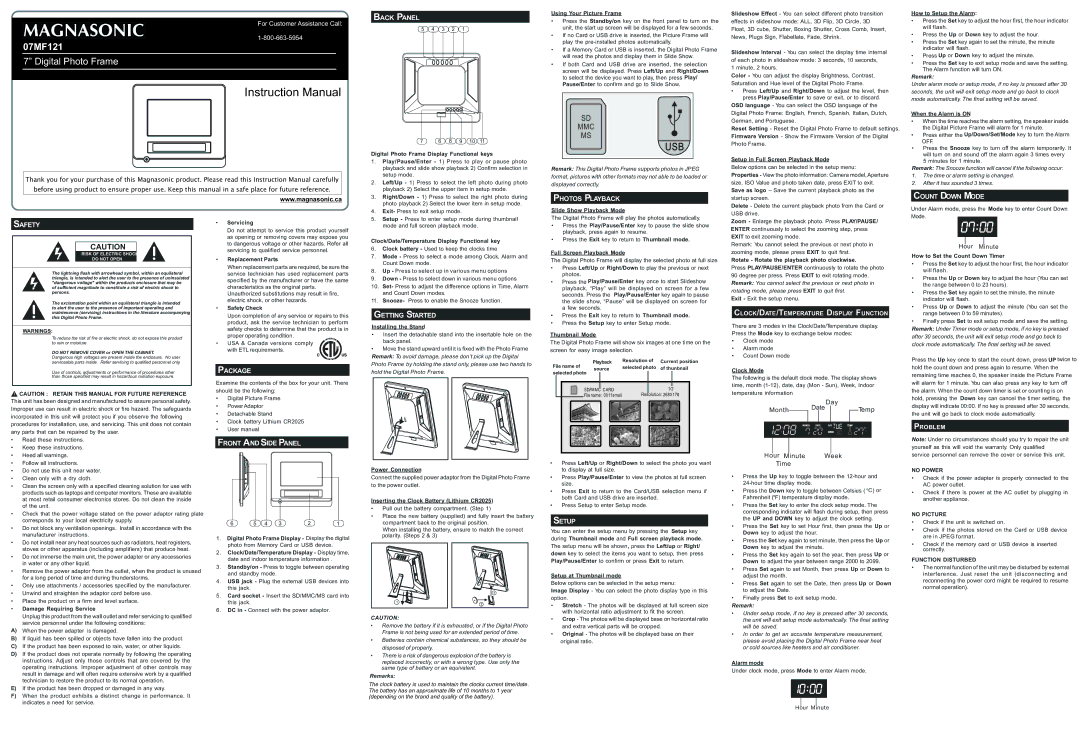
BACK PANEL
5 4 3 2 1
7 6 8 9 10 11
Digital Photo Frame Display Functional keys
1. | Play/Pause/Enter - 1) Press to play or pause photo |
| playback and slide show playback 2) Confirm selection in |
| setup mode. |
2. | Left/Up - 1) Press to select the left photo during photo |
| playback 2) Select the upper item in setup mode. |
3. | Right/Down - 1) Press to select the right photo during |
| photo playback 2) Select the lower item in setup mode. |
4. | Exit- Press to exit setup mode. |
5. | Setup - Press to enter setup mode during thumbnail |
Using Your Picture Frame
•Press the Standby/on key on the front panel to turn on the unit, the start up screen will be displayed for a few seconds.
•If no Card or USB drive is inserted, the Picture Frame will play the
•If a Memory Card or USB is inserted, the Digital Photo Frame will read the photos and display them in Slide Show.
•If both Card and USB drive are inserted, the selection screen will be displayed. Press Left/Up and Right/Down to select the device you want to play, then press Play/ Pause/Enter to confirm and go to Slide Show.
SD
MMC
MS
USB
Remark: This Digital Photo Frame supports photos in JPEG format, pictures with other formats may not able to be loaded or displayed correctly.
PHOTOS PLAYBACK
Slide Show Playback Mode
The Digital Photo Frame will play the photos automatically.
Slideshow Effect - You can select different photo transition effects in slideshow mode: ALL, 3D Flip, 3D Circle, 3D Float, 3D cube, Shutter, Boxing Shutter, Cross Comb, Insert, News, Plugs Sign, Flabellate, Fade, Shrink.
Slideshow Interval - You can select the display time internal of each photo in slideshow mode: 3 seconds, 10 seconds,
1 minute, 2 hours.
Color - You can adjust the display Brightness, Contrast, Saturation and Hue level of the Digital Photo Frame.
•Press Left/Up and Right/Down to adjust the level, then press Play/Pause/Enter to save or exit, or to discard.
OSD language - You can select the OSD language of the Digital Photo Frame: English, French, Spanish, Italian, Dutch, German, and Portuguese.
Reset Setting - Reset the Digital Photo Frame to default settings. Firmware Version - Show the Firmware Version of the Digital
Photo Frame.
Setup in Full Screen Playback Mode
Below options can be selected in the setup menu:
Properties - View the photo information: Camera model, Aperture size, ISO Value and photo taken date, press EXIT to exit. Save as logo – Save the current playback photo as the startup screen.
Delete - Delete the current playback photo from the Card or USB drive.
How to Setup the Alarm:
•Press the Set key to adjust the hour first, the hour indicator will flash.
•Press the Up or Down key to adjust the hour.
•Press the Set key again to set the minute, the minute indicator will flash.
•Press Up or Down key to adjust the minute.
•Press the Set key to exit setup mode and save the setting. The Alarm function will turn ON.
Remark:
Under alarm mode or setup mode, if no key is pressed after 30 seconds, the unit will exit setup mode and go back to clock mode automatically. The final setting will be saved.
When the Alarm is ON
•When the time reaches the alarm setting, the speaker inside the Digital Picture Frame will alarm for 1 minute.
•Press either the Up/Down/Set/Mode key to turn the Alarm OFF.
•Press the Snooze key to turn off the alarm temporarily. It will turn on and sound off the alarm again 3 times every 5 minutes for 1 minute.
Remark: The Snooze function will cancel if the following occur:
1.The time or alarm setting is changed.
2.After it has sounded 3 times.
COUNT DOWN MODE
Under Alarm mode, press the Mode key to enter Count Down
Mode.
SAFETY
CAUTION
RISK OF ELECTRIC SHOCK
DO NOT OPEN
The lightning flash with arrowhead symbol, within an equilateral triangle, is intended to alert the user to the presence of uninsulated "dangerous voltage" within the products enclosure that may be
of sufficient magnitude to constitute a risk of electric shock to persons.
The exclamation point within an equilateral triangle is intended to alert the user to the presence of important operating and maintenance (servicing) instructions in the literature accompanying this Digital Photo Frame.
WARNINGS:
To reduce the risk of fire or electric shock, do not expose this product to rain or moisture.
DO NOT REMOVE COVER or OPEN THE CABINET.
Dangerous high voltages are present inside the enclosure. No user serviceable parts inside. Refer servicing to qualified personnel only.
Use of controls, adjustments or performance of procedures other than those specified may result in hazardous radiation exposure.
![]() CAUTION : RETAIN THIS MANUAL FOR FUTURE REFERENCE
CAUTION : RETAIN THIS MANUAL FOR FUTURE REFERENCE
This unit has been designed and manufactured to assure personal safety.
Improper use can result in electric shock or fire hazard. The safeguards
incorporated in this unit will protect you if you observe the following
procedures for installation, use, and servicing. This unit does not contain
any parts that can be repaired by the user.
•Read these instructions.
•Keep these instructions.
•Heed all warnings.
•Follow all instructions.
•Do not use this unit near water.
•Clean only with a dry cloth.
•Clean the screen only with a specified cleaning solution for use with products such as laptops and computer monitors. These are available at most retail consumer electronics stores. Do not clean the inside of the unit.
•Check that the power voltage stated on the power adaptor rating plate corresponds to your local electricity supply.
•Do not block any ventilation openings. Install in accordance with the manufacturer instructions.
•Do not install near any heat sources such as radiators, heat registers, stoves or other apparatus (including amplifiers) that produce heat.
•Do not immerse the main unit, the power adapter or any accessories in water or any other liquid.
•Remove the power adaptor from the outlet, when the product is unused for a long period of time and during thunderstorms.
•Only use attachments / accessories specified by the manufacturer.
•Unwind and straighten the adaptor cord before use.
•Place the product on a firm and level surface.
•Damage Requiring Service
Unplug this product from the wall outlet and refer servicing to qualified service personnel under the following conditions:
A)When the power adapter is damaged.
B)If liquid has been spilled or objects have fallen into the product.
C)If the product has been exposed to rain, water, or other liquids.
D)If the product does not operate normally by following the operating instructions. Adjust only those controls that are covered by the operating instructions. Improper adjustment of other controls may result in damage and will often require extensive work by a qualified technician to restore the product to its normal operation.
E)If the product has been dropped or damaged in any way.
F)When the product exhibits a distinct change in performance. It indicates a need for service.
•Servicing
Do not attempt to service this product yourself as opening or removing covers may expose you to dangerous voltage or other hazards. Refer all servicing to qualified service personnel.
•Replacement Parts
When replacement parts are required, be sure the service technician has used replacement parts specified by the manufacturer or have the same characteristics as the original parts.
Unauthorized substitutions may result in fire, electric shock, or other hazards.
•Safety Check
Upon completion of any service or repairs to this product, ask the service technician to perform safety checks to determine that the product is in proper operating condition.
•USA & Canada versions comply with ETL requirements.
PACKAGE
Examine the contents of the box for your unit. There should be the following:
•Digital Picture Frame
•Power Adaptor
•Detachable Stand
•Clock battery Lithium CR2025
•User manual
FRONT AND SIDE PANEL
6 | 5 | 4 | 3 | 2 | 1 |
1.Digital Photo Frame Display - Display the digital photo from Memory Card or USB device.
2.Clock/Date/Temperature Display - Display time, date and indoor temperature information .
3.Standby/on - Press to toggle between operating and standby mode.
4.USB jack - Plug the external USB devices into this jack.
5.Card socket - Insert the SD/MMC/MS card into this jack.
6.DC in - Connect with the power adaptor.
mode and full screen playback mode. |
Clock/Date/Temperature Display Functional key
6.Clock battery - Used to keep the clocks time
7.Mode - Press to select a mode among Clock, Alarm and Count Down mode.
8.Up - Press to select up in various menu options
9.Down - Press to select down in various menu options
10.Set- Press to adjust the difference options in Time, Alarm and Count Down modes.
11.Snooze- Press to enable the Snooze function.
GETTING STARTED
Installing the Stand
•Insert the detachable stand into the insertable hole on the back panel.
•Move the stand upward until it is fixed with the Photo Frame
Remark: To avoid damage, please don’t pick up the Digital Photo Frame by holding the stand only, please use two hands to hold the Digital Photo Frame.
Power Connection
Connect the supplied power adaptor from the Digital Photo Frame to the power outlet.
Inserting the Clock Battery (Lithium CR2025)
•Pull out the battery compartment. (Step 1)
•Place the new battery (supplied) and fully insert the battery compartment back to the original position.
When installing the battery, ensure to match the correct polarity. (Steps 2 & 3)
3
1
2
CAUTION:
•Remove the battery if it is exhausted, or if the Digital Photo Frame is not being used for an extended period of time.
•Batteries contain chemical substances, so they should be disposed of properly.
•There is a risk of dangerous explosion of the battery is replaced incorrectly, or with a wrong type. Use only the same type of battery or an equivalent.
Remarks:
The clock battery is used to maintain the clocks current time/date. The battery has an approximate life of 10 months to 1 year (depending on the brand and quality of the battery).
•Press the Play/Pause/Enter key to pause the slide show playback, press again to resume.
•Press the Exit key to return to Thumbnail mode.
Full Screen Playback Mode
The Digital Photo Frame will display the selected photo at full size
•Press Left/Up or Right/Down to play the previous or next photos.
•Press the Play/Pause/Enter key once to start Slideshow playback, “Play” will be displayed on screen for a few seconds. Press the Play/Pause/Enter key again to pause the slide show, “Pause” will be displayed on screen for a few seconds.
•Press the Exit key to return to Thumbnail mode.
•Press the Setup key to enter Setup mode.
Thumbnail Mode
The Digital Photo Frame will show six images at one time on the screen for easy image selection.
File name of | Playback | Resolution of | Current position | |||||
source | selected photo | of thunbnail | ||||||
selected photo |
|
|
|
|
| |||
|
|
|
|
|
|
|
|
|
|
|
|
|
|
|
|
|
|
|
|
| SD/ MMC | CARD |
| 1/2 |
| |
|
|
| File name : 0011small | Resolution: 268X178 |
| |||
|
|
|
|
|
|
|
|
|
•Press Left/Up or Right/Down to select the photo you want to display at full size.
•Press Play/Pause/Enter to view the photos at full screen size.
•Press Exit to return to the Card/USB selection menu if both Card and USB drive are inserted.
•Press Setup to enter Setup mode.
SETUP
You can enter the setup menu by pressing the Setup key during Thumbnail mode and Full screen playback mode. The setup menu will be shown, press the Left/up or Right/ down key to select the items you want to setup, then press Play/Pause/Enter to confirm or press Exit to return.
Setup at Thumbnail mode
Below options can be selected in the setup menu:
Image Display - You can select the photo display type in this
option.
•Stretch - The photos will be displayed at full screen size with horizontal ratio adjustment to fit the screen.
•Crop - The photos will be displayed base on horizontal ratio and extra vertical parts will be cropped.
•Original - The photos will be displayed base on their original ratio.
Zoom - Enlarge the playback photo. Press PLAY/PAUSE/ ENTER continuously to select the zooming step, press EXIT to exit zooming mode.
Remark: You cannot select the previous or next photo in zooming mode, please press EXIT to quit first.
Rotate - Rotate the playback photo clockwise.
Press PLAY/PAUSE/ENTER continuously to rotate the photo 90 degree per press. Press EXIT to exit rotating mode. Remark: You cannot select the previous or next photo in rotating mode, please press EXIT to quit first.
Exit - Exit the setup menu.
CSDLOCK/DATE/TEMPERATURE DISPLAY FUNCTION
MMC
There are 3 modes in the Clock/Date/Temperature display. Press the Mode key to exchange below modes:
•Clock mode
•Alarm mode
•Count Down mode
Clock Mode
The following is the default clock mode. The display shows time, month
|
| Date | Day | |||
Month |
|
|
| Temp | ||
|
|
| ||||
|
|
|
|
|
|
|
|
|
|
|
|
|
|
|
|
|
|
|
|
|
Hour Minute | Week |
Time |
|
•Press the Up key to toggle between the
•Press the Down key to toggle between Celsius ( oC) or Fahrenheit (oF) temperature display mode.
•Press the Set key to enter the clock setup mode. The corresponding indicator will flash during setup, then press the UP and DOWN key to adjust the clock setting.
•Press the Set key to set Hour first, then press the Up or Down key to adjust the hour.
•Press the Set key again to set minute, then press the Up or Down key to adjust the minute.
•Press the Set key again to set the year, then press Up or Down to adjust the year between range 2000 to 2099.
•Press Set again to set Month, then press Up or Down to adjust the month.
•Press Set again to set the Date, then press Up or Down to adjust the Date.
•Finally press Set to exit setup mode.
Remark:
•Under setup mode, if no key is pressed after 30 seconds, the unit will exit setup mode automatically. The final setting will be saved.
•In order to get an accurate temperature measurement, please avoid placing the Digital Photo Frame near heat or cold sources like heaters and air conditioner.
Alarm mode
Under clock mode, press Mode to enter Alarm mode.
Hour Minute
Hour Minute
How to Set the Count Down Timer
•Press the Set key to adjust the hour first, the hour indicator will flash.
•Press the Up or Down key to adjust the hour (You can set the range between 0 to 23 hours).
•Press the Set key again to set the minute, the minute indicator will flash.
•Press Up or Down to adjust the minute (You can set the range between 0 to 59 minutes).
•Finally press Set to exit setup mode and save the setting.
Remark: Under Timer mode or setup mode, if no key is pressed after 30 seconds, the unit will exit setup mode and go back to clock mode automatically. The final setting will be saved.
Press the Up key once to start the count down, press UP twice to hold the count down and press again to resume. When the remaining time reaches 0, the speaker inside the Picture Frame will alarm for 1 minute. You can also press any key to turn off the alarm. When the count down timer is set or counting is on hold, pressing the Down key can cancel the timer setting, the display will indicate 00:00. If no key is pressed after 30 seconds, the unit will go back to clock mode automatically.
PROBLEM
Note: Under no circumstances should you try to repair the unit yourself as this will void the warranty. Only qualified service personnel can remove the cover or service this unit.
NO POWER
•Check if the power adapter is properly connected to the AC power outlet.
•Check if there is power at the AC outlet by plugging in another appliance.
NO PICTURE
•Check if the unit is switched on.
•Check if the photos stored on the Card or USB device are in JPEG format.
•Check if the memory card or USB device is inserted correctly.
FUNCTION DISTURBED
•The normal function of the unit may be disturbed by external interference. Just reset the unit (disconnecting and reconnecting the power cord might be required to resume normal operation).