Unpacking
1.With packaged unit on the floor, carton arrows should point upward.
2.Carefully remove staples from top of carton and fold back sides.
3.Carefully remove cabinet from carton by lifting out unit using finger holes in styrofoam side inset and place on work surface.
CAUTION: Do not attempt to lift this air curtain by its louver or damage may result.
4.Unscrew six (6) knurled nuts and remove air intake grille. (See Figure 3.)
Figure 3 - Removing Air Intake Grille
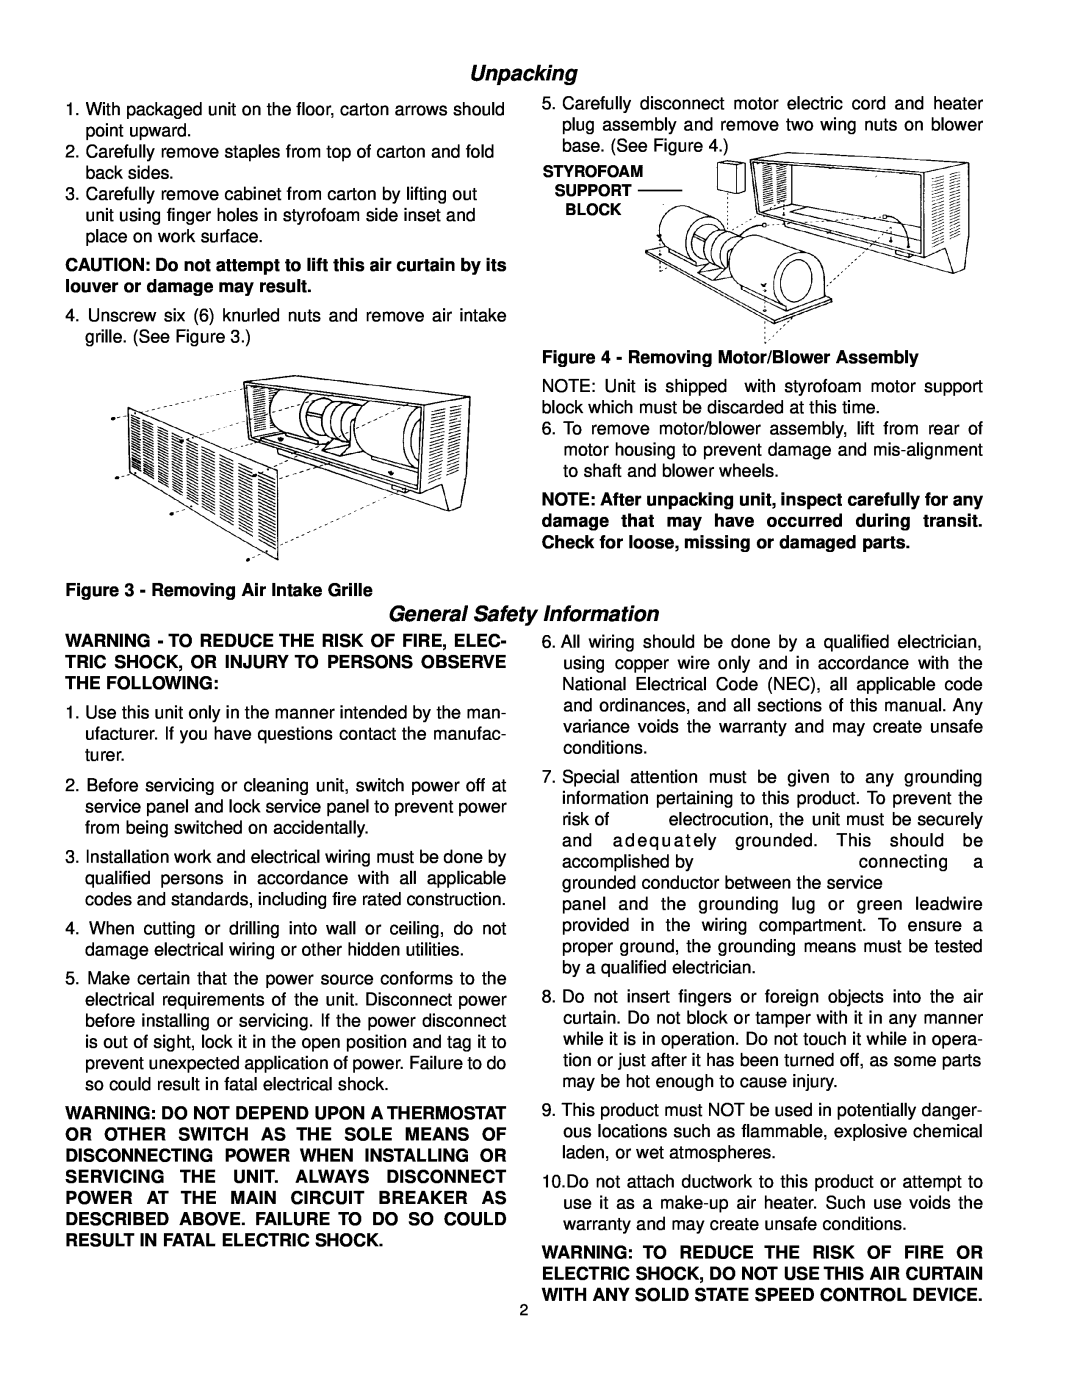
5.Carefully disconnect motor electric cord and heater plug assembly and remove two wing nuts on blower base. (See Figure 4.)
STYROFOAM
SUPPORT
BLOCK
Figure 4 - Removing Motor/Blower Assembly
NOTE: Unit is shipped with styrofoam motor support block which must be discarded at this time.
6.To remove motor/blower assembly, lift from rear of motor housing to prevent damage and
to shaft and blower wheels.
NOTE: After unpacking unit, inspect carefully for any damage that may have occurred during transit. Check for loose, missing or damaged parts.
General Safety Information
WARNING - TO REDUCE THE RISK OF FIRE, ELEC- TRIC SHOCK, OR INJURY TO PERSONS OBSERVE THE FOLLOWING:
1.Use this unit only in the manner intended by the man- ufacturer. If you have questions contact the manufac- turer.
2.Before servicing or cleaning unit, switch power off at service panel and lock service panel to prevent power from being switched on accidentally.
3.Installation work and electrical wiring must be done by qualified persons in accordance with all applicable codes and standards, including fire rated construction.
4.When cutting or drilling into wall or ceiling, do not damage electrical wiring or other hidden utilities.
5.Make certain that the power source conforms to the electrical requirements of the unit. Disconnect power before installing or servicing. If the power disconnect is out of sight, lock it in the open position and tag it to prevent unexpected application of power. Failure to do
so could result in fatal electrical shock.
WARNING: DO NOT DEPEND UPON A THERMOSTAT OR OTHER SWITCH AS THE SOLE MEANS OF DISCONNECTING POWER WHEN INSTALLING OR SERVICING THE UNIT. ALWAYS DISCONNECT POWER AT THE MAIN CIRCUIT BREAKER AS DESCRIBED ABOVE. FAILURE TO DO SO COULD RESULT IN FATAL ELECTRIC SHOCK.
6.All wiring should be done by a qualified electrician, using copper wire only and in accordance with the National Electrical Code (NEC), all applicable code and ordinances, and all sections of this manual. Any variance voids the warranty and may create unsafe conditions.
7.Special attention must be given to any grounding information pertaining to this product. To prevent the
risk of | electrocution, the | unit must be securely |
|
| ||||
and | a d e q u a t ely | gro | unded. | This | should | be |
| |
accomplished by |
|
|
|
| connecting | a | ||
grounded conductor between the service |
|
|
|
| ||||
panel and the grounding lug or | green | leadwire |
|
|
| |||
provided in the wiring compartment. To ensure a proper ground, the grounding means must be tested by a qualified electrician.
8.Do not insert fingers or foreign objects into the air curtain. Do not block or tamper with it in any manner while it is in operation. Do not touch it while in opera- tion or just after it has been turned off, as some parts may be hot enough to cause injury.
9.This product must NOT be used in potentially danger-
ous locations such as flammable, explosive chemical laden, or wet atmospheres.
10.Do not attach ductwork to this product or attempt to use it as a
WARNING: TO REDUCE THE RISK OF FIRE OR ELECTRIC SHOCK, DO NOT USE THIS AIR CURTAIN WITH ANY SOLID STATE SPEED CONTROL DEVICE.
2