RKF Roadking®- All models 94’-07’
The RoadKing®Flip Fork Lock Cover Clock or Thermometer takes the place of the factory installed fork lock plate. The RKF comes with either a clock or thermometer, one extra rubber compression ring, two screws, one clear plastic spacer, one battery replacement tool and billet mount.
1)Carefully remove the item from its package.
2)To remove the clock pry slowly under the edge of the clock with the long flat
side of a knife or similar object in a screwdriver style motion or use the “Pull Here” tab if so equipped, you may also be able to push through the hole in the bottom of the holder. Make sure that the clock does not fall and become damaged.
3)Carefully pry off factory plastic fork lock plate that has
4)Then remove the two Phillips screws beneath the lock plate.
5)Open the mount by pulling the top half up from the base, place the mount and the clear rubber spacer that goes under the mount in position over the two exposed screw holes.
6)Apply LOCTITE®242 blue to the thread of the screws provided and install the screws to hold the cover in place. (The LOCTITE®prevents loosening of threaded fasteners.)
7)The Fork Lock Cover spring closes cover automatically. (The cover WILL NOT stay open)
8)After setting the time per instructions on bag, install the clock into the holder/mount all the way as per instructions on in the General Care section of these instructions.
NO KEY MODIFICATION IS REQUIRED FOR RKF
RKS Roadking®- All models 94’-07’
The Road King®Swivel Fork Lock Cover Clock or Thermometer takes the place of the factory installed fork lock plate. The RKS comes with either a clock or thermometer, one extra rubber compression ring, two screws, one clear plastic spacer, one battery replacement tool and billet mount.
1)Carefully remove the item from it’s package.
2)To remove the clock pry slowly under the edge of the clock with the long
flat side of a knife or similar object in a screwdriver style motion or use the “Pull Here” tab if so equipped, you may also be able to push through the hole in the bottom of the holder. Make sure that the clock does not fall and become damaged.
3)Carefully pry off factory plastic fork lock plate that has
4)Then remove the two Phillips screws beneath the lock plate.
5)Open the mount by rotating the top half clockwise, place the mount and the clear rubber spacer that goes under the mount in position over the two exposed screw holes.
6)Apply LOCTITE®242 blue to the thread of the screws provided and install the screws to hold the cover in place.
(The LOCTITE®prevents loosening of threaded fasteners.)
7)The Fork Lock Cover turns counterclockwise to close.
8)After setting the time per instructions on bag, install the clock into the holder/mount all the way as per instructions in the General Care section of these instructions.
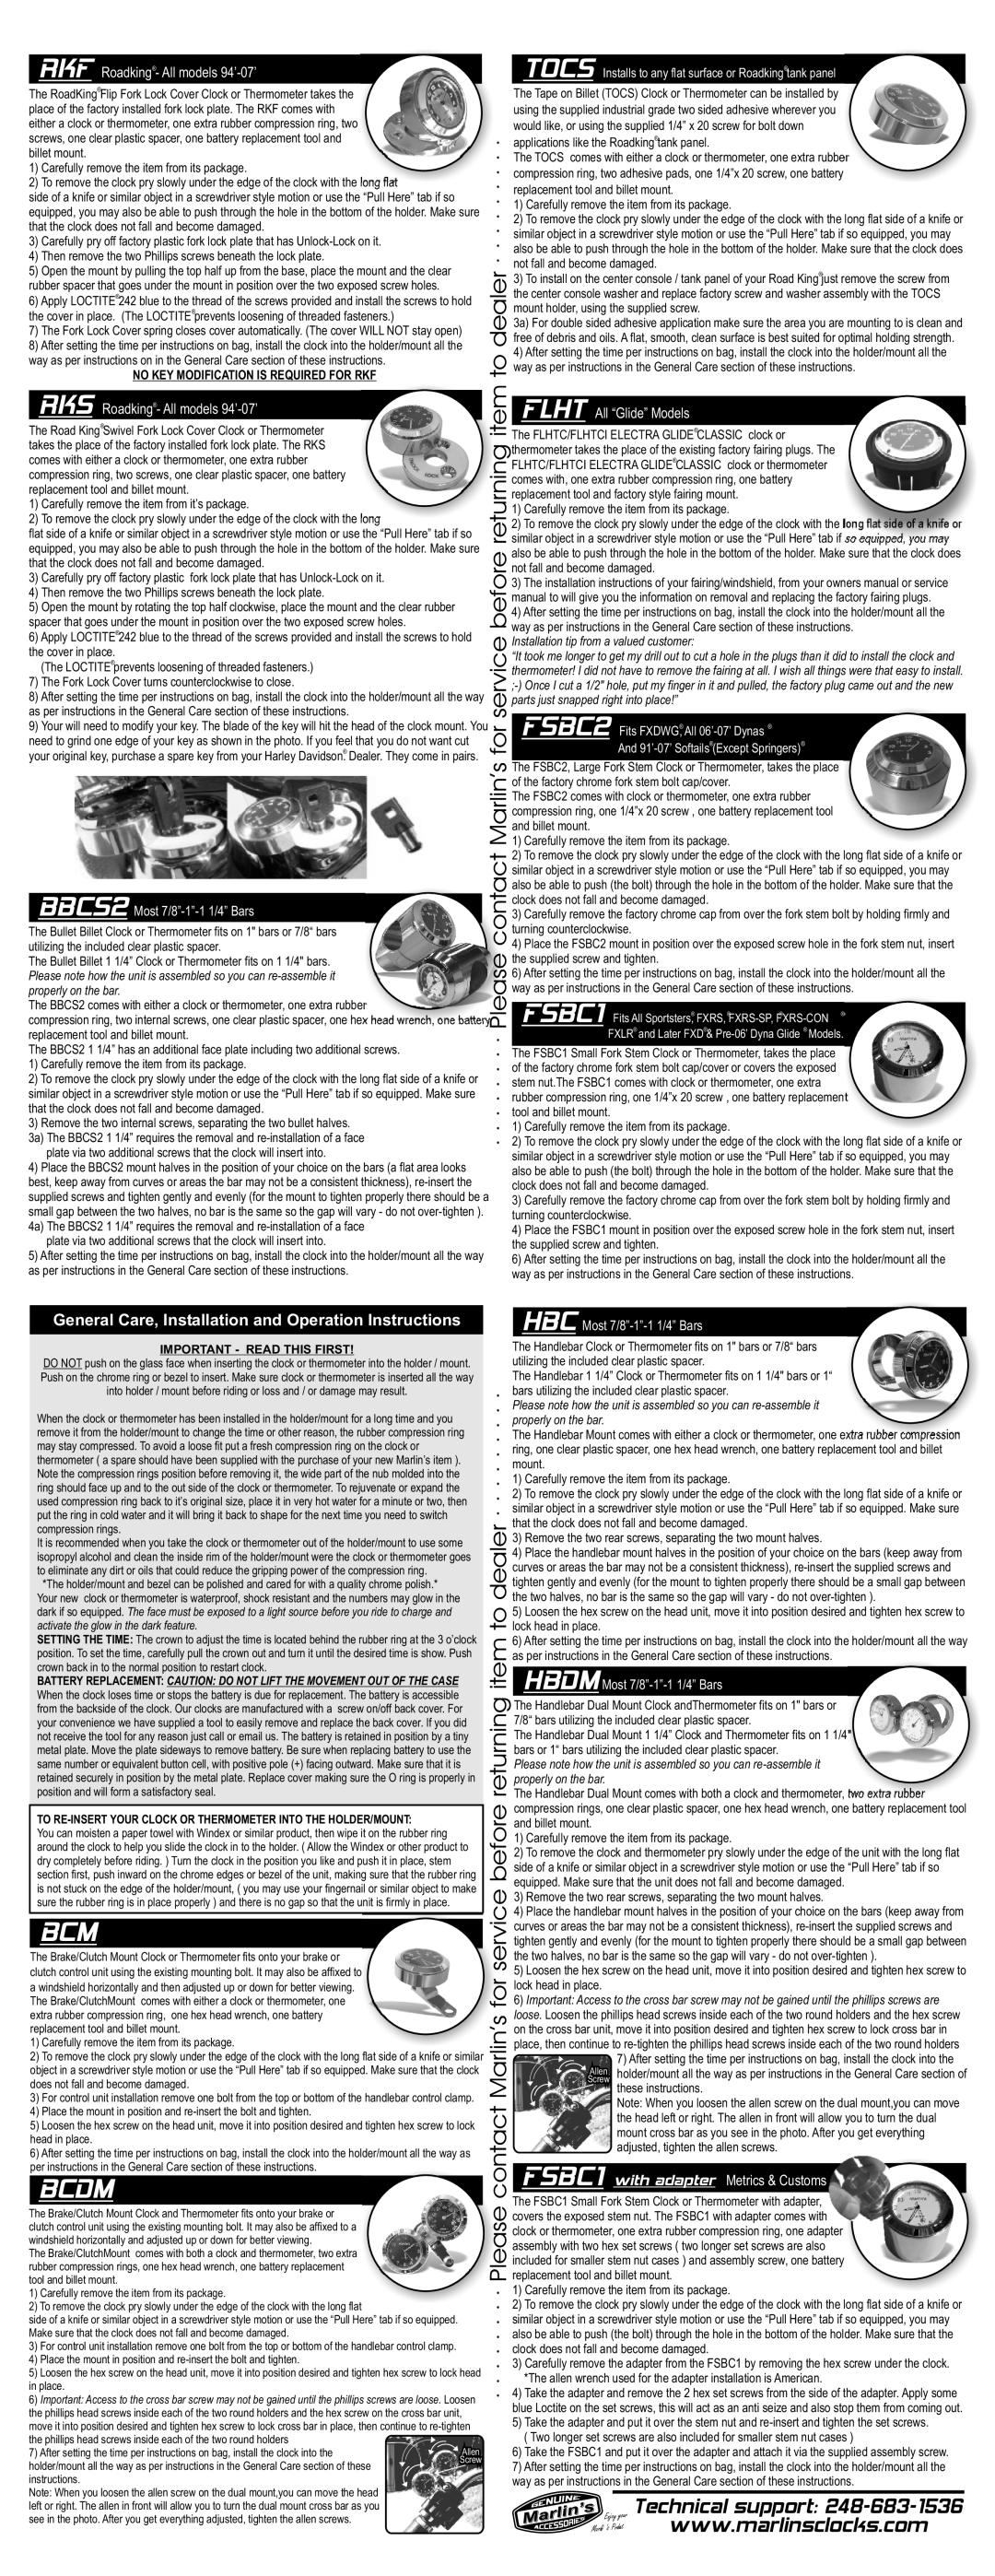
9)Your will need to modify your key. The blade of the key will hit the head of the clock mount. You need to grind one edge of your key as shown in the photo. If you feel that you do not want cut
®
your original key, purchase a spare key from your Harley Davidson. Dealer. They come in pairs.
BBCS2 Most 7/8”-1”-1 1/4” Bars
The Bullet Billet Clock or Thermometer fits on 1" bars or 7/8“ bars utilizing the included clear plastic spacer.
The Bullet Billet 1 1/4” Clock or Thermometer fits on 1 1/4" bars. Please note how the unit is assembled so you can
The BBCS2 comes with either a clock or thermometer, one extra rubber
compression ring, two internal screws, one clear plastic spacer, one hex head wrench, one battery replacement tool and billet mount.
The BBCS2 1 1/4” has an additional face plate including two additional screws.
1)Carefully remove the item from its package.
2)To remove the clock pry slowly under the edge of the clock with the long flat side of a knife or similar object in a screwdriver style motion or use the “Pull Here” tab if so equipped. Make sure that the clock does not fall and become damaged.
3)Remove the two internal screws, separating the two bullet halves.
3a) The BBCS2 1 1/4” requires the removal and
4)Place the BBCS2 mount halves in the position of your choice on the bars (a flat area looks best, keep away from curves or areas the bar may not be a consistent thickness),
plate via two additional screws that the clock will insert into.
5)After setting the time per instructions on bag, install the clock into the holder/mount all the way as per instructions in the General Care section of these instructions.
· · · · · · · · Please contact Marlin’s for service before returning item to dealer · · · · · · · · ·
TOCS Installs to any flat surface or Roadking®tank panel
The Tape on Billet (TOCS) Clock or Thermometer can be installed by using the supplied industrial grade two sided adhesive wherever you would like, or using the supplied 1/4” x 20 screw for bolt down applications like the Roadking®tank panel.
The TOCS comes with either a clock or thermometer, one extra rubber compression ring, two adhesive pads, one 1/4”x 20 screw, one battery replacement tool and billet mount.
1)Carefully remove the item from its package.
2)To remove the clock pry slowly under the edge of the clock with the long flat side of a knife or similar object in a screwdriver style motion or use the “Pull Here” tab if so equipped, you may also be able to push through the hole in the bottom of the holder. Make sure that the clock does not fall and become damaged.
3)To install on the center console / tank panel of your Road King®just remove the screw from the center console washer and replace factory screw and washer assembly with the TOCS mount holder, using the supplied screw.
3a) For double sided adhesive application make sure the area you are mounting to is clean and free of debris and oils. A flat, smooth, clean surface is best suited for optimal holding strength.
4)After setting the time per instructions on bag, install the clock into the holder/mount all the way as per instructions in the General Care section of these instructions.
FLHT All “Glide” Models
The FLHTC/FLHTCI ELECTRA GLIDE®CLASSIC clock or thermometer takes the place of the existing factory fairing plugs. The FLHTC/FLHTCI ELECTRA GLIDE®CLASSIC clock or thermometer comes with, one extra rubber compression ring, one battery replacement tool and factory style fairing mount.
1)Carefully remove the item from its package.
2)To remove the clock pry slowly under the edge of the clock with the long flat side of a knife or similar object in a screwdriver style motion or use the “Pull Here” tab if so equipped, you may also be able to push through the hole in the bottom of the holder. Make sure that the clock does not fall and become damaged.
3)The installation instructions of your fairing/windshield, from your owners manual or service manual to will give you the information on removal and replacing the factory fairing plugs.
4)After setting the time per instructions on bag, install the clock into the holder/mount all the way as per instructions in the General Care section of these instructions.
Installation tip from a valued customer:
“It took me longer to get my drill out to cut a hole in the plugs than it did to install the clock and thermometer! I did not have to remove the fairing at all. I wish all things were that easy to install.
FSBC2 Fits FXDWG, All | ® |
® |
And 91’-07’ Softails®(Except Springers)®
The FSBC2, Large Fork Stem Clock or Thermometer, takes the place of the factory chrome fork stem bolt cap/cover.
The FSBC2 comes with clock or thermometer, one extra rubber compression ring, one 1/4”x 20 screw , one battery replacement tool and billet mount.
1)Carefully remove the item from its package.
2)To remove the clock pry slowly under the edge of the clock with the long flat side of a knife or similar object in a screwdriver style motion or use the “Pull Here” tab if so equipped, you may also be able to push (the bolt) through the hole in the bottom of the holder. Make sure that the clock does not fall and become damaged.
3)Carefully remove the factory chrome cap from over the fork stem bolt by holding firmly and turning counterclockwise.
4)Place the FSBC2 mount in position over the exposed screw hole in the fork stem nut, insert the supplied screw and tighten.
6)After setting the time per instructions on bag, install the clock into the holder/mount all the way as per instructions in the General Care section of these instructions.
FSBC1 Fits All Sportsters, FXRS, | ® |
®®® |
FXLR® and Later FXD®&
The FSBC1 Small Fork Stem Clock or Thermometer, takes the place of the factory chrome fork stem bolt cap/cover or covers the exposed stem nut.The FSBC1 comes with clock or thermometer, one extra rubber compression ring, one 1/4”x 20 screw , one battery replacement tool and billet mount.
1)Carefully remove the item from its package.
2)To remove the clock pry slowly under the edge of the clock with the long flat side of a knife or similar object in a screwdriver style motion or use the “Pull Here” tab if so equipped, you may also be able to push (the bolt) through the hole in the bottom of the holder. Make sure that the clock does not fall and become damaged.
3)Carefully remove the factory chrome cap from over the fork stem bolt by holding firmly and turning counterclockwise.
4)Place the FSBC1 mount in position over the exposed screw hole in the fork stem nut, insert the supplied screw and tighten.
6)After setting the time per instructions on bag, install the clock into the holder/mount all the way as per instructions in the General Care section of these instructions.
General Care, Installation and Operation Instructions
IMPORTANT - READ THIS FIRST!
DO NOT push on the glass face when inserting the clock or thermometer into the holder / mount. Push on the chrome ring or bezel to insert. Make sure clock or thermometer is inserted all the way into holder / mount before riding or loss and / or damage may result.
When the clock or thermometer has been installed in the holder/mount for a long time and you remove it from the holder/mount to change the time or other reason, the rubber compression ring may stay compressed. To avoid a loose fit put a fresh compression ring on the clock or thermometer ( a spare should have been supplied with the purchase of your new Marlin’s item ). Note the compression rings position before removing it, the wide part of the nub molded into the ring should face up and to the out side of the clock or thermometer. To rejuvenate or expand the used compression ring back to it’s original size, place it in very hot water for a minute or two, then put the ring in cold water and it will bring it back to shape for the next time you need to switch compression rings.
It is recommended when you take the clock or thermometer out of the holder/mount to use some isopropyl alcohol and clean the inside rim of the holder/mount were the clock or thermometer goes to eliminate any dirt or oils that could reduce the gripping power of the compression ring.
*The holder/mount and bezel can be polished and cared for with a quality chrome polish.* Your new clock or thermometer is waterproof, shock resistant and the numbers may glow in the dark if so equipped. The face must be exposed to a light source before you ride to charge and activate the glow in the dark feature.
SETTING THE TIME: The crown to adjust the time is located behind the rubber ring at the 3 o’clock position. To set the time, carefully pull the crown out and turn it until the desired time is show. Push crown back in to the normal position to restart clock.
BATTERY REPLACEMENT: CAUTION: DO NOT LIFT THE MOVEMENT OUT OF THE CASE
When the clock loses time or stops the battery is due for replacement. The battery is accessible from the backside of the clock. Our clocks are manufactured with a screw on/off back cover. For your convenience we have supplied a tool to easily remove and replace the back cover. If you did not receive the tool for any reason just call or email us. The battery is retained in position by a tiny metal plate. Move the plate sideways to remove battery. Be sure when replacing battery to use the same number or equivalent button cell, with positive pole (+) facing outward. Make sure that it is retained securely in position by the metal plate. Replace cover making sure the O ring is properly in position and will form a satisfactory seal.
TO
You can moisten a paper towel with Windex or similar product, then wipe it on the rubber ring around the clock to help you slide the clock in to the holder. ( Allow the Windex or other product to dry completely before riding. ) Turn the clock in the position you like and push it in place, stem section first, push inward on the chrome edges or bezel of the unit, making sure that the rubber ring is not stuck on the edge of the holder/mount, ( you may use your fingernail or similar object to make sure the rubber ring is in place properly ) and there is no gap so that the unit is firmly in place.
BCM
The Brake/Clutch Mount Clock or Thermometer fits onto your brake or clutch control unit using the existing mounting bolt. It may also be affixed to a windshield horizontally and then adjusted up or down for better viewing. The Brake/ClutchMount comes with either a clock or thermometer, one extra rubber compression ring, one hex head wrench, one battery replacement tool and billet mount.
1)Carefully remove the item from its package.
2)To remove the clock pry slowly under the edge of the clock with the long flat side of a knife or similar object in a screwdriver style motion or use the “Pull Here” tab if so equipped. Make sure that the clock does not fall and become damaged.
3)For control unit installation remove one bolt from the top or bottom of the handlebar control clamp.
4)Place the mount in position and
5)Loosen the hex screw on the head unit, move it into position desired and tighten hex screw to lock head in place.
6)After setting the time per instructions on bag, install the clock into the holder/mount all the way as per instructions in the General Care section of these instructions.
BCDM
The Brake/Clutch Mount Clock and Thermometer fits onto your brake or clutch control unit using the existing mounting bolt. It may also be affixed to a windshield horizontally and adjusted up or down for better viewing.
The Brake/ClutchMount comes with both a clock and thermometer, two extra rubber compression rings, one hex head wrench, one battery replacement tool and billet mount.
1)Carefully remove the item from its package.
2)To remove the clock pry slowly under the edge of the clock with the long flat
side of a knife or similar object in a screwdriver style motion or use the “Pull Here” tab if so equipped. Make sure that the clock does not fall and become damaged.
3)For control unit installation remove one bolt from the top or bottom of the handlebar control clamp.
4)Place the mount in position and
5)Loosen the hex screw on the head unit, move it into position desired and tighten hex screw to lock head in place.
6)Important: Access to the cross bar screw may not be gained until the phillips screws are loose. Loosen the phillips head screws inside each of the two round holders and the hex screw on the cross bar unit, move it into position desired and tighten hex screw to lock cross bar in place, then continue to
the phillips head screws inside each of the two round holders |
|
7) After setting the time per instructions on bag, install the clock into the | Allen |
holder/mount all the way as per instructions in the General Care section of these | ScrewScrew |
instructions. |
|
Note: When you loosen the allen screw on the dual mount,you can move the head |
|
left or right. The allen in front will allow you to turn the dual mount cross bar as you |
|
see in the photo. After you get everything adjusted, tighten the allen screws. |
|
· · · · · · · · Please contact Marlin’s for service before returning item to dealer · · · · · · · · ·
HBC Most 7/8”-1”-1 1/4” Bars
The Handlebar Clock or Thermometer fits on 1" bars or 7/8“ bars utilizing the included clear plastic spacer.
The Handlebar 1 1/4” Clock or Thermometer fits on 1 1/4" bars or 1“ bars utilizing the included clear plastic spacer.
Please note how the unit is assembled so you can
The Handlebar Mount comes with either a clock or thermometer, one extra rubber compression ring, one clear plastic spacer, one hex head wrench, one battery replacement tool and billet mount.
1)Carefully remove the item from its package.
2)To remove the clock pry slowly under the edge of the clock with the long flat side of a knife or similar object in a screwdriver style motion or use the “Pull Here” tab if so equipped. Make sure that the clock does not fall and become damaged.
3)Remove the two rear screws, separating the two mount halves.
4)Place the handlebar mount halves in the position of your choice on the bars (keep away from curves or areas the bar may not be a consistent thickness),
5)Loosen the hex screw on the head unit, move it into position desired and tighten hex screw to lock head in place.
6)After setting the time per instructions on bag, install the clock into the holder/mount all the way as per instructions in the General Care section of these instructions.
HBDM Most 7/8”-1”-1 1/4” Bars
The Handlebar Dual Mount Clock andThermometer fits on 1" bars or 7/8“ bars utilizing the included clear plastic spacer.
The Handlebar Dual Mount 1 1/4” Clock and Thermometer fits on 1 1/4" bars or 1“ bars utilizing the included clear plastic spacer.
Please note how the unit is assembled so you can
The Handlebar Dual Mount comes with both a clock and thermometer, two extra rubber compression rings, one clear plastic spacer, one hex head wrench, one battery replacement tool and billet mount.
1)Carefully remove the item from its package.
2)To remove the clock and thermometer pry slowly under the edge of the unit with the long flat side of a knife or similar object in a screwdriver style motion or use the “Pull Here” tab if so equipped. Make sure that the unit does not fall and become damaged.
3)Remove the two rear screws, separating the two mount halves.
4)Place the handlebar mount halves in the position of your choice on the bars (keep away from curves or areas the bar may not be a consistent thickness),
5)Loosen the hex screw on the head unit, move it into position desired and tighten hex screw to lock head in place.
6)Important: Access to the cross bar screw may not be gained until the phillips screws are loose. Loosen the phillips head screws inside each of the two round holders and the hex screw on the cross bar unit, move it into position desired and tighten hex screw to lock cross bar in place, then continue to
7) After setting the time per instructions on bag, install the clock into the
![]() Allen holder/mount all the way as per instructions in the General Care section of ScrewScrew
Allen holder/mount all the way as per instructions in the General Care section of ScrewScrew
these instructions.
Note: When you loosen the allen screw on the dual mount,you can move the head left or right. The allen in front will allow you to turn the dual mount cross bar as you see in the photo. After you get everything adjusted, tighten the allen screws.
FSBC1 with adapter Metrics & Customs
The FSBC1 Small Fork Stem Clock or Thermometer with adapter, covers the exposed stem nut. The FSBC1 with adapter comes with clock or thermometer, one extra rubber compression ring, one adapter assembly with two hex set screws ( two longer set screws are also included for smaller stem nut cases ) and assembly screw, one battery replacement tool and billet mount.
1)Carefully remove the item from its package.
2)To remove the clock pry slowly under the edge of the clock with the long flat side of a knife or similar object in a screwdriver style motion or use the “Pull Here” tab if so equipped, you may also be able to push (the bolt) through the hole in the bottom of the holder. Make sure that the clock does not fall and become damaged.
3)Carefully remove the adapter from the FSBC1 by removing the hex screw under the clock. *The allen wrench used for the adapter installation is American.
4)Take the adapter and remove the 2 hex set screws from the side of the adapter. Apply some blue Loctite on the set screws, this will act as an anti seize and also stop them from coming out.
5)Take the adapter and put it over the stem nut and
6)Take the FSBC1 and put it over the adapter and attach it via the supplied assembly screw.
7)After setting the time per instructions on bag, install the clock into the holder/mount all the way as per instructions in the General Care section of these instructions.
Mar | Enjoy your | Technical support: |
t | www.marlinsclocks.com | |
| lni ’s Produc |
|