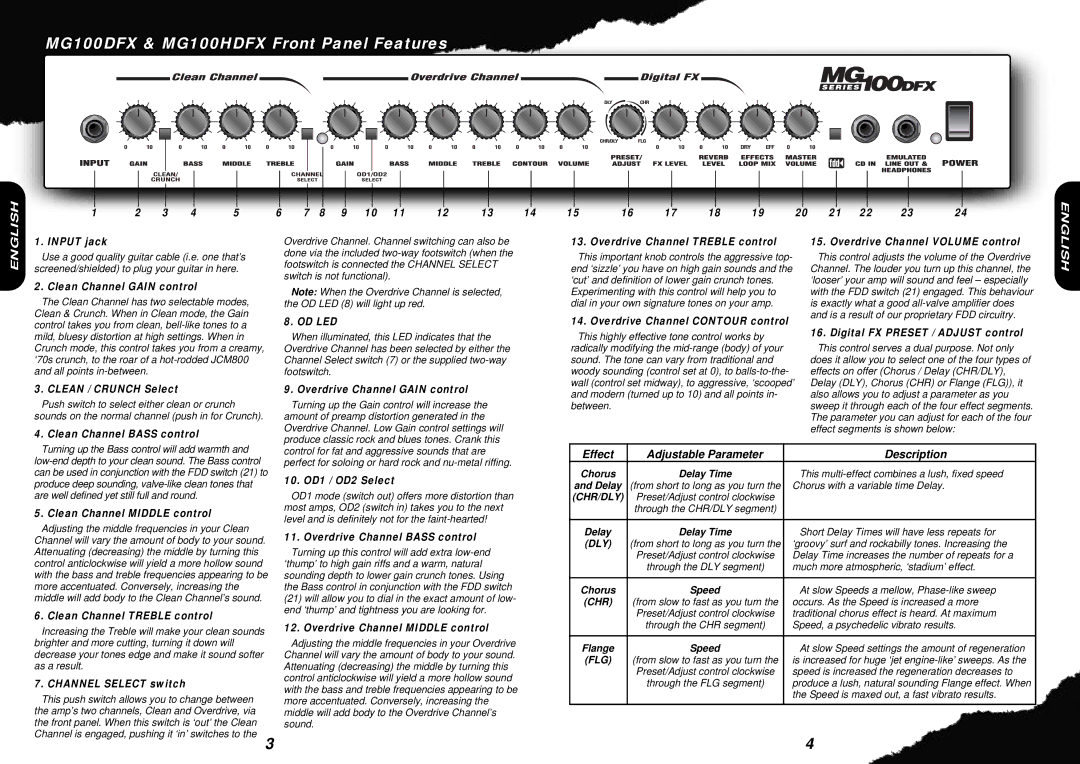
1. INPUT jack
Use a good quality guitar cable (i.e. one that’s screened/shielded) to plug your guitar in here.
2. Clean Channel GAIN control
The Clean Channel has two selectable modes, Clean & Crunch. When in Clean mode, the Gain control takes you from clean, bell-like tones to a mild, bluesy distortion at high settings. When in Crunch mode, this control takes you from a creamy, ‘70s crunch, to the roar of a hot-rodded JCM800 and all points in-between.
3. CLEAN / CRUNCH Select
Push switch to select either clean or crunch sounds on the normal channel (push in for Crunch).
4. Clean Channel BASS control
Overdrive Channel. Channel switching can also be done via the included two-way footswitch (when the footswitch is connected the CHANNEL SELECT switch is not functional).
Note: When the Overdrive Channel is selected, the OD LED (8) will light up red.
8. OD LED
When illuminated, this LED indicates that the Overdrive Channel has been selected by either the Channel Select switch (7) or the supplied two-way footswitch.
9. Overdrive Channel GAIN control
Turning up the Gain control will increase the amount of preamp distortion generated in the Overdrive Channel. Low Gain control settings will produce classic rock and blues tones. Crank this
13. Overdrive Channel TREBLE control
This important knob controls the aggressive top- end ‘sizzle’ you have on high gain sounds and the ‘cut’ and definition of lower gain crunch tones.
Experimenting with this control will help you to dial in your own signature tones on your amp.
14. Overdrive Channel CONTOUR control
This highly effective tone control works by radically modifying the mid-range (body) of your sound. The tone can vary from traditional and woody sounding (control set at 0), to balls-to-the- wall (control set midway), to aggressive, ‘scooped’ and modern (turned up to 10) and all points in- between.
15. Overdrive Channel VOLUME control
This control adjusts the volume of the Overdrive Channel. The louder you turn up this channel, the ‘looser’ your amp will sound and feel – especially with the FDD switch (21) engaged. This behaviour is exactly what a good all-valve amplifier does and is a result of our proprietary FDD circuitry.
16. Digital FX PRESET / ADJUST control
This control serves a dual purpose. Not only does it allow you to select one of the four types of effects on offer (Chorus / Delay (CHR/DLY), Delay (DLY), Chorus (CHR) or Flange (FLG)), it also allows you to adjust a parameter as you sweep it through each of the four effect segments. The parameter you can adjust for each of the four effect segments is shown below:
Turning up the Bass control will add warmth and low-end depth to your clean sound. The Bass control can be used in conjunction with the FDD switch (21) to produce deep sounding, valve-like clean tones that are well defined yet still full and round.
5. Clean Channel MIDDLE control
Adjusting the middle frequencies in your Clean Channel will vary the amount of body to your sound. Attenuating (decreasing) the middle by turning this control anticlockwise will yield a more hollow sound with the bass and treble frequencies appearing to be more accentuated. Conversely, increasing the middle will add body to the Clean Channel’s sound.
6. Clean Channel TREBLE control
Increasing the Treble will make your clean sounds brighter and more cutting, turning it down will decrease your tones edge and make it sound softer as a result.
7. CHANNEL SELECT switch
This push switch allows you to change between the amp’s two channels, Clean and Overdrive, via the front panel. When this switch is ‘out’ the Clean Channel is engaged, pushing it ‘in’ switches to the
control for fat and aggressive sounds that are perfect for soloing or hard rock and nu-metal riffing.
10. OD1 / OD2 Select
OD1 mode (switch out) offers more distortion than most amps, OD2 (switch in) takes you to the next level and is definitely not for the faint-hearted!
11. Overdrive Channel BASS control
Turning up this control will add extra low-end ‘thump’ to high gain riffs and a warm, natural sounding depth to lower gain crunch tones. Using the Bass control in conjunction with the FDD switch
(21)will allow you to dial in the exact amount of low- end ‘thump’ and tightness you are looking for.
12. Overdrive Channel MIDDLE control
Adjusting the middle frequencies in your Overdrive Channel will vary the amount of body to your sound. Attenuating (decreasing) the middle by turning this control anticlockwise will yield a more hollow sound with the bass and treble frequencies appearing to be more accentuated. Conversely, increasing the middle will add body to the Overdrive Channel’s sound.
Effect | Adjustable Parameter | Description |
Chorus | Delay Time | This multi-effect combines a lush, fixed speed |
and Delay | (from short to long as you turn the | Chorus with a variable time Delay. |
(CHR/DLY) | Preset/Adjust control clockwise | |
| through the CHR/DLY segment) | |
| | |
Delay | Delay Time | Short Delay Times will have less repeats for |
(DLY) | (from short to long as you turn the | ‘groovy’ surf and rockabilly tones. Increasing the |
| Preset/Adjust control clockwise | Delay Time increases the number of repeats for a |
| through the DLY segment) | much more atmospheric, ‘stadium’ effect. |
| | |
Chorus | Speed | At slow Speeds a mellow, Phase-like sweep |
(CHR) | (from slow to fast as you turn the | occurs. As the Speed is increased a more |
| Preset/Adjust control clockwise | traditional chorus effect is heard. At maximum |
| through the CHR segment) | Speed, a psychedelic vibrato results. |
| | |
Flange | Speed | At slow Speed settings the amount of regeneration |
(FLG) | (from slow to fast as you turn the | is increased for huge ‘jet engine-like’ sweeps. As the |
| Preset/Adjust control clockwise | speed is increased the regeneration decreases to |
| through the FLG segment) | produce a lush, natural sounding Flange effect. When |
| | the Speed is maxed out, a fast vibrato results. |
| | |