Component Readings/Testing

!WARNING

To avoid risk of electrical shock, personal injury, or death, disconnect power to dishwasher before servicing.

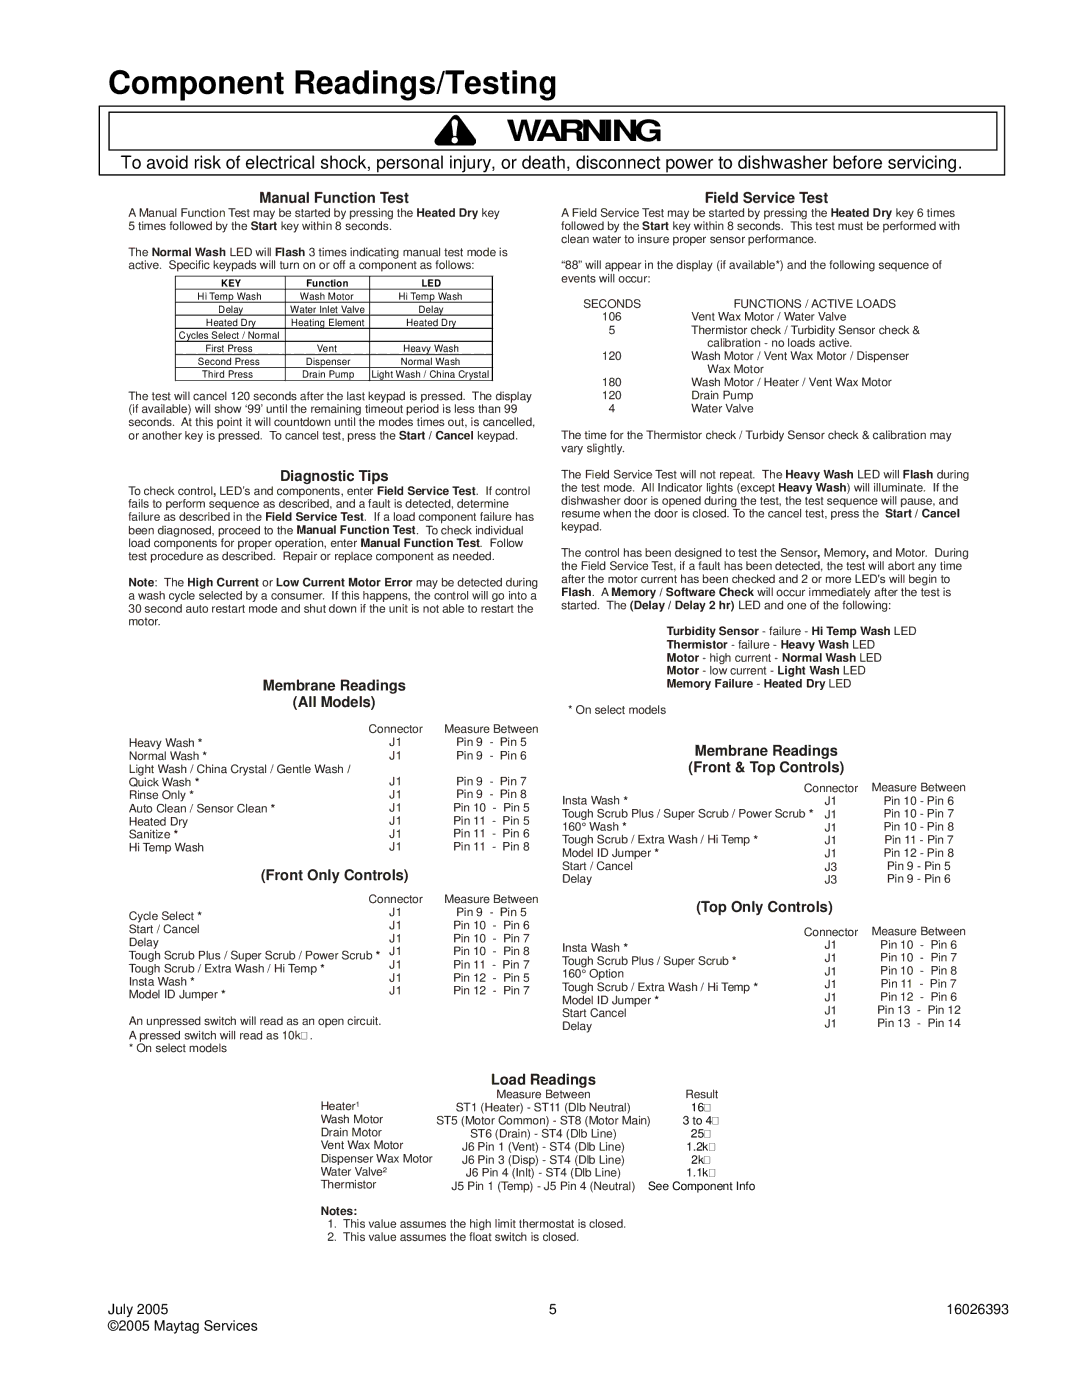
Manual Function Test

A Manual Function Test may be started by pressing the Heated Dry key 5 times followed by the Start key within 8 seconds.

The Normal Wash LED will Flash 3 times indicating manual test mode is active. Specific keypads will turn on or off a component as follows:

KEY

Function

LED

Hi Temp Wash

Wash Motor

Hi Temp Wash

Delay

Water Inlet Valve

Delay

Heated Dry

Heating Element

Heated Dry

Cycles Select / Normal


First Press

Vent

Heavy Wash

Second Press

Dispenser

Normal Wash

Third Press

Drain Pump

Light Wash / China Crystal

The test will cancel 120 seconds after the last keypad is pressed. The display (if available) will show ‘99’ until the remaining timeout period is less than 99 seconds. At this point it will countdown until the modes times out, is cancelled, or another key is pressed. To cancel test, press the Start / Cancel keypad.

Diagnostic Tips

To check control, LED’s and components, enter Field Service Test. If control fails to perform sequence as described, and a fault is detected, determine failure as described in the Field Service Test. If a load component failure has been diagnosed, proceed to the Manual Function Test. To check individual load components for proper operation, enter Manual Function Test. Follow test procedure as described. Repair or replace component as needed.

Note: The High Current or Low Current Motor Error may be detected during a wash cycle selected by a consumer. If this happens, the control will go into a 30 second auto restart mode and shut down if the unit is not able to restart the motor.

Membrane Readings

(All Models)


Connector

Measure Between

Heavy Wash *

J1

Pin 9

- Pin 5

Normal Wash *

J1

Pin 9

- Pin 6

Light Wash / China Crystal / Gentle Wash /

J1

Pin 9

- Pin 7

Quick Wash *

Rinse Only *

J1

Pin 9

- Pin 8

Auto Clean / Sensor Clean *

J1

Pin 10 - Pin 5

Heated Dry

J1

Pin 11 - Pin 5

Sanitize *

J1

Pin 11 - Pin 6

Hi Temp Wash

J1

Pin 11 - Pin 8

(Front Only Controls)

Connector

Measure Between

Cycle Select *

J1

Pin 9 - Pin 5

Start / Cancel

J1

Pin 10 -

Pin 6

J1

Pin 10 -

Pin 7

Delay

J1

Pin 10 - Pin 8

Tough Scrub Plus / Super Scrub / Power Scrub *

Tough Scrub / Extra Wash / Hi Temp *

J1

Pin 11 - Pin 7

J1

Pin 12 - Pin 5

Insta Wash *

Model ID Jumper *

J1

Pin 12 - Pin 7

An unpressed switch will read as an open circuit.

A pressed switch will read as 10k . * On select models

Field Service Test

A Field Service Test may be started by pressing the Heated Dry key 6 times followed by the Start key within 8 seconds. This test must be performed with clean water to insure proper sensor performance.

“88” will appear in the display (if available*) and the following sequence of events will occur:

SECONDS

FUNCTIONS / ACTIVE LOADS

106

Vent Wax Motor / Water Valve

5

Thermistor check / Turbidity Sensor check &


calibration - no loads active.

120Wash Motor / Vent Wax Motor / Dispenser Wax Motor

180

Wash Motor / Heater / Vent Wax Motor

120

Drain Pump

4

Water Valve

The time for the Thermistor check / Turbidy Sensor check & calibration may vary slightly.

The Field Service Test will not repeat. The Heavy Wash LED will Flash during the test mode. All Indicator lights (except Heavy Wash) will illuminate. If the dishwasher door is opened during the test, the test sequence will pause, and resume when the door is closed. To the cancel test, press the Start / Cancel keypad.

The control has been designed to test the Sensor, Memory, and Motor. During the Field Service Test, if a fault has been detected, the test will abort any time after the motor current has been checked and 2 or more LED's will begin to Flash. A Memory / Software Check will occur immediately after the test is started. The (Delay / Delay 2 hr) LED and one of the following:

Turbidity Sensor - failure - Hi Temp Wash LED

Thermistor - failure - Heavy Wash LED

Motor - high current - Normal Wash LED

Motor - low current - Light Wash LED

Memory Failure - Heated Dry LED

* On select models

Membrane Readings

(Front & Top Controls)

Connector

Measure Between

Insta Wash *

J1

Pin 10 - Pin 6

Tough Scrub Plus / Super Scrub / Power Scrub *

J1

Pin 10 - Pin 7

160° Wash *

J1

Pin 10 - Pin 8

Tough Scrub / Extra Wash / Hi Temp *

J1

Pin 11

- Pin 7

Model ID Jumper *

J1

Pin 12

- Pin 8

Start / Cancel

J3

Pin 9 - Pin 5

Delay

J3

Pin 9 - Pin 6

(Top Only Controls)


Connector

Measure Between

Insta Wash *

J1

Pin 10 -

Pin 6

Tough Scrub Plus / Super Scrub *

J1

Pin 10 -

Pin 7

160° Option

J1

Pin 10 -

Pin 8

Tough Scrub / Extra Wash / Hi Temp *

J1

Pin 11 - Pin 7

Model ID Jumper *

J1

Pin 12 - Pin 6

Start Cancel

J1

Pin 13

-

Pin 12

Delay

J1

Pin 13

-

Pin 14

Load Readings

Heater¹

Measure Between

Result

ST1 (Heater) - ST11 (Dlb Neutral)

16

Wash Motor

ST5 (Motor Common) - ST8 (Motor Main)

3 to 4

Drain Motor

ST6 (Drain) - ST4 (Dlb Line)

25

Vent Wax Motor

J6 Pin 1 (Vent) - ST4 (Dlb Line)

1.2k

Dispenser Wax Motor

J6 Pin 3 (Disp) - ST4 (Dlb Line)

2k

Water Valve²

J6 Pin 4 (Inlt) - ST4 (Dlb Line)

1.1k

Thermistor

J5 Pin 1 (Temp) - J5 Pin 4 (Neutral) See Component Info

Notes:

1.This value assumes the high limit thermostat is closed.

2.This value assumes the float switch is closed.

July 2005

5

16026393

©2005 Maytag Services


Page 5
Image 5
Maytag DDB1501AW, PDBL390AW, MDBH965AW, MDBM601AW, ADB/CDB1500AW, CDU650AW Component Readings/Testing, Manual Function Test

DDB1501AW, CDU650AW, ADB/CDB1500AW, MDBM601AW, MDBH965AW specifications

The Maytag PDBL390AW, ADB/CDB1500AW, CDU650AW, DDB1501AW, and MDBH965AW models are a testament to Maytag's commitment to quality and performance in the realm of dishwashers. Each model boasts a range of sophisticated features designed to cater to modern households, ensuring efficient cleaning while maintaining user convenience.

Starting with the Maytag PDBL390AW, this built-in dishwasher is known for its robust construction and reliable performance. It showcases Maytag's PowerBlast cycle, which uses high-pressure spray jets to tackle tough, stuck-on messes. Additionally, it features a stainless steel tub that enhances durability and maintains optimal drying performance.

The ADB/CDB1500AW is another impressive model from Maytag, offering a spacious interior capable of accommodating large loads. This dishwasher includes a versatile third rack, allowing users to organize silverware and small utensils for efficient cleaning. Its quiet operation, rated at a sound level of 47 dBA, makes it suitable for open kitchen spaces, providing a peaceful environment while in use.

Moving on to the CDU650AW, this model stands out for its sleek design and energy efficiency. It is equipped with Maytag's EcoWash cycle, which conserves water and energy without compromising cleaning power. The dishwasher also features a Delay Start option, enabling users to run cleaning cycles at their convenience, helping to save on utility bills while maximizing efficiency.

The DDB1501AW is perfect for customers seeking flexibility and convenience. This model includes an adjustable upper rack, allowing for taller items on the lower level. It also incorporates the Soil Sensor technology, which detects the level of dirt on dishes and adjusts the wash cycle accordingly for optimal cleaning results.

Lastly, the MDBH965AW is designed with robust cleaning technology that includes the Jet Clean option for exceptional results. With a spacious 14-place setting capacity and the ProWash cycle, this model offers smart wash cycle adjustments based on load composition, ensuring the best cleaning performance for various dish types.

In summary, Maytag's PDBL390AW, ADB/CDB1500AW, CDU650AW, DDB1501AW, and MDBH965AW dishwashers deliver power, efficiency, and user-friendly features that cater to diverse household needs. With enhanced cleaning technologies and thoughtful design, these models exemplify the brand's dedication to providing reliable and effective dishwashing solutions.