W10201177B
Guide D’UTILISATION ET D’ENTRETIEN
Table DES Matières
Table of Contents
Your safety and the safety of others are very important
Dryer Safety
Page
Location Requirements
Installation Instructions
Tools and Parts
Dryer Dimensions
Installation Clearances
Mobile home Additional installation requirements
Mobile home installations require
Gas Supply Line
Electrical Requirements
Gas Supply Requirements
Gas Type
Dryer Gas Pipe
Venting Requirements
Gas supply connection requirements
Burner Input Requirements
If this is a new vent system Vent material
If using an existing vent system
Plan Vent System
Optional exhaust installations
Special provisions for mobile home installations
Install Vent System
Install Leveling Legs
Vent system chart
For mobile home use
Make Gas Connection
Connect Vent
Level Dryer
Connect Inlet Hose
Reverse the strike
Remove the door assembly
Reverse Door Swing
Reinstall the door
If the dryer will not start, check the following
Complete Installation
Starting Your Dryer
Dryer USE
To restart the dryer
Stopping, Pausing, or Restarting
Drying and Cycle Tips
To stop or pause your dryer at any time
Cycles
Status Lights
Delicate
Sensor Preset Cycle Settings
Steam Preset Cycle Settings
Timed Preset Cycle Settings
Options
Modifiers
Drying Rack Option
End Signal
Changing Cycles, Modifiers, and Options
Dryer Care
Cleaning the Dryer Location
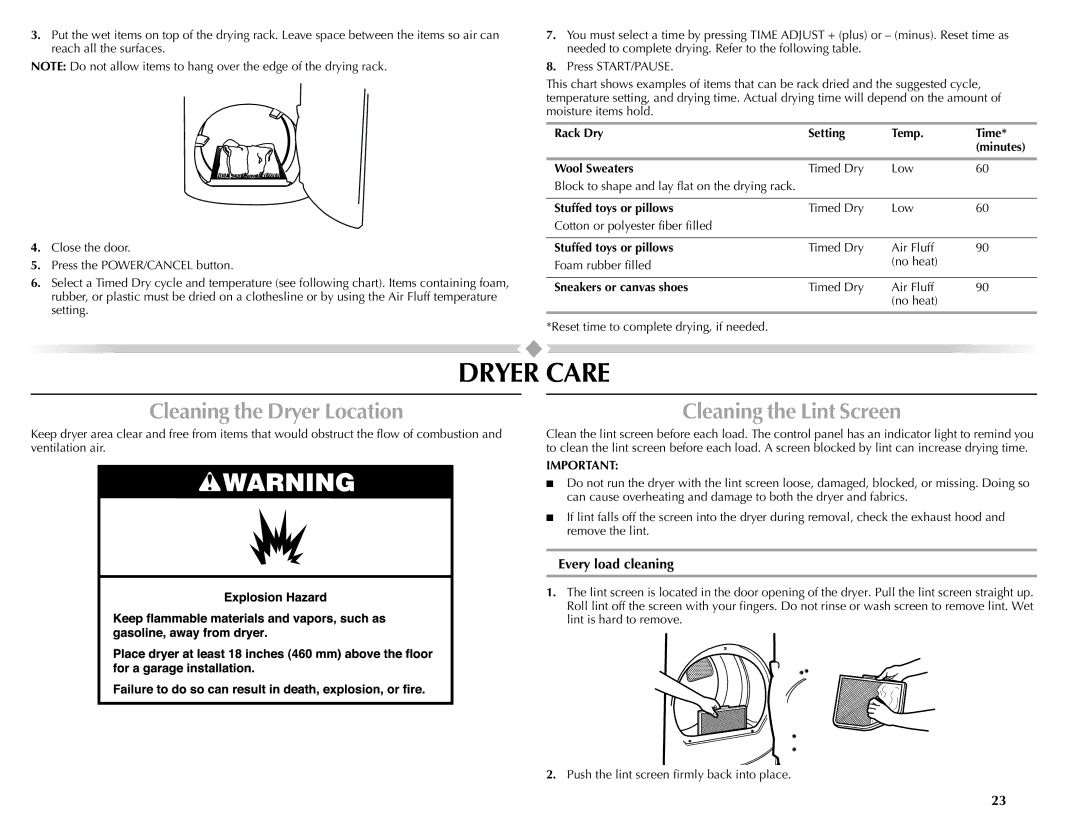
Cleaning the Lint Screen
Every load cleaning
Vacation, Storage, and Moving Care
Cleaning the Dryer Interior
Removing Accumulated Lint
Water Inlet Hoses
Dryer Operation
Troubleshooting
Is the dryer located in a closet?
Dryer Results
Are fabric softener sheets blocking the grille?
Is the exhaust vent the correct length?
Loads are wrinkled
Cycle time too short
Lint on load
Stains on load or drum
Canada
Assistance or Service
Accessories
U.S.A
This limited warranty does not cover
Maytag Major Appliance Warranty
Votre sécurité et celle des autres est très importante
Sécurité DE LA Sécheuse
Page
Importantes Instructions DE Sécurité
Outillage et pièces
Instructions D’INSTALLATION
Exigences d’emplacement
Dégagements de séparation à respecter
Dimensions de la sécheuse
Linstallation dans une maison mobile exige
Gaz naturel
Spécifications électriques
Alimentation en gaz
Type de gaz
Canalisation d’arrivée de gaz de la sécheuse
Canalisation d’arrivée de gaz
Exigences concernant le raccordement au gaz
Caractéristiques d’alimentation du brûleur
En cas dutilisation du système dévacuation existant
Exigences concernant lévacuation
Évacuation
Installations dévacuation facultatives
Déterminer litinéraire dacheminement du conduit
Pour utilisation dans une maison mobile
Installation du système d’évacuation
Installation des pieds de nivellement
Raccordement au gaz
Raccordement des tuyaux dalimentation
Raccordement du conduit d’évacuation
Dépose de la porte
Réglage de laplomb de la sécheuse
Inversion du sens douverture de la porte
Inversion de la gâche
Réinstallation de la porte
Fermer la porte vérifier l’engagement de la gâche
Si la sécheuse ne démarre pas, vérifier ce qui suit
Achever linstallation
Mise en marche de la sécheuse
Utilisation DE LA Sécheuse
Utilisation d’un programme vapeur
Utilisation dun programme de détection
Fonctionnement du système de séchage Sensi-Care
Utilisation dun programme minuté
Témoins lumineux
Arrêt, pause ou remise en marche
Conseils pour le séchage et les programmes
Programmes
Modificateurs
Signal de fin de programme
Modification des préréglages de degré de séchage
Changement des programmes, modificateurs Et options
Option de grille de séchage
Changement des programmes après avoir appuyé sur Start
Jouets rembourrés ou oreillers
Nettoyage de lemplacement de la sécheuse
Entretien DE LA Sécheuse
Nettoyage du filtre à charpie
Tuyaux darrivée deau
Nettoyage de l’intérieur de la sécheuse
Retrait de la charpie accumulée
Fonctionnement de la sécheuse
Dépannage
Changement de l’ampoule d’éclairage Du tambour
La sécheuse affiche un message codé
Résultats de la sécheuse
Charges avec faux plis
Temps de programme trop court
Charpie sur la charge
Taches sur la charge ou sur le tambour
Si vous avez besoin de pièces de rechange
Assistance OU Service
Accessoires
Au Canada
La présente garantie limitée ne couvre pas
Garantie DES Gros Appareils Ménagers Maytag
W10201177B