INSTALLATION INSTRUCTIONS

General Instructions

General:

Run the wiring so that RCA cables are at least 18“ away from power and speaker cables. Keep RCA cables away from electrical devices in the vehicle that can cause electrical noise, such as electric fuel pumps, emission control modules and other on-board electronic modules.

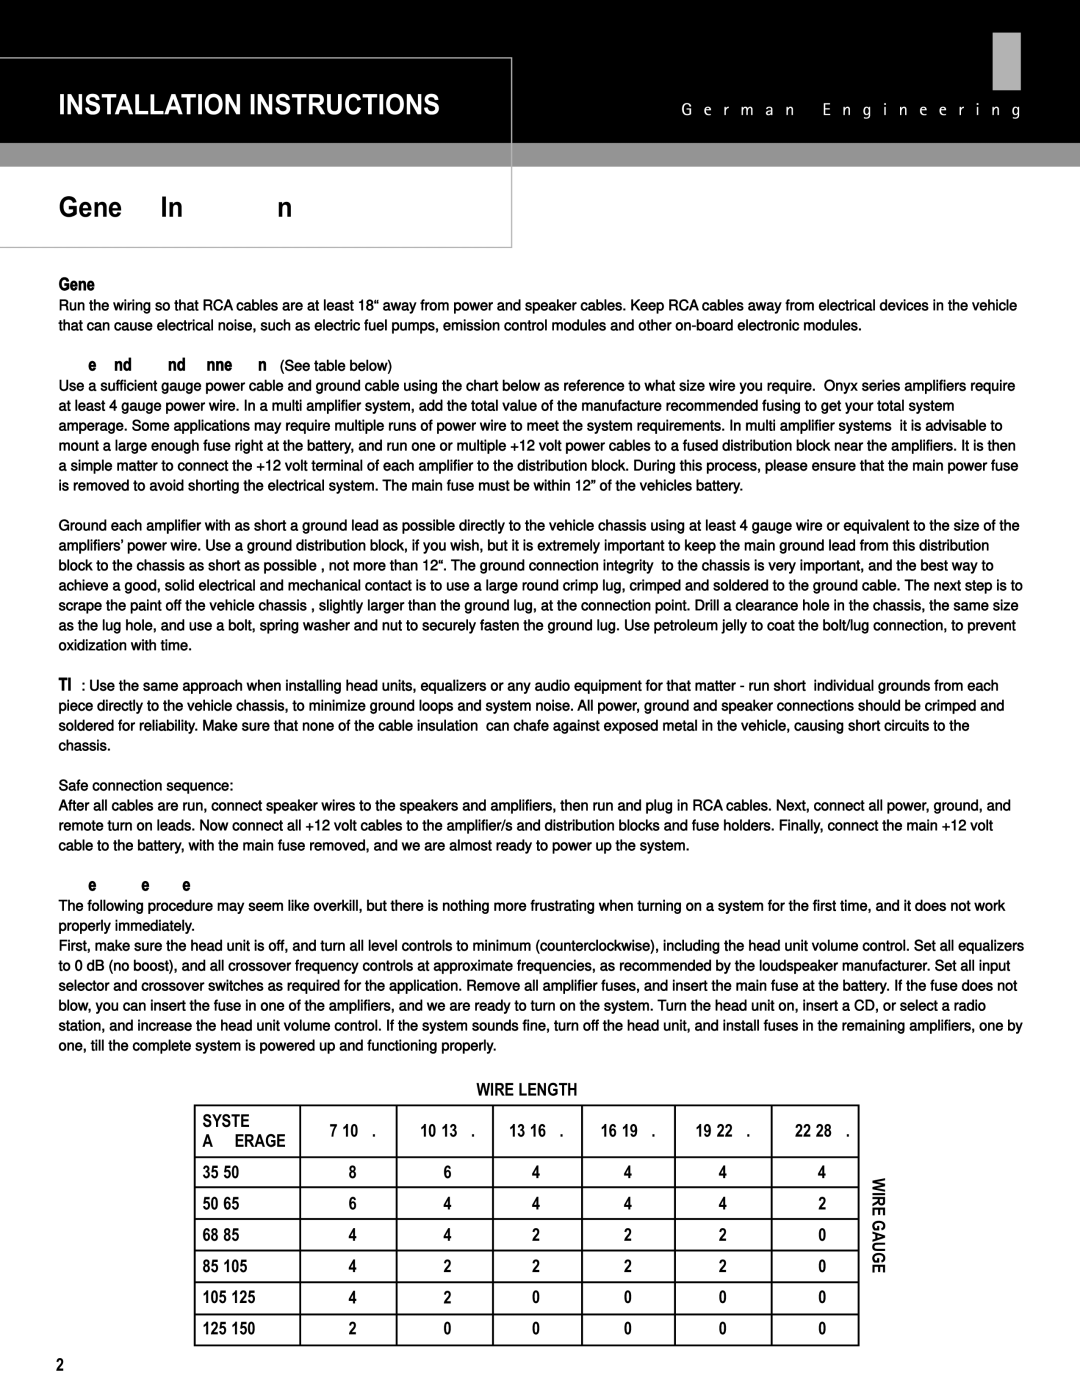
Power and ground connections:(See table below)

Use a sufficient gauge power cable and ground cable using the chart below as reference to what size wire you require. Onyx series amplifiers require at least 4 gauge power wire. In a multi amplifier system, add the total value of the manufacture recommended fusing to get your total system amperage. Some applications may require multiple runs of power wire to meet the system requirements. In multi amplifier systems it is advisable to mount a large enough fuse right at the battery, and run one or multiple +12 volt power cables to a fused distribution block near the amplifiers. It is then a simple matter to connect the +12 volt terminal of each amplifier to the distribution block. During this process, please ensure that the main power fuse is removed to avoid shorting the electrical system. The main fuse must be within 12” of the vehicles battery.

Ground each amplifier with as short a ground lead as possible directly to the vehicle chassis using at least 4 gauge wire or equivalent to the size of the amplifiers’ power wire. Use a ground distribution block, if you wish, but it is extremely important to keep the main ground lead from this distribution block to the chassis as short as possible , not more than 12“. The ground connection integrity to the chassis is very important, and the best way to achieve a good, solid electrical and mechanical contact is to use a large round crimp lug, crimped and soldered to the ground cable. The next step is to scrape the paint off the vehicle chassis , slightly larger than the ground lug, at the connection point. Drill a clearance hole in the chassis, the same size as the lug hole, and use a bolt, spring washer and nut to securely fasten the ground lug. Use petroleum jelly to coat the bolt/lug connection, to prevent oxidization with time.

TIP: Use the same approach when installing head units, equalizers or any audio equipment for that matter - run short individual grounds from each piece directly to the vehicle chassis, to minimize ground loops and system noise. All power, ground and speaker connections should be crimped and soldered for reliability. Make sure that none of the cable insulation can chafe against exposed metal in the vehicle, causing short circuits to the chassis.

Safe connection sequence:

After all cables are run, connect speaker wires to the speakers and amplifiers, then run and plug in RCA cables. Next, connect all power, ground, and remote turn on leads. Now connect all +12 volt cables to the amplifier/s and distribution blocks and fuse holders. Finally, connect the main +12 volt cable to the battery, with the main fuse removed, and we are almost ready to power up the system.

Power up the system:

The following procedure may seem like overkill, but there is nothing more frustrating when turning on a system for the first time, and it does not work properly immediately.

First, make sure the head unit is off, and turn all level controls to minimum (counterclockwise), including the head unit volume control. Set all equalizers to 0 dB (no boost), and all crossover frequency controls at approximate frequencies, as recommended by the loudspeaker manufacturer. Set all input selector and crossover switches as required for the application. Remove all amplifier fuses, and insert the main fuse at the battery. If the fuse does not blow, you can insert the fuse in one of the amplifiers, and we are ready to turn on the system. Turn the head unit on, insert a CD, or select a radio station, and increase the head unit volume control. If the system sounds fine, turn off the head unit, and install fuses in the remaining amplifiers, one by one, till the complete system is powered up and functioning properly.


WIRE LENGTH


SYSTEM

7-10 ft.

10-13 ft.


13-16 ft.

16-19 ft.

19-22 ft.

22-28 ft.


AMPERAGE


35-50

8

6


4

4

4

4

WIRE


50-65

6

4


4

4

4

2


GAUGE

85-105

4

2


2

2

2

0

68-85

4

4


2

2

2

0


105-125

4

2


0

0

0

0


125-150

2

0


0

0

0

0


2

Page 3
Image 3
MB QUART ONX4.80/500, ONX1.1500D, ONX4.60, ONX4.125 General Instructions, 10 ft 10-13 ft 13-16 ft 16-19 ft 19-22 ft 22-28 ft

ONX1.1500D, ONX4.125, ONX4.80/500, ONX1.1000D, ONX2.100 specifications

MB Quart, a renowned name in the audio industry, has made a significant impact with its ONX series, which includes models like the ONX4.80, ONX4.60, ONX2.100, ONX1.1000D, and ONX4.80/500. These amplifiers are designed to deliver powerful audio performance while being versatile enough to cater to various needs in the automotive sound sector.

The ONX4.80 is a 4-channel amplifier capable of delivering a robust 80 watts RMS per channel at 4 ohms, showcasing a total power output of 500 watts. This model incorporates a unique class-D topology that provides high efficiency and low distortion, ensuring that users can enjoy crisp sound quality without draining their vehicle’s power supply. Its compact design allows for easy installation in tight spaces, making it an ideal choice for both experienced installers and DIY enthusiasts.

Meanwhile, the ONX4.60, a slightly smaller 4-channel amplifier, offers 60 watts RMS per channel at 4 ohms, with a similar class-D configuration. This amplifier is particularly well-suited for users looking to power smaller speaker setups or as part of a multi-amplifier system. Its low-profile design and excellent thermal management features further enhance its performance, providing reliable power during extended listening sessions.

For those in need of monoblock power, the ONX1.1000D stands out with its impressive ability to deliver 1,000 watts RMS at 1 ohm. This amplifier is engineered to drive subwoofers with ease, thanks to its high-efficiency operation and comprehensive thermal protection circuitry. The ONX1.1000D also features an adjustable low-pass filter and bass boost controls, allowing users to tailor their low-frequency output to suit their specific preferences.

The ONX2.100, a 2-channel amplifier, rounds out the range with a strong 100 watts RMS per channel at 4 ohms. It is perfect for driving full-range speakers or as part of a larger multi-channel setup. Like its counterparts, the ONX2.100 employs advanced circuitry for low noise and high fidelity, making it an excellent choice for any audio enthusiast looking to enhance their vehicle’s sound system.

Collectively, the ONX series amplifiers from MB Quart embody robust performance, compact design, and superior technology, making them an ideal choice for anyone looking to elevate their automotive audio experience. Whether users seek powerful lows, clear mids, or crisp highs, there is an ONX model tailored to meet those needs while maintaining reliability and efficiency.