- 6 -
| 5 |
|
| 1 | 8 |
| 4 |
|
|
| |
| 3 |
|
|
| 7 |
|
|
|
| 14 | |
| 6 |
|
|
| 12 |
| 13 |
|
|
| 9 |
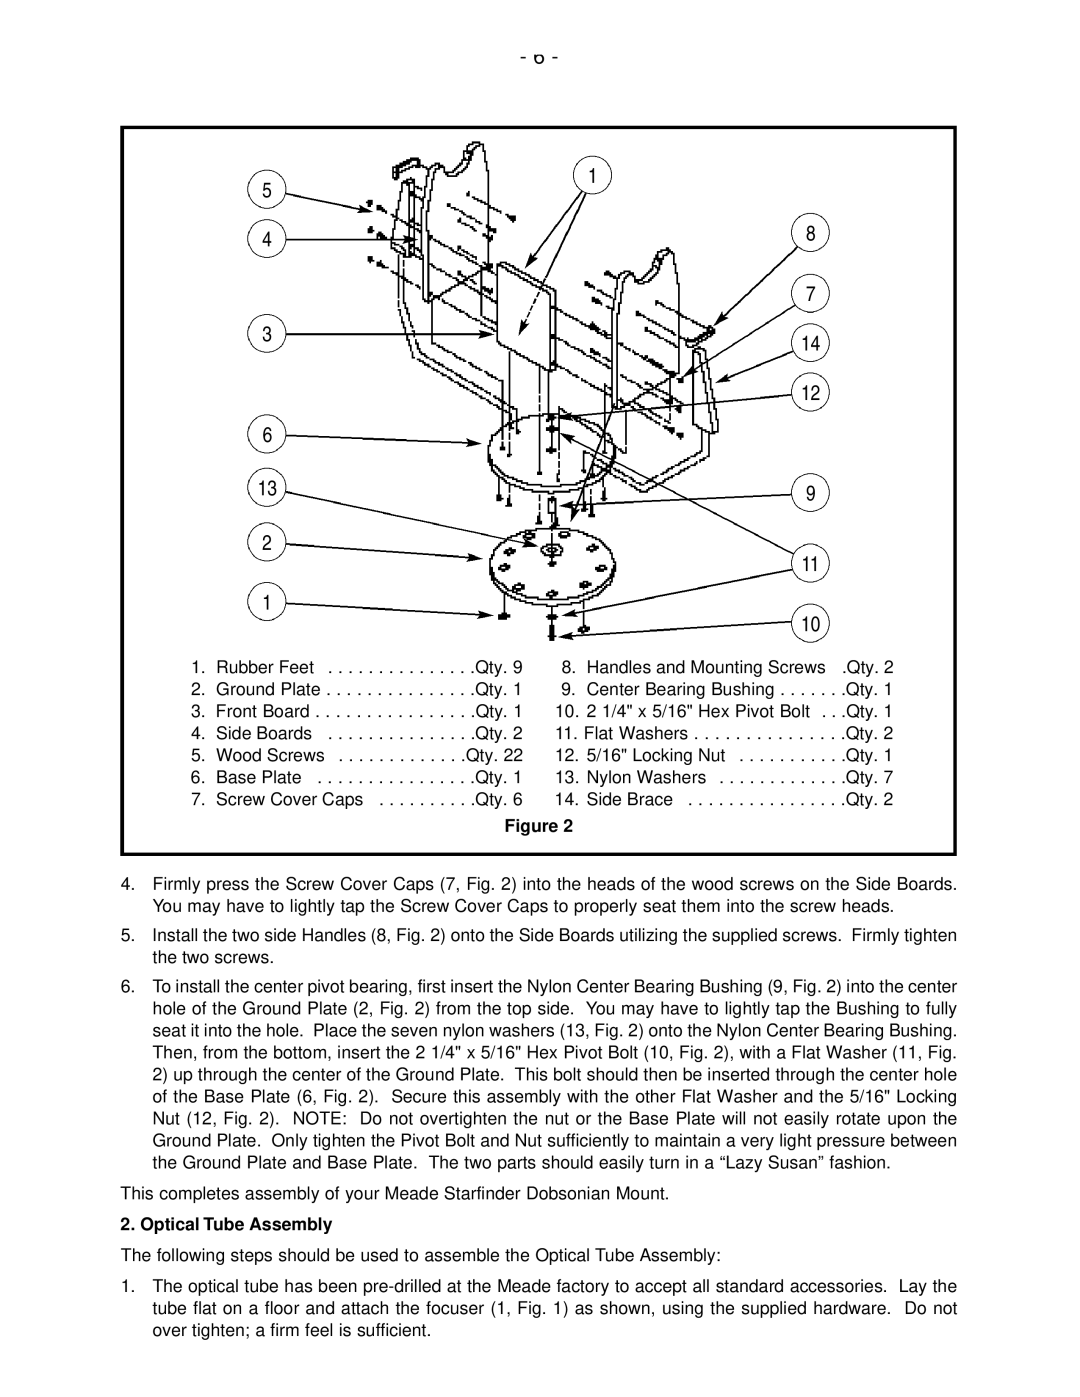
1. | Rubber Feet | .Qty. 9 | 8. | Handles and Mounting Screws .Qty. 2 | |
2. | Ground Plate | .Qty. 1 | 9. | Center Bearing Bushing | . . . . . . .Qty. 1 |
2 | .Qty. 1 | ||||
3. | Front Board | 10. | 2 1/4" x 5/16" Hex Pivot | Bolt . . .Qty. 1 | |
|
|
| 11 | ||
4. | Side Boards | .Qty. 2 | 11. Flat Washers | . . . . . . .Qty. 2 | |
5. | Screws | Qty. 22 | 12. | 5/16" Locking Nut . . . . | . . . . . . .Qty. 1 |
Wood1 | .Qty. 1 | ||||
6. | Base Plate | 13. | Nylon Washers | . . . .Qty. 7 | |
|
|
| . . .10 | ||
7. | Screw Cover Caps | .Qty. 6 | 14. | Side Brace | . . . . . . .Qty. 2 |
Figure 2
4.Firmly press the Screw Cover Caps (7, Fig. 2) into the heads of the wood screws on the Side Boards. You may have to lightly tap the Screw Cover Caps to properly seat them into the screw heads.
5.Install the two side Handles (8, Fig. 2) onto the Side Boards utilizing the supplied screws. Firmly tighten the two screws.
6.To install the center pivot bearing, first insert the Nylon Center Bearing Bushing (9, Fig. 2) into the center hole of the Ground Plate (2, Fig. 2) from the top side. You may have to lightly tap the Bushing to fully seat it into the hole. Place the seven nylon washers (13, Fig. 2) onto the Nylon Center Bearing Bushing. Then, from the bottom, insert the 2 1/4" x 5/16" Hex Pivot Bolt (10, Fig. 2), with a Flat Washer (11, Fig. 2) up through the center of the Ground Plate. This bolt should then be inserted through the center hole of the Base Plate (6, Fig. 2). Secure this assembly with the other Flat Washer and the 5/16" Locking Nut (12, Fig. 2). NOTE: Do not overtighten the nut or the Base Plate will not easily rotate upon the Ground Plate. Only tighten the Pivot Bolt and Nut sufficiently to maintain a very light pressure between the Ground Plate and Base Plate. The two parts should easily turn in a “Lazy Susan” fashion.
This completes assembly of your Meade Starfinder Dobsonian Mount.
2. Optical Tube Assembly
The following steps should be used to assemble the Optical Tube Assembly:
1.The optical tube has been