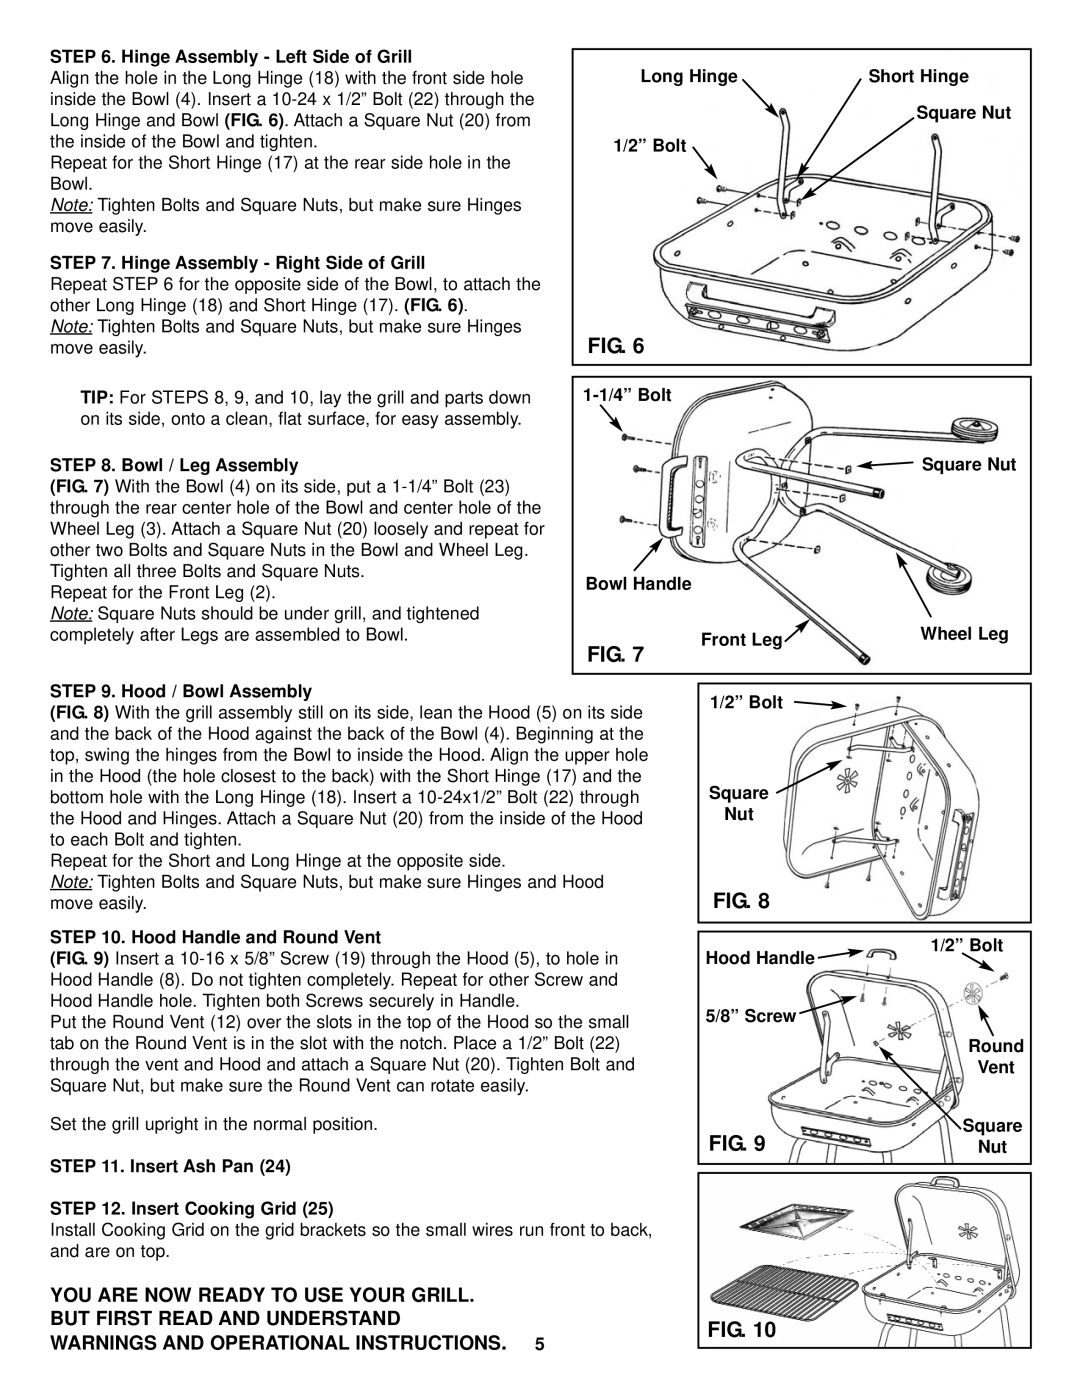
STEP 6. Hinge Assembly - Left Side of Grill
Align the hole in the Long Hinge (18) with the front side hole inside the Bowl (4). Insert a
Repeat for the Short Hinge (17) at the rear side hole in the Bowl.
Note: Tighten Bolts and Square Nuts, but make sure Hinges move easily.
STEP 7. Hinge Assembly - Right Side of Grill
Repeat STEP 6 for the opposite side of the Bowl, to attach the other Long Hinge (18) and Short Hinge (17). (FIG. 6).
Note: Tighten Bolts and Square Nuts, but make sure Hinges move easily.
TIP: For STEPS 8, 9, and 10, lay the grill and parts down on its side, onto a clean, flat surface, for easy assembly.
STEP 8. Bowl / Leg Assembly
(FIG. 7) With the Bowl (4) on its side, put a 1-1/4” Bolt (23) through the rear center hole of the Bowl and center hole of the Wheel Leg (3). Attach a Square Nut (20) loosely and repeat for other two Bolts and Square Nuts in the Bowl and Wheel Leg. Tighten all three Bolts and Square Nuts.
Repeat for the Front Leg (2).
Note: Square Nuts should be under grill, and tightened completely after Legs are assembled to Bowl.
Long Hinge |
| Short Hinge |
Square Nut
1/2” Bolt
FIG. 6
![]() Square Nut
Square Nut
Bowl Handle |
|
|
|
| |
|
|
|
|
|
|
|
|
|
| Wheel Leg | |
|
|
| Front Leg |
| |
FIG. 7 |
| ||||
|
|
|
|
| |
|
|
|
|
| |
STEP 9. Hood / Bowl Assembly
(FIG. 8) With the grill assembly still on its side, lean the Hood (5) on its side and the back of the Hood against the back of the Bowl (4). Beginning at the top, swing the hinges from the Bowl to inside the Hood. Align the upper hole in the Hood (the hole closest to the back) with the Short Hinge (17) and the bottom hole with the Long Hinge (18). Insert a 10-24x1/2” Bolt (22) through the Hood and Hinges. Attach a Square Nut (20) from the inside of the Hood to each Bolt and tighten.
Repeat for the Short and Long Hinge at the opposite side.
Note: Tighten Bolts and Square Nuts, but make sure Hinges and Hood move easily.
STEP 10. Hood Handle and Round Vent
(FIG. 9) Insert a 10-16 x 5/8” Screw (19) through the Hood (5), to hole in Hood Handle (8). Do not tighten completely. Repeat for other Screw and Hood Handle hole. Tighten both Screws securely in Handle.
Put the Round Vent (12) over the slots in the top of the Hood so the small tab on the Round Vent is in the slot with the notch. Place a 1/2” Bolt (22) through the vent and Hood and attach a Square Nut (20). Tighten Bolt and Square Nut, but make sure the Round Vent can rotate easily.
1/2” Bolt
Square  Nut
Nut
FIG. 8
Hood Handle 
5/8” Screw 
1/2” Bolt
Round
Vent
Set the grill upright in the normal position.
STEP 11. Insert Ash Pan (24)
STEP 12. Insert Cooking Grid (25)
Install Cooking Grid on the grid brackets so the small wires run front to back, and are on top.
YOU ARE NOW READY TO USE YOUR GRILL. BUT FIRST READ AND UNDERSTAND WARNINGS AND OPERATIONAL INSTRUCTIONS. 5
|
| Square |
FIG. 9 |
| Nut |
|
|
|
FIG. 10