UK
INTRODUCTION
To get the best out of your new apparatus, please read this user guide carefully before using it for the first time. We also recommend that you keep the instructions for future reference, so that you can remind yourself of the functions of your apparatus.
SAFETY MEASURES
•Incorrect use of this apparatus may cause personal injury and damage.
•Use for its intended purpose only. The manufacturer is not responsible for any injury or damage resulting from incorrect use or handling (see also Guarantee Terms).
•For domestic use only. Not for outdoor or commercial use.
•For connection to 230 V, 50 Hz only. The appliance must be earthed.
•The apparatus, cord or plug must not be placed in water or any other liquid.
•Never touch the apparatus, cord or plug with wet or damp hands.
•Never leave the apparatus unattended when it is switched on.
•Keep children under supervision when in use.
•Keep the cord and apparatus away from heat sources, hot objects and naked flames.
•Switch the appliance off and unplug it when it is not in use, and before you change the dust bag and clean or replace the filters.
o Avoid pulling the cord when removing the plug from the socket. Instead, hold the plug.
o Keep hold of the plug when rewinding the cord, so that it does not strike the appliance.
•Never use the appliance unless it has a dust bag, motor filter and exhaust filter fitted.
•Only use accessories manufactured or recommended by the manufacturer.
•Do not use it on wet surfaces.
•Take particular care when vacuuming stairs, due to the risk of falling.
•Do not use the kit to vacuum up matches, hot ashes, cigarette butts, hard or sharp objects, wet or damp substances, combustible materials (petrol, solvents, etc.) or vapour from these.
•Do not use to vacuum fine sand or dust – e.g. plaster, brick dust and the like.
•Do not cover the appliance’s suction or exhaust port.
•Ensure that you keep clothing, hair and body parts away from the nozzle and moving parts of the appliance.
•Do not use the appliance if the cable or plug are damaged, if it is not functioning properly, or if it has been damaged by a heavy impact or similar.
•If the appliance or plug is damaged, it must be inspected and if necessary, repaired by an authorised repair engineer, otherwise there is a risk of electric shock. Never try to repair the apparatus yourself. Please contact the store where you bought the appliance for repairs under guarantee. Unauthorised repairs or modifications to the appliance will invalidate the guarantee.
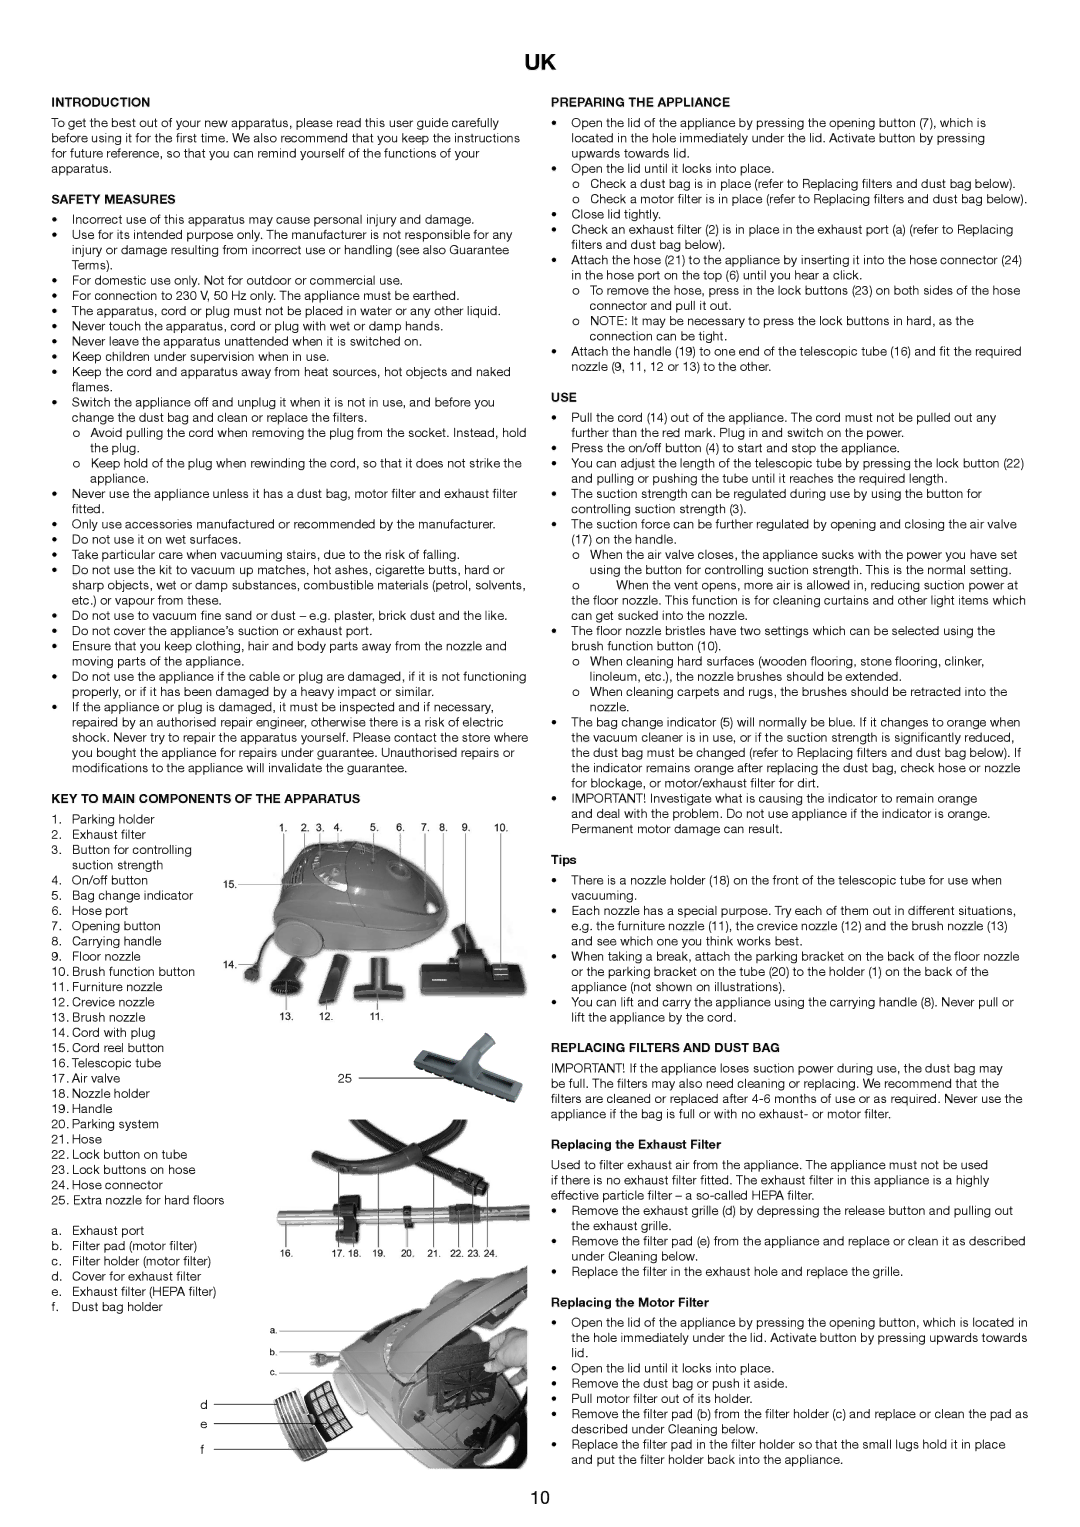
KEY TO MAIN COMPONENTS OF THE APPARATUS
1.Parking holder
2.Exhaust filter
3.Button for controlling suction strength
4.On/off button
5.Bag change indicator
6.Hose port
7.Opening button
8.Carrying handle
9.Floor nozzle
10.Brush function button
11.Furniture nozzle
12.Crevice nozzle
13.Brush nozzle
14.Cord with plug
15.Cord reel button
16.Telescopic tube
17. Air valve | 25 |
18.Nozzle holder
19.Handle
20.Parking system
21.Hose
22.Lock button on tube
23.Lock buttons on hose
24.Hose connector
25.Extra nozzle for hard floors
a.Exhaust port
b.Filter pad (motor filter)
c.Filter holder (motor filter)
d.Cover for exhaust filter
e.Exhaust filter (HEPA filter)
f.Dust bag holder
d e
f
PREPARING THE APPLIANCE
•Open the lid of the appliance by pressing the opening button (7), which is located in the hole immediately under the lid. Activate button by pressing upwards towards lid.
•Open the lid until it locks into place.
o Check a dust bag is in place (refer to Replacing filters and dust bag below). o Check a motor filter is in place (refer to Replacing filters and dust bag below).
•Close lid tightly.
•Check an exhaust filter (2) is in place in the exhaust port (a) (refer to Replacing filters and dust bag below).
•Attach the hose (21) to the appliance by inserting it into the hose connector (24) in the hose port on the top (6) until you hear a click.
o To remove the hose, press in the lock buttons (23) on both sides of the hose connector and pull it out.
o NOTE: It may be necessary to press the lock buttons in hard, as the connection can be tight.
•Attach the handle (19) to one end of the telescopic tube (16) and fit the required nozzle (9, 11, 12 or 13) to the other.
USE
•Pull the cord (14) out of the appliance. The cord must not be pulled out any further than the red mark. Plug in and switch on the power.
•Press the on/off button (4) to start and stop the appliance.
•You can adjust the length of the telescopic tube by pressing the lock button (22) and pulling or pushing the tube until it reaches the required length.
•The suction strength can be regulated during use by using the button for controlling suction strength (3).
•The suction force can be further regulated by opening and closing the air valve
(17) on the handle.
o When the air valve closes, the appliance sucks with the power you have set using the button for controlling suction strength. This is the normal setting.
oWhen the vent opens, more air is allowed in, reducing suction power at the floor nozzle. This function is for cleaning curtains and other light items which can get sucked into the nozzle.
•The floor nozzle bristles have two settings which can be selected using the brush function button (10).
o When cleaning hard surfaces (wooden flooring, stone flooring, clinker, linoleum, etc.), the nozzle brushes should be extended.
oWhen cleaning carpets and rugs, the brushes should be retracted into the nozzle.
•The bag change indicator (5) will normally be blue. If it changes to orange when the vacuum cleaner is in use, or if the suction strength is significantly reduced, the dust bag must be changed (refer to Replacing filters and dust bag below). If the indicator remains orange after replacing the dust bag, check hose or nozzle for blockage, or motor/exhaust filter for dirt.
•IMPORTANT! Investigate what is causing the indicator to remain orange and deal with the problem. Do not use appliance if the indicator is orange. Permanent motor damage can result.
Tips
•There is a nozzle holder (18) on the front of the telescopic tube for use when vacuuming.
•Each nozzle has a special purpose. Try each of them out in different situations, e.g. the furniture nozzle (11), the crevice nozzle (12) and the brush nozzle (13) and see which one you think works best.
•When taking a break, attach the parking bracket on the back of the floor nozzle or the parking bracket on the tube (20) to the holder (1) on the back of the appliance (not shown on illustrations).
•You can lift and carry the appliance using the carrying handle (8). Never pull or lift the appliance by the cord.
REPLACING FILTERS AND DUST BAG
IMPORTANT! If the appliance loses suction power during use, the dust bag may be full. The filters may also need cleaning or replacing. We recommend that the filters are cleaned or replaced after
Replacing the Exhaust Filter
Used to filter exhaust air from the appliance. The appliance must not be used if there is no exhaust filter fitted. The exhaust filter in this appliance is a highly effective particle filter – a
•Remove the exhaust grille (d) by depressing the release button and pulling out the exhaust grille.
•Remove the filter pad (e) from the appliance and replace or clean it as described under Cleaning below.
•Replace the filter in the exhaust hole and replace the grille.
Replacing the Motor Filter
•Open the lid of the appliance by pressing the opening button, which is located in the hole immediately under the lid. Activate button by pressing upwards towards lid.
•Open the lid until it locks into place.
•Remove the dust bag or push it aside.
•Pull motor filter out of its holder.
•Remove the filter pad (b) from the filter holder (c) and replace or clean the pad as described under Cleaning below.
•Replace the filter pad in the filter holder so that the small lugs hold it in place and put the filter holder back into the appliance.
10