+/–/ENTER/MENU

SETTING THE CHANNELS

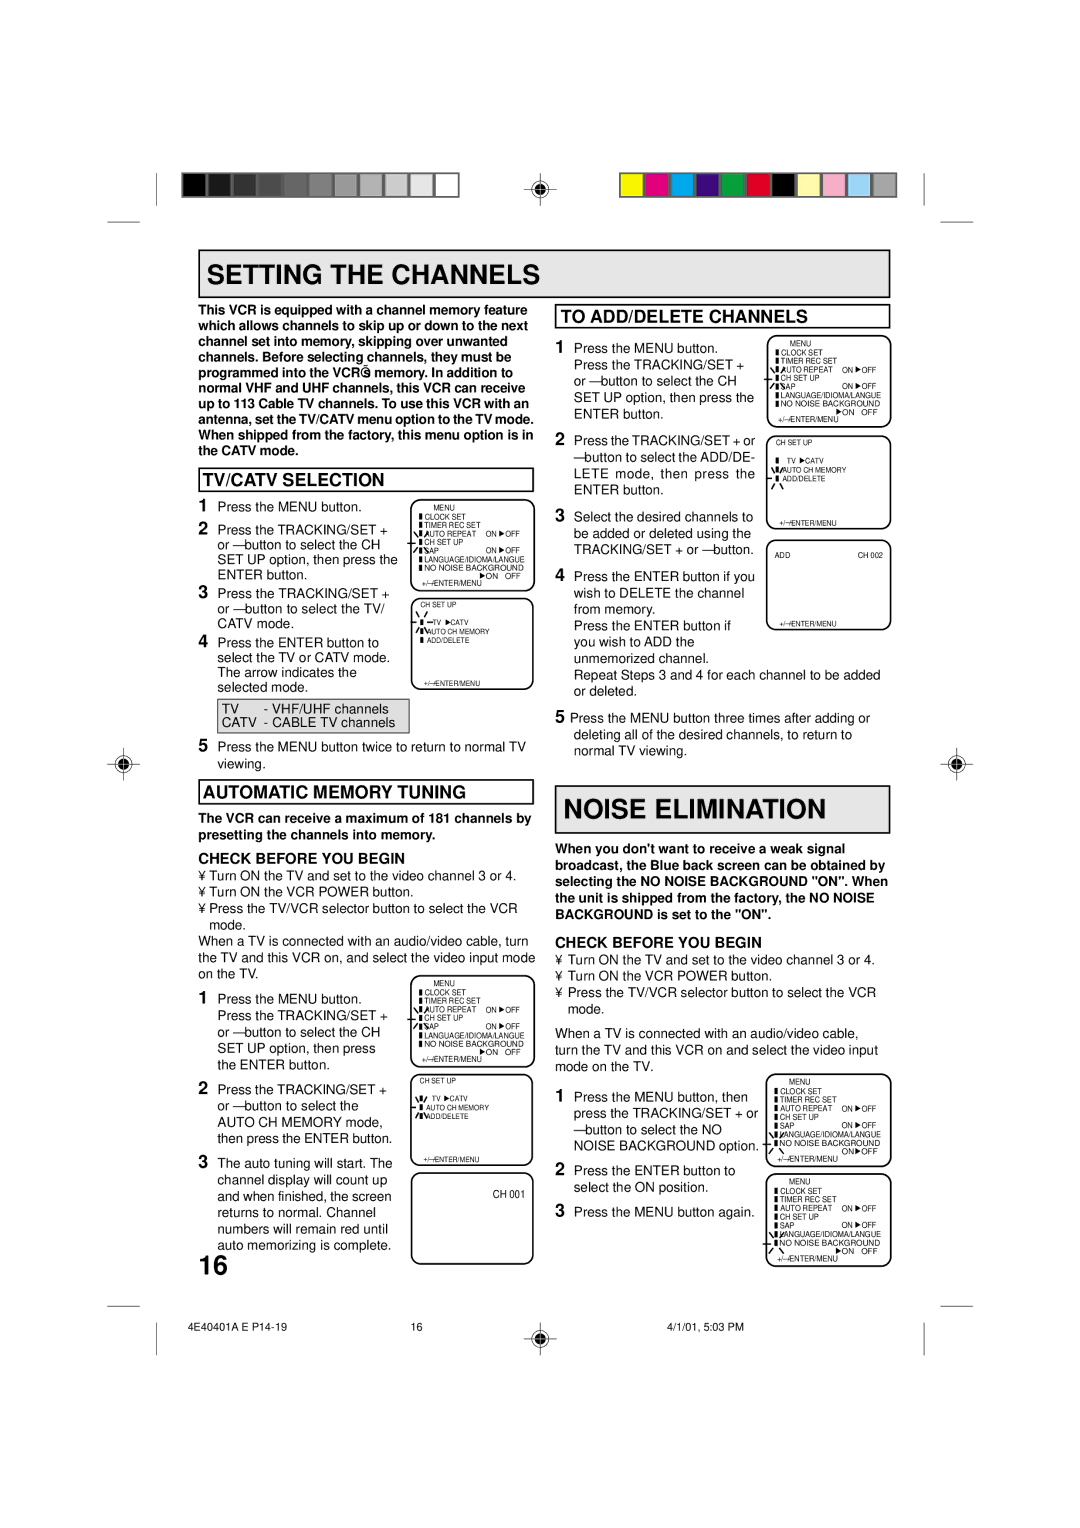
This VCR is equipped with a channel memory feature which allows channels to skip up or down to the next channel set into memory, skipping over unwanted channels. Before selecting channels, they must be programmed into the VCR’s memory. In addition to normal VHF and UHF channels, this VCR can receive up to 113 Cable TV channels. To use this VCR with an antenna, set the TV/CATV menu option to the TV mode.

TO ADD/DELETE CHANNELS

1 Press the MENU button.


MENU


CLOCK SET


Press the TRACKING/SET +


TIMER REC SET


AUTO REPEAT

ON

OFF


or – button to select the CH


CH SET UP

ON

OFF


SAP


SET UP option, then press the


LANGUAGE/IDIOMA/LANGUE


NO NOISE BACKGROUND


ENTER button.


+/–/ENTER/MENU

ON

OFF

When shipped from the factory, this menu option is in the CATV mode.

TV/CATV SELECTION

1

Press the MENU button.


MENU


2


CLOCK SET


Press the TRACKING/SET +


TIMER REC SET


AUTO REPEAT

ON

OFF


or – button to select the CH


CH SET UP

ON

OFF


SAP


SET UP option, then press the


LANGUAGE/IDIOMA/LANGUE


NO NOISE BACKGROUND

2Press the TRACKING/SET + or

– button to select the ADD/DE- LETE mode, then press the ENTER button.

3Select the desired channels to be added or deleted using the TRACKING/SET + or – button.

CH SET UP

TV CATV

AUTO CH MEMORY

ADD/DELETE

+/–/ENTER/MENU

ADD

CH 002


ENTER button.

+/–/ENTER/MENUON OFF

3 Press the TRACKING/SET +


CH SET UP


or – button to select the TV/


CATV mode.


TV CATV


4 Press the ENTER button to


AUTO CH MEMORY


ADD/DELETE


select the TV or CATV mode.


The arrow indicates the


+/–/ENTER/MENU


selected mode.


TV - VHF/UHF channels


CATV - CABLE TV channels


5Press the MENU button twice to return to normal TV viewing.

AUTOMATIC MEMORY TUNING

The VCR can receive a maximum of 181 channels by presetting the channels into memory.

CHECK BEFORE YOU BEGIN

Turn ON the TV and set to the video channel 3 or 4.

Turn ON the VCR POWER button.

Press the TV/VCR selector button to select the VCR mode.

When a TV is connected with an audio/video cable, turn the TV and this VCR on, and select the video input mode on the TV.

4Press the ENTER button if you

wish to DELETE the channel from memory.

Press the ENTER button if you wish to ADD the unmemorized channel.

Repeat Steps 3 and 4 for each channel to be added or deleted.

5Press the MENU button three times after adding or deleting all of the desired channels, to return to normal TV viewing.

NOISE ELIMINATION

When you don't want to receive a weak signal broadcast, the Blue back screen can be obtained by selecting the NO NOISE BACKGROUND "ON". When the unit is shipped from the factory, the NO NOISE BACKGROUND is set to the "ON".

CHECK BEFORE YOU BEGIN

Turn ON the TV and set to the video channel 3 or 4.

Turn ON the VCR POWER button.

1 Press the MENU button.

Press the TRACKING/SET +

or – button to select the CH

SET UP option, then press

the ENTER button.

MENU


CLOCK SET


TIMER REC SET


AUTO REPEAT

ON

OFF

CH SET UP

ON

OFF

SAP

LANGUAGE/IDIOMA/LANGUE NO NOISE BACKGROUND

+/–/ENTER/MENUON OFF

Press the TV/VCR selector button to select the VCR

mode.

When a TV is connected with an audio/video cable, turn the TV and this VCR on and select the video input mode on the TV.

2 Press the TRACKING/SET +

or – button to select the

AUTO CH MEMORY mode,

then press the ENTER button.

3 The auto tuning will start. The

channel display will count up

and when finished, the screen

returns to normal. Channel

numbers will remain red until

auto memorizing is complete.

CH SET UP

TV CATV

AUTO CH MEMORY

ADD/DELETE

+/–/ENTER/MENU

CH 001

1Press the MENU button, then press the TRACKING/SET + or

– button to select the NO NOISE BACKGROUND option.

2Press the ENTER button to select the ON position.

3Press the MENU button again.

MENU


CLOCK SET


TIMER REC SET


AUTO REPEAT

ON

OFF

CH SET UP

ON

OFF

SAP

LANGUAGE/IDIOMA/LANGUE NO NOISE BACKGROUND

+/–/ENTER/MENUONOFF

MENU


CLOCK SET


TIMER REC SET


AUTO REPEAT

ON

OFF

CH SET UP

ON

OFF

SAP

LANGUAGE/IDIOMA/LANGUE NO NOISE BACKGROUND ON OFF

16

+/–/ENTER/MENU

4E40401A E P14-19

16

4/1/01, 5:03 PM

Page 16
Image 16
Memorex MVR4041 owner manual Setting the Channels, Noise Elimination, To ADD/DELETE Channels, TV/CATV Selection

MVR4041 specifications

The Memorex MVR4041 is an advanced technology device that blends functionality with user-friendly features, making it a desirable choice for both casual users and tech enthusiasts. This versatile media player and recorder is designed with a dual focus on high performance and ease of use, enabling it to cater to a wide array of multimedia applications.

One of the standout features of the MVR4041 is its ability to play and record a variety of media formats. Supporting popular formats such as DVD, CD, and various digital files, this device ensures that users can enjoy their favorite content without compatibility concerns. The MVR4041's capability to handle both physical and digital media allows for seamless transitions between different content types, making it a versatile addition to any home entertainment system.

Equipped with cutting-edge recording technology, the MVR4041 offers high-definition video recording with impressive clarity and detail. Users can easily record live television shows or create their own video content directly onto DVDs or external storage devices. This flexibility caters to the growing demand for personalized media experiences, allowing users to archive their favorite shows and memories with minimal effort.

The MVR4041 employs an intuitive user interface, featuring an easy-to-navigate menu system that simplifies operation. This ensures that even users with limited technical knowledge can enjoy its full range of features. The inclusion of a remote control further enhances accessibility, enabling users to manage their media experience from a distance.

With regard to connectivity, the Memorex MVR4041 boasts multiple input and output options. HDMI, USB, and AV connections provide users with various ways to integrate the device into their existing home theater setup. The ability to connect to external devices such as smartphones, tablets, or laptops enhances the MVR4041’s utility, making it an essential hub for modern digital entertainment.

Another significant characteristic of the MVR4041 is its robust build quality and stylish design. This not only ensures durability but also allows it to blend seamlessly with other electronic devices in the living room.

In summary, the Memorex MVR4041 stands out as a comprehensive media solution, offering extensive playback and recording capabilities alongside a user-friendly design. This makes it an ideal choice for anyone looking to enhance their multimedia experience, providing both convenience and performance in one sleek package.