10" *

Instructions for Door and Jamb Butt Template 49-54-0101

The MILWAUKEE Door and Jamb Butt Template is for use with a router equipped with a templet guide to cut mortises for hinges on 1-3/4", 2",

Fig. 1

1

and 2-1/4" thick doors that are 6'6", 6'8" and 7' long. It can also be used on jambs with or without a door stop installed. Mortises for 1-3/8" doors can also be cut provided the door stop has not been installed. Hinge size is adjustable from 2-1/2" to 5-1/2".

Kit includes:

1Upper frame housing (with top gauge assembly)

2Lower frame housing

2 Link rail

15/8" Template guide for use with MILWAUKEE 49-54-1040 subbase.

12Extra nails

WARNING!

To reduce the risk of injury, read and understand the operator's manual packaged with your power tool.

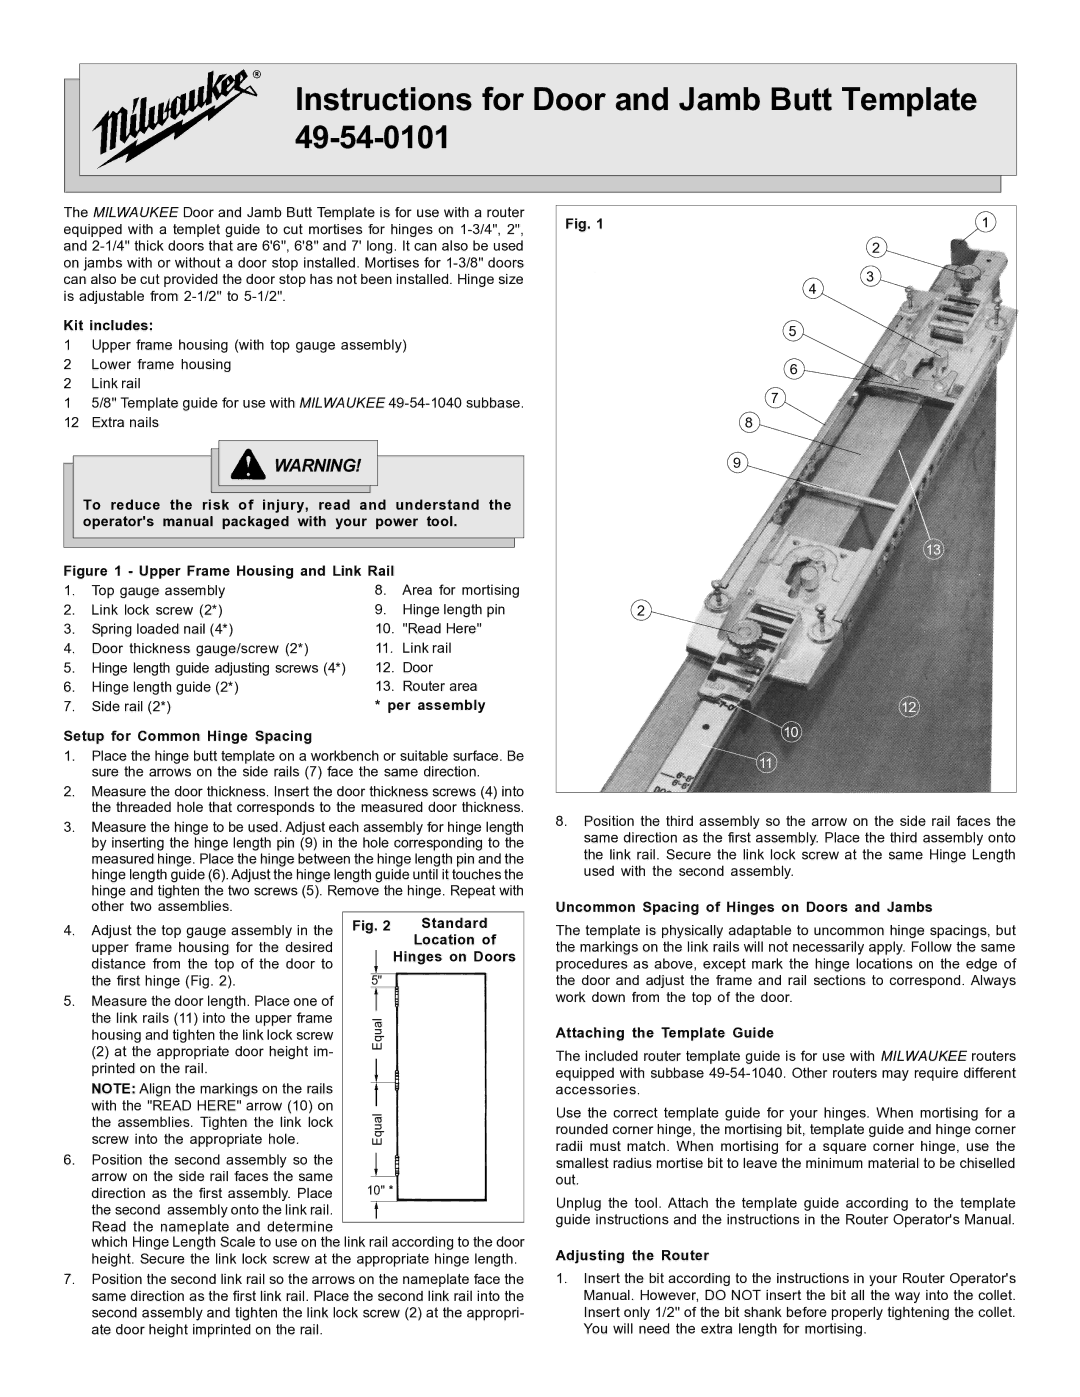
Figure 1 - Upper Frame Housing and Link Rail


1.

Top gauge assembly

8.

Area for mortising

2.

Link lock screw (2*)

9.

Hinge length pin

3.

Spring loaded nail (4*)

10.

"Read Here"

4.

Door thickness gauge/screw (2*)

11.

Link rail

5.

Hinge length guide adjusting screws (4*)

12.

Door

6.

Hinge length guide (2*)

13.

Router area

7.

Side rail (2*)

* per assembly

Setup for Common Hinge Spacing

1.

Place the hinge butt template on a workbench or suitable surface. Be


sure the arrows on the side rails (7) face the same direction.

2.

Measure the door thickness. Insert the door thickness screws (4) into


the threaded hole that corresponds to the measured door thickness.

4

5

6

7

8

9

2

10

11

2

3

13

12

3. Measure the hinge to be used. Adjust each assembly for hinge length

by inserting the hinge length pin (9) in the hole corresponding to the

measured hinge. Place the hinge between the hinge length pin and the

hinge length guide (6). Adjust the hinge length guide until it touches the

hinge and tighten the two screws (5). Remove the hinge. Repeat with

other two assemblies.

4. Adjust the top gauge assembly in the

Fig. 2


Standard

upper frame housing for the desired


Location of


Hinges on Doors

distance from the top of the door to


the first hinge (Fig. 2).


5"


5. Measure the door length. Place one of


the link rails (11) into the upper frame

Equal


housing and tighten the link lock screw


(2) at the appropriate door height im-


printed on the rail.


NOTE: Align the markings on the rails


with the "READ HERE" arrow (10) on

Equal


the assemblies. Tighten the link lock


screw into the appropriate hole.


6.Position the second assembly so the arrow on the side rail faces the same

direction as the first assembly. Place the second assembly onto the link rail.

Read the nameplate and determine

which Hinge Length Scale to use on the link rail according to the door height. Secure the link lock screw at the appropriate hinge length.

7. Position the second link rail so the arrows on the nameplate face the same direction as the first link rail. Place the second link rail into the second assembly and tighten the link lock screw (2) at the appropri- ate door height imprinted on the rail.

8.Position the third assembly so the arrow on the side rail faces the same direction as the first assembly. Place the third assembly onto the link rail. Secure the link lock screw at the same Hinge Length used with the second assembly.

Uncommon Spacing of Hinges on Doors and Jambs

The template is physically adaptable to uncommon hinge spacings, but the markings on the link rails will not necessarily apply. Follow the same procedures as above, except mark the hinge locations on the edge of the door and adjust the frame and rail sections to correspond. Always work down from the top of the door.

Attaching the Template Guide

The included router template guide is for use with MILWAUKEE routers equipped with subbase 49-54-1040. Other routers may require different accessories.

Use the correct template guide for your hinges. When mortising for a rounded corner hinge, the mortising bit, template guide and hinge corner radii must match. When mortising for a square corner hinge, use the smallest radius mortise bit to leave the minimum material to be chiselled out.

Unplug the tool. Attach the template guide according to the template guide instructions and the instructions in the Router Operator's Manual.

Adjusting the Router

1.Insert the bit according to the instructions in your Router Operator's Manual. However, DO NOT insert the bit all the way into the collet. Insert only 1/2" of the bit shank before properly tightening the collet. You will need the extra length for mortising.

Page 1
Image 1
Milwaukee 49-54-0101, 49-54-1040 manual Kit includes, Per assembly, Setup for Common Hinge Spacing, Standard, Location

49-54-1040, 49-54-0101 specifications

Milwaukee 49-54-1040 and 49-54-0101 are two essential tools in Milwaukee's robust lineup of products, specifically designed for professionals engaged in demanding tasks. These tools offer impressive features, advanced technologies, and characteristics that cater to both the needs of tradespeople and DIY enthusiasts alike.

The Milwaukee 49-54-1040 is a heavy-duty reciprocating saw blade designed for cutting metal. This blade is constructed with high-quality materials, providing superior durability and longer life during intense applications. The 49-54-1040 features a bi-metal design that combines high-speed steel and high-carbon steel, allowing it to withstand extreme pressures and stresses during use. Its tooth design is optimized for fast cutting, making it ideal for professionals who require speed without sacrificing performance.

In addition to its cutting capabilities, the 49-54-1040 is designed for versatility. It can easily cut through various materials such as stainless steel, aluminum, and other alloys. This feature is particularly beneficial for professionals in the construction and metalworking industries, as it allows them to handle different tasks with just one blade.

On the other hand, the Milwaukee 49-54-0101 is a high-performance saw blade that primarily focuses on wood and plastic cutting applications. Made from premium materials, it ensures precision cuts and consistent performance over repeated use. The 49-54-0101 incorporates an advanced tooth geometry that facilitates smooth cutting, while reducing binding and splintering. This is vital for tasks that require clean edges, making it a favorite among carpenters and woodworkers.

One of the standout characteristics of both tools is their compatibility with a variety of reciprocating saws. Being universally adaptable, they can be utilized with many brands, enhancing the convenience of tool usage on various job sites.

Furthermore, both products reflect Milwaukee’s commitment to innovation, durability, and safety. Integrated safety features ensure that users can operate these tools confidently, minimizing the risk of accidents.

In conclusion, Milwaukee 49-54-1040 and 49-54-0101 represent the pinnacle of cutting solutions in their respective categories. With outstanding performance, innovative technologies, and user-friendly characteristics, they are indispensable tools for any professional seeking quality and reliability in their work. Whether tackling metal or wood, these saw blades deliver efficiency and precision, making them worth considering for your toolbox.