3. FLARING WORK AND PIPE CONNECTION

3-1. FLARING WORK

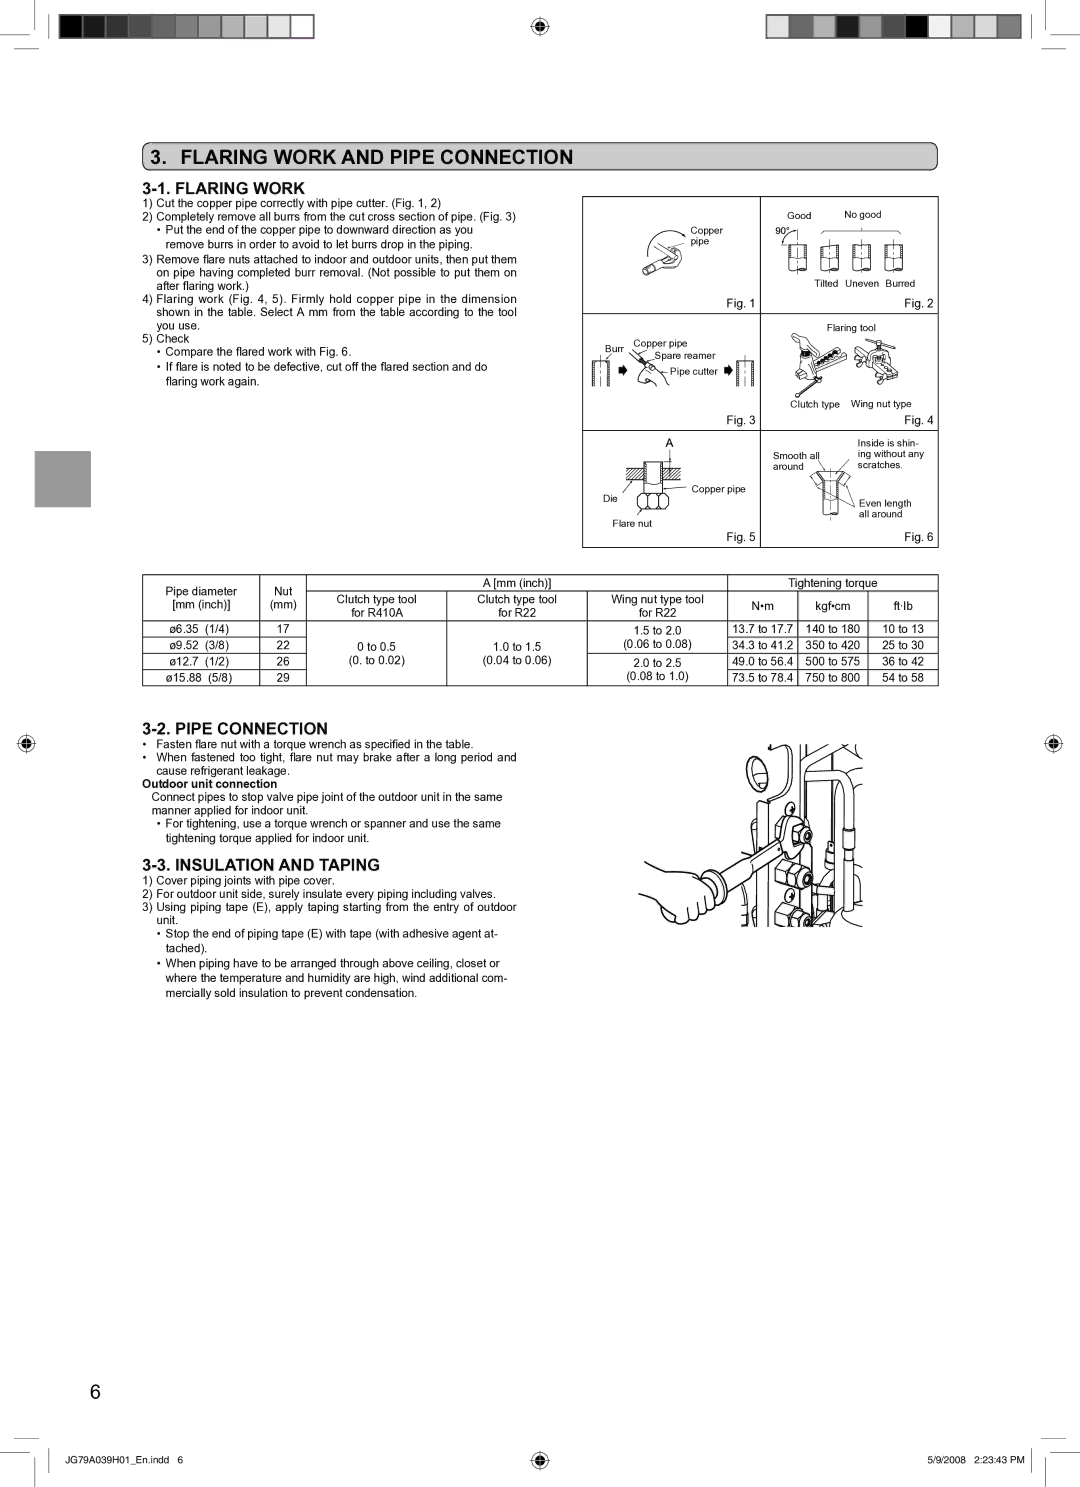
1)Cut the copper pipe correctly with pipe cutter. (Fig. 1, 2)

2)Completely remove all burrs from the cut cross section of pipe. (Fig. 3)

Put the end of the copper pipe to downward direction as you remove burrs in order to avoid to let burrs drop in the piping.

3)Remove flare nuts attached to indoor and outdoor units, then put them on pipe having completed burr removal. (Not possible to put them on after flaring work.)

4)Flaring work (Fig. 4, 5). Firmly hold copper pipe in the dimension shown in the table. Select A mm from the table according to the tool you use.

5)Check

Compare the flared work with Fig. 6.

If flare is noted to be defective, cut off the flared section and do flaring work again.


Good

No good


Copper


pipe


Tilted

Uneven Burred


Fig. 1

Fig. 2


Flaring tool

Burr

Copper pipe


Spare reamer


Pipe cutter


Clutch type

Wing nut type


Fig. 3

Fig. 4


Inside is shin-


Smooth all

ing without any


around

scratches.

Die

Copper pipe


Even length


Flare nut

all around


Fig. 5

Fig. 6

Pipe diameter

Nut


A [mm (inch)]


Tightening torque


[mm (inch)]

(mm)

Clutch type tool

Clutch type tool

Wing nut type tool

N•m

kgf•cm


ft·Ib

for R410A

for R22

for R22


ø6.35

(1/4)

17


1.5 to 2.0

13.7 to 17.7

140 to 180


10 to 13

ø9.52

(3/8)

22

0 to 0.5

1.0 to 1.5

(0.06 to 0.08)

34.3 to 41.2

350 to 420


25 to 30

ø12.7

(1/2)

26

(0. to 0.02)

(0.04 to 0.06)

2.0 to 2.5

49.0 to 56.4

500 to 575


36 to 42

ø15.88

(5/8)

29


(0.08 to 1.0)

73.5 to 78.4

750 to 800


54 to 58

3-2. PIPE CONNECTION

Fasten flare nut with a torque wrench as specified in the table.

When fastened too tight, flare nut may brake after a long period and

cause refrigerant leakage.

Outdoor unit connection

Connect pipes to stop valve pipe joint of the outdoor unit in the same manner applied for indoor unit.

For tightening, use a torque wrench or spanner and use the same tightening torque applied for indoor unit.

3-3. INSULATION AND TAPING

1)Cover piping joints with pipe cover.

2)For outdoor unit side, surely insulate every piping including valves.

3)Using piping tape (E), apply taping starting from the entry of outdoor unit.

Stop the end of piping tape (E) with tape (with adhesive agent at- tached).

When piping have to be arranged through above ceiling, closet or where the temperature and humidity are high, wind additional com- mercially sold insulation to prevent condensation.

JG79A039H01_En.indd 6

5/9/2008 2:23:43 PM

Page 6
Image 6
Mitsubishi Electronics MXZ-2A20NA Flaring Work and Pipe Connection, Insulation and Taping, Outdoor unit connection

MXZ-2A20NA specifications

The Mitsubishi Electronics MXZ-2A20NA is a highly efficient multi-split air conditioning system designed to provide optimal comfort in residential and commercial spaces. Renowned for its advanced technologies, this model is part of Mitsubishi's commitment to energy efficiency and user-friendly operation.

One of the standout features of the MXZ-2A20NA is its multi-zone capability. The unit can simultaneously connect to up to two indoor units, allowing users to customize the climate in different areas of their home or office. This flexibility not only enhances comfort but also promotes energy savings, as only the necessary spaces are heated or cooled.

Efficiency is at the core of the MXZ-2A20NA's design. With a SEER (Seasonal Energy Efficiency Ratio) rating that exceeds industry standards, this unit ensures low energy consumption while maintaining excellent cooling performance. The Advanced Inverter Technology further optimizes efficiency by adjusting the compressor speed based on the cooling or heating demand. This results in less energy wastage and greater cost savings on utility bills.

The unit is equipped with Mitsubishi’s proprietary 3D i-See Sensor, which intelligently detects temperature variations and adjusts airflow accordingly. This technology enables the system to deliver consistent and comfortable temperatures throughout the room, eliminating hot and cold spots.

Another key feature of the MXZ-2A20NA is its Whisper Quiet operation. The outdoor unit is engineered for minimal noise, making it suitable for residential settings without disrupting the peace of the home. The indoor units also operate quietly, adding to the overall comfort.

Moreover, the MXZ-2A20NA supports advanced connectivity options, including compatibility with Mitsubishi’s MELCloud app. This allows users to control their system remotely via a smartphone, providing convenience and enabling precise temperature management from anywhere.

In terms of installation, the MXZ-2A20NA features a compact design that allows for flexibility in placement, making it an ideal choice for spaces with limited installation options. Its robust build quality ensures durability and reliability over years of operation.

In summary, the Mitsubishi Electronics MXZ-2A20NA represents a blend of cutting-edge technology and user-friendly features, offering efficient cooling and heating for modern living environments. With its multi-zone capability, energy-efficient operation, and advanced control options, it stands out as an excellent choice for maintaining comfort in any climate.