Menu operation |
|
|
|
|
|
|
|
|
|
IMAGE | CONTRAST |
| ± | 30 |
| RED | ± | 30 |
|
| BRIGHTNESS |
| ± | 30 |
| YELLOW | ± | 30 | ENGLISH |
| sRGB | *1 | ON, OFF |
| GREEN | ± | 30 | ||
|
|
| |||||||
| COLOR MATRIX | VIDEO |
| CYAN | ± | 30 |
| ||
|
|
| COMPUTER |
| BLUE | ± | 30 |
| |
|
|
| USER |
| MAGENTA | ± | 30 |
| |
|
|
| OFF | SATURATION | ± | 5 |
| ||
| COLOR TEMP. |
| STANDARD | CONTRAST R | ± | 30 |
| ||
|
|
| HIGH | CONTRAST B | ± | 30 |
| ||
|
|
| LOW | BRIGHTNESS R | ± | 30 |
| ||
|
|
| USER | BRIGHTNESS B | ± | 30 |
| ||
| COLOR | *2 | ± | 10 | (Displays only when the source is selected to VIDEO) |
| |||
| TINT | ± | 10 | (Displays only when the source is selected to VIDEO) |
| ||||
| SHARPNESS |
| ± | 10 |
|
|
|
|
|
INSTALLATION | IRIS |
| 1, 2, 3, OFF |
|
|
|
|
| |
| KEYSTONE |
|
|
|
| ||||
| AUTO POWER ON | ON, OFF |
|
|
|
|
| ||
| AUTO POWER OFF | OFF, 5, 10, 15, 30, 60 min |
|
|
|
| |||
| SPLASH SCREEN | ON, OFF |
|
|
|
|
| ||
| BACK COLOR |
| BLUE, BLACK |
|
|
|
|
| |
| LAMP MODE |
| STANDARD, LOW |
|
|
|
| ||
| IMAGE REVERSE | OFF, MIRROR, INVERT, MIRROR INVERT |
|
|
| ||||
FEATURE | MENU POSITION | 1=Upper left, 2=Lower right | (The item can not be selected when |
| |||||
| EXPAND MODE |
| 1 - 2 |
| the source is selected to COMPUTER) |
| |||
|
|
|
|
|
|
| |||
| AUDIO MODE |
| COMPUTER, VIDEO, COMPUTER VIDEO, MUTE |
|
|
| |||
| VIDEO SIGNAL |
| AUTO, NTSC, PAL, SECAM, 4.43NTSC, |
| |||||
| ANAMORPHIC |
| ON, OFF |
|
|
|
|
| |
| LANGUAGE |
|
| , English, Español, Deutsch, Français, Italiano, |
|
| |||
| RESET ALL |
| OK |
|
|
|
|
| |
SIGNAL | MEMORY CALL |
| AUTO, USER1, USER2 |
|
|
|
| ||
| HORIZ.POSITION | 0 - 999 | *3 |
|
|
|
| ||
| VERT.POSITION | 0 - 999 | *3 |
|
|
|
| ||
| FINE SYNC. | *4 | 0 - 39 | *3 |
|
|
|
| |
| TRACKING | *4 | 0 - 9999 |
|
|
|
| ||
| COMPUTER INPUT *4 | RGB, YCBCR / YPBPR |
|
|
|
| |||
| HOLD | *4 | AUTO |
| BEGIN |
| |||
|
|
| ON |
|
| ||||
|
|
| OFF |
| END | 1 - 99 |
| ||
|
| USER |
|
|
|
| CLAMP POSITION | *4 |
| 0 - +63 | *3 | |
|
|
|
|
|
|
| CLAMP WIDTH | *4 |
| 1 - 63 | *3 | |
|
| MEMORIZE |
| USER1, USER2 |
|
|
| |||||
|
|
|
|
| HORIZ. PIXELS *4 |
| 0 - 9999 | *3 | ||||
|
| DELETE |
| USER1, USER2 |
|
|
| |||||
|
|
|
|
| VERT LINES | *4 |
| 0 - 9999 | *3 | |||
|
| DEFAULT |
|
|
|
|
| |||||
|
|
|
|
|
| VERT. SYNC |
|
| AUTO, ON, OFF |
| ||
* 1: The item can not be selected when the sRGB is set to ON. |
|
|
|
| ||||||||
| SHUTTER (U) |
|
| 0 - 383 |
|
| ||||||
|
|
|
|
| ||||||||
* 2: The item can not be selected with certain signals. |
| SHUTTER (L) |
|
| 0 - 383 |
|
| |||||
|
|
|
|
| ||||||||
* 3: Setting range is different with certain signals. |
| SHUTTER(LS) |
|
| 0 - 510 |
|
| |||||
|
|
|
|
| ||||||||
* 4: The item can not be selected when the source is selected |
| SHUTTER(RS) |
|
| 0 - 510 |
|
| |||||
|
|
|
|
| ||||||||
|
|
|
|
|
|
| ||||||
VIDEO or |
|
|
|
|
|
|
|
|
|
| ||
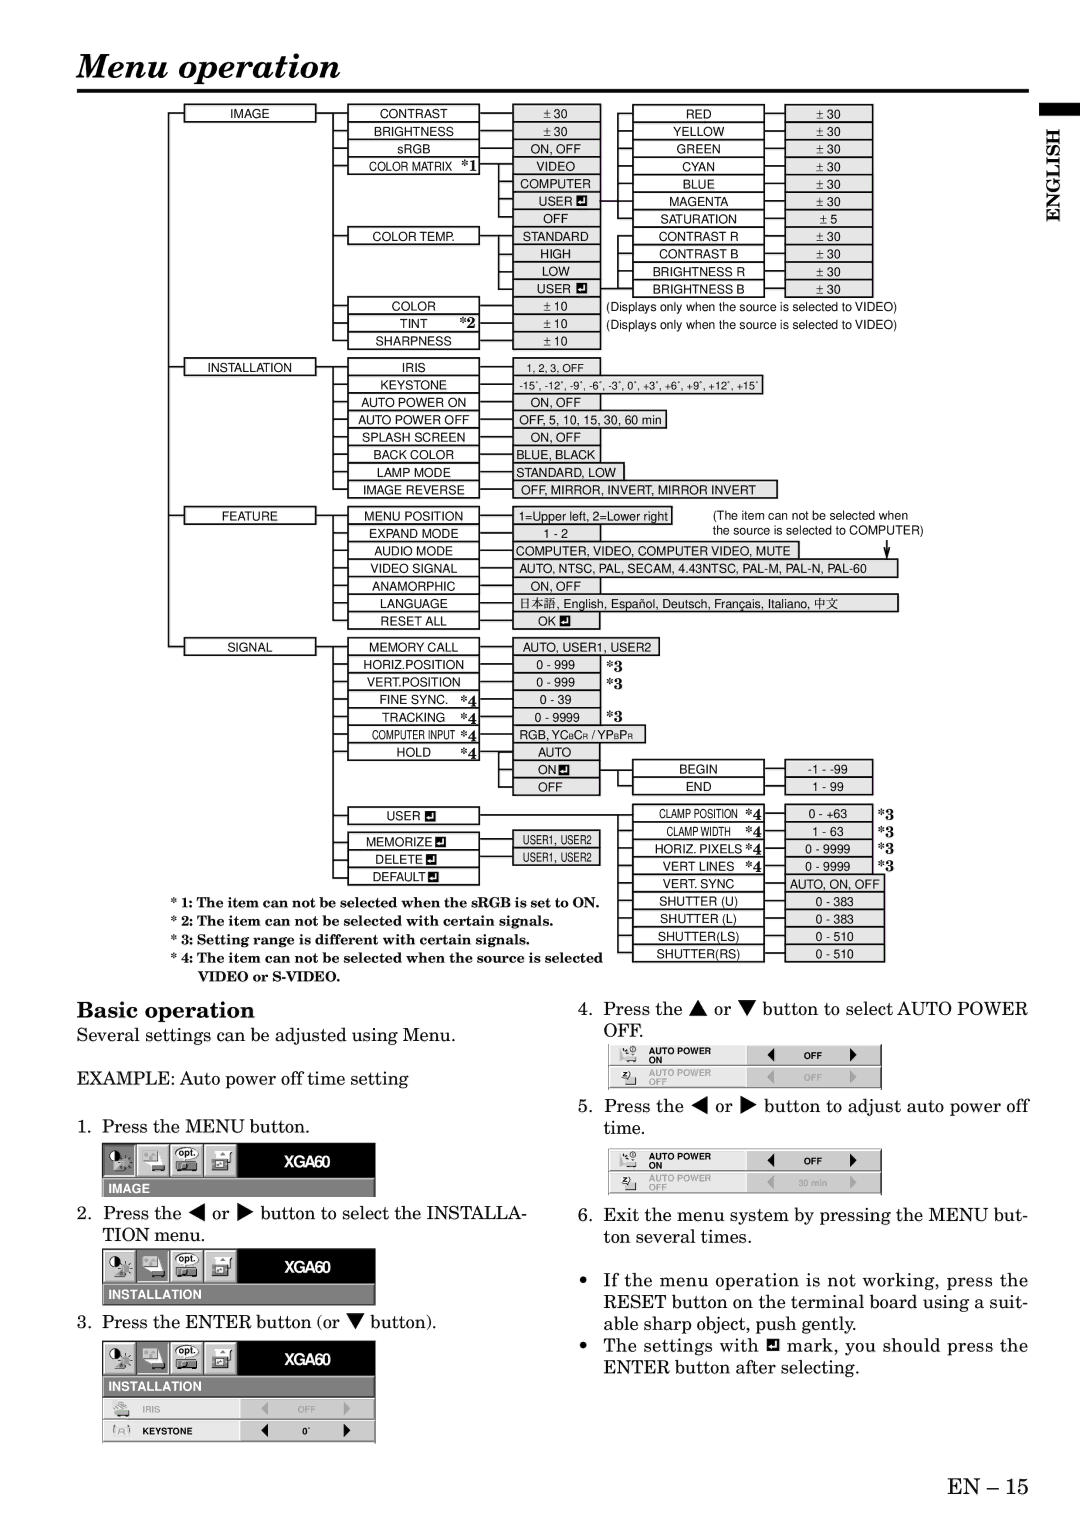
Basic operation |
|
|
| 4. Press the { or } button to select AUTO POWER | ||||||||||||||||||
Several settings can be adjusted using Menu. |
| OFF. |
|
|
| |||||||||||||||||
|
|
|
|
|
|
|
|
|
|
|
|
|
|
|
|
|
| AUTO POWER |
|
| OFF |
|
|
|
|
|
|
|
|
|
|
|
|
|
|
|
|
|
|
| ON |
|
|
| |
EXAMPLE: Auto power off time setting |
|
|
|
| AUTO POWER |
|
| OFF |
| |||||||||||||
|
|
|
| OFF |
|
|
| |||||||||||||||
|
|
|
|
|
|
|
|
|
|
|
|
|
|
|
|
|
|
|
|
|
|
|
1. Press the MENU button. | 5. Press the $ or % button to adjust auto power off | |||||||||||||||||||||
| time. |
|
|
| ||||||||||||||||||
|
|
|
|
|
|
|
|
|
|
|
|
|
|
|
|
|
|
|
|
|
|
|
|
|
|
|
|
| opt. |
|
|
|
|
|
|
|
|
|
|
|
|
|
|
|
|
|
|
|
|
|
|
|
|
|
| XGA60 |
|
|
|
|
|
| AUTO POWER |
|
| OFF |
| |
|
|
|
|
|
|
|
|
|
|
|
|
|
|
|
|
| ON |
|
|
| ||
|
|
|
|
|
|
|
|
|
|
|
|
|
|
|
|
|
| AUTO POWER |
|
| 30 min |
|
| IMAGE |
|
|
|
|
|
|
| OFF |
|
|
| ||||||||||
|
|
|
|
|
|
|
|
|
|
|
|
|
|
|
|
|
|
|
|
|
|
|
2. | Press the $ or % button to select the INSTALLA- | 6. Exit the menu system by pressing the MENU but- | ||||||||||||||||||||
| TION menu. |
|
|
|
| ton several times. |
|
|
| |||||||||||||
|
|
|
|
|
| opt. |
|
|
|
| XGA60 |
|
|
|
|
|
|
|
|
|
|
|
|
|
|
|
|
|
|
|
|
|
|
|
|
| • | If the menu operation is not working, press the | |||||||
|
|
|
|
|
|
|
|
|
|
|
|
|
| |||||||||
| INSTALLATION |
|
|
| ||||||||||||||||||
|
|
|
|
| RESET button on the terminal board using a suit- | |||||||||||||||||
3. | Press the ENTER button (or } button). |
| ||||||||||||||||||||
| able sharp object, push gently. | |||||||||||||||||||||
|
|
|
|
|
|
|
|
|
|
|
|
|
| • | The settings with |
| mark, you should press the | |||||
|
|
|
|
|
| opt. |
|
|
|
| XGA60 |
|
|
| ||||||||
|
|
|
| |||||||||||||||||||
|
|
|
|
|
|
|
|
|
|
|
|
|
| ENTER button after selecting. | ||||||||
|
|
|
|
|
|
|
|
|
|
|
|
|
|
| ||||||||
| INSTALLATION |
|
|
|
|
|
|
|
|
|
|
|
| |||||||||
|
|
|
| IRIS |
| OFF |
|
|
|
|
|
|
|
|
|
|
| |||||
|
|
|
| KEYSTONE |
| 0˚ |
|
|
|
|
|
|
|
|
|
|
| |||||
|
|
|
|
|
|
|
|
|
|
|
|
|
|
|
|
|
|
|
|
|
|
|
EN – 15