Disassembly
CAUTION: Turn OFF both hot and cold water supplies. Open handle to alleviate water pressure to insure that complete water
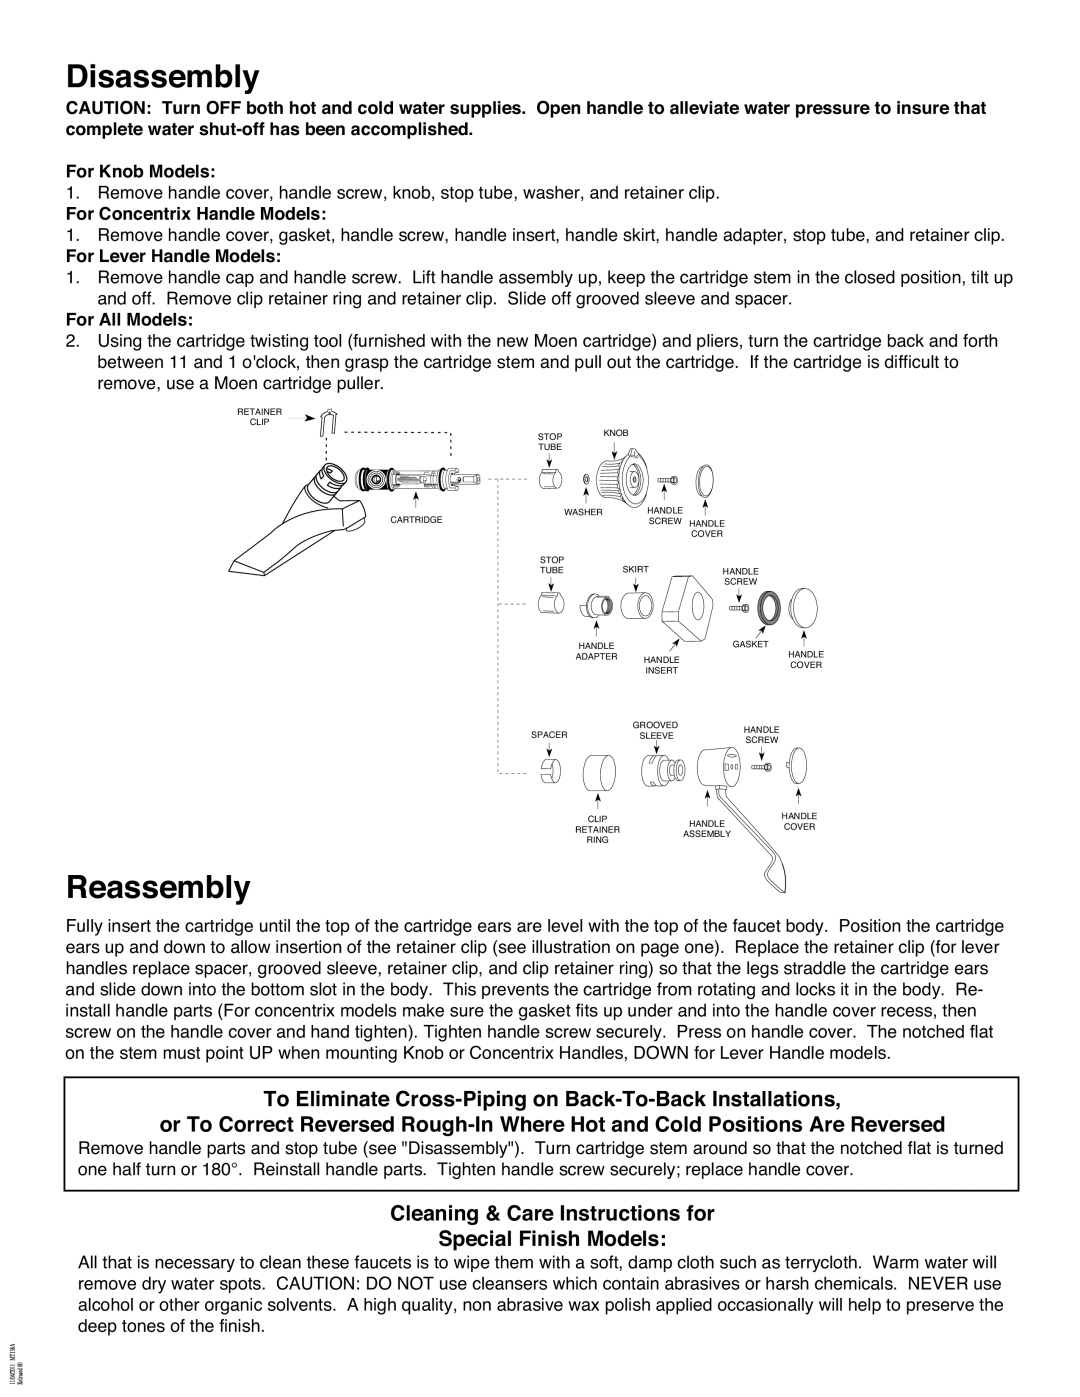
For Knob Models:
1.Remove handle cover, handle screw, knob, stop tube, washer, and retainer clip.
For Concentrix Handle Models:
1.Remove handle cover, gasket, handle screw, handle insert, handle skirt, handle adapter, stop tube, and retainer clip.
For Lever Handle Models:
1.Remove handle cap and handle screw. Lift handle assembly up, keep the cartridge stem in the closed position, tilt up and off. Remove clip retainer ring and retainer clip. Slide off grooved sleeve and spacer.
For All Models:
2.Using the cartridge twisting tool (furnished with the new Moen cartridge) and pliers, turn the cartridge back and forth between 11 and 1 o'clock, then grasp the cartridge stem and pull out the cartridge. If the cartridge is difficult to remove, use a Moen cartridge puller.
RETAINER
CLIP
STOP
TUBE
KNOB
![]()
![]() C
C
CARTRIDGE | WASHER | HANDLE |
|
|
| SCREW | HANDLE |
| |
|
|
| COVER |
|
| STOP | SKIRT |
|
|
| TUBE | HANDLE |
| |
|
|
| SCREW |
|
| HANDLE |
| GASKET | HANDLE |
| ADAPTER | HANDLE |
| |
|
|
| COVER | |
|
| INSERT |
| |
|
|
|
| |
| SPACER | GROOVED | HANDLE |
|
| SLEEVE |
| ||
| SCREW |
| ||
|
|
|
| |
| CLIP |
| HANDLE | HANDLE |
| RETAINER |
| COVER | |
| RING |
| ASSEMBLY |
|
|
|
|
|
Reassembly
Fully insert the cartridge until the top of the cartridge ears are level with the top of the faucet body. Position the cartridge ears up and down to allow insertion of the retainer clip (see illustration on page one). Replace the retainer clip (for lever handles replace spacer, grooved sleeve, retainer clip, and clip retainer ring) so that the legs straddle the cartridge ears and slide down into the bottom slot in the body. This prevents the cartridge from rotating and locks it in the body. Re- install handle parts (For concentrix models make sure the gasket fits up under and into the handle cover recess, then screw on the handle cover and hand tighten). Tighten handle screw securely. Press on handle cover. The notched flat on the stem must point UP when mounting Knob or Concentrix Handles, DOWN for Lever Handle models.
To Eliminate
or To Correct Reversed
Remove handle parts and stop tube (see "Disassembly"). Turn cartridge stem around so that the notched flat is turned one half turn or 180°. Reinstall handle parts. Tighten handle screw securely; replace handle cover.
Cleaning & Care Instructions for
Special Finish Models:
All that is necessary to clean these faucets is to wipe them with a soft, damp cloth such as terrycloth. Warm water will remove dry water spots. CAUTION: DO NOT use cleansers which contain abrasives or harsh chemicals. NEVER use alcohol or other organic solvents. A high quality, non abrasive wax polish applied occasionally will help to preserve the deep tones of the finish.