Disassembly

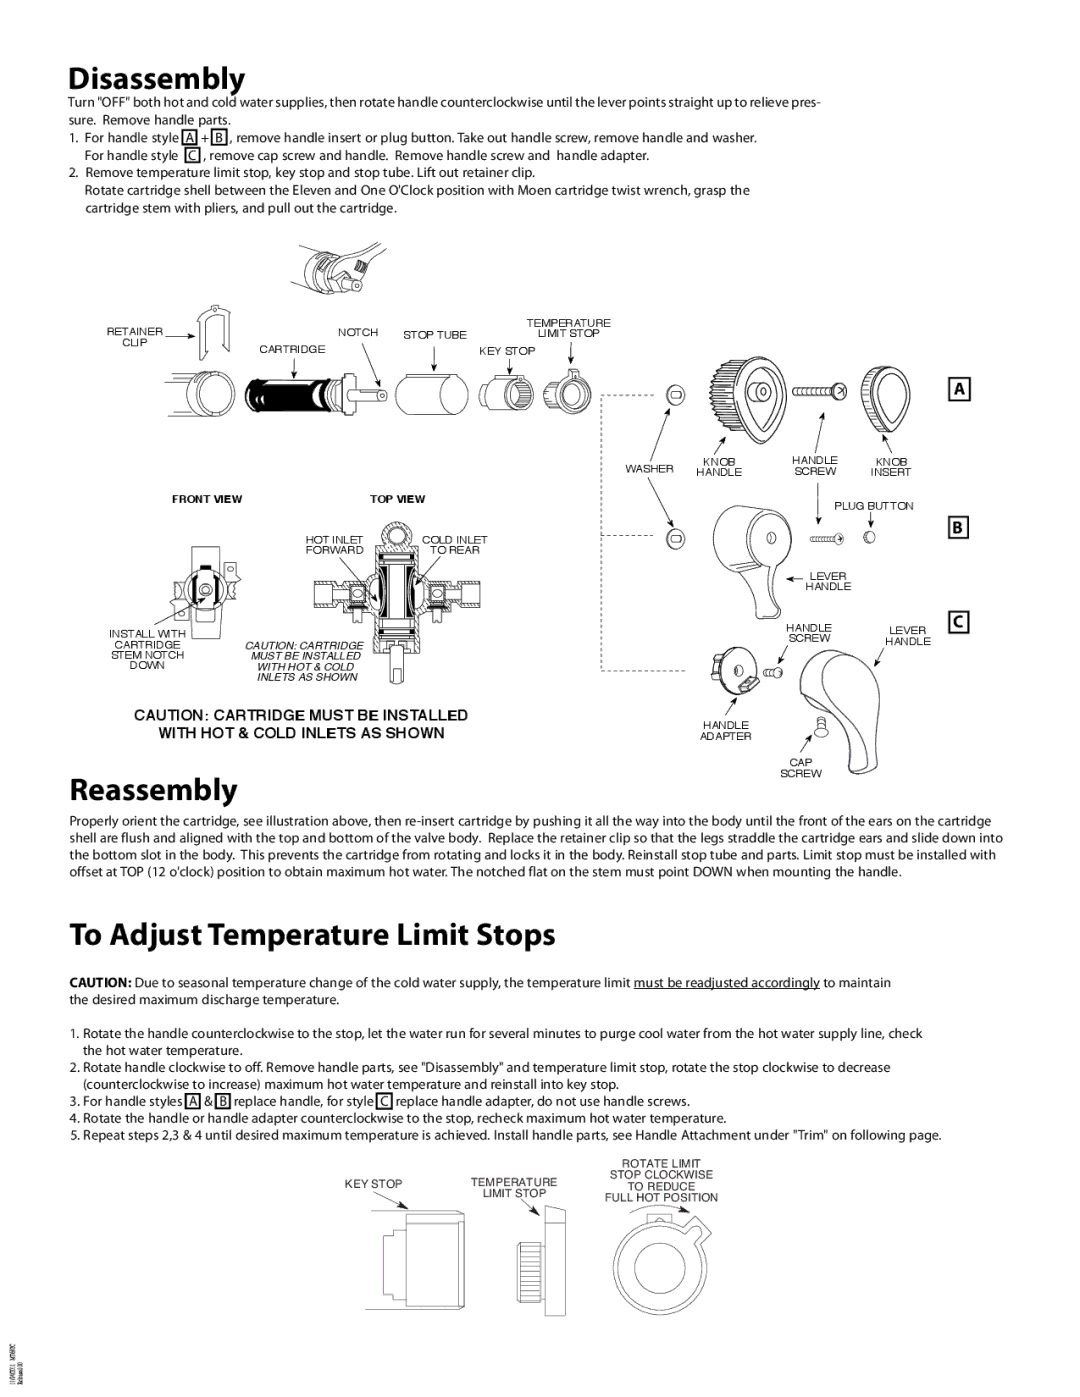
Turn "OFF" both hot and cold water supplies, then rotate handle counterclockwise until the lever points straight up to relieve pres- sure. Remove handle parts.

1.For handle style A + B , remove handle insert or plug button. Take out handle screw, remove handle and washer. For handle style C , remove cap screw and handle. Remove handle screw and handle adapter.

2.Remove temperature limit stop, key stop and stop tube. Lift out retainer clip.

Rotate cartridge shell between the Eleven and One O'Clock position with Moen cartridge twist wrench, grasp the cartridge stem with pliers, and pull out the cartridge.

RETAINER￿


NOTCH


TEMPERATURE￿


STOP TUBE

LIMIT STOP

CLIP

CARTRIDGE


KEY STOP


WASHER

KNOB￿

HANDLE￿

KNOB￿


HANDLE

SCREW

INSERT

FRONT VIEW

TOP VIEW


PLUG BUTTON


HOT INLET￿

COLD INLET￿


FORWARD

TO REAR


LEVER￿


HANDLE


INSTALL WITH￿


HANDLE￿

LEVER￿


SCREW


HANDLE

CARTRIDGE￿

CAUTION: CARTRIDGE


STEM NOTCH￿

MUST BE INSTALLED


DOWN

WITH HOT & COLD


INLETS AS SHOWN


CAUTION: CARTRIDGE MUST BE INSTALLED

HANDLE￿


WITH HOT & COLD INLETS AS SHOWN


ADAPTER


CAP￿

SCREW

Reassembly

A

B

C

Properly orient the cartridge, see illustration above, then re-insert cartridge by pushing it all the way into the body until the front of the ears on the cartridge shell are flush and aligned with the top and bottom of the valve body. Replace the retainer clip so that the legs straddle the cartridge ears and slide down into the bottom slot in the body. This prevents the cartridge from rotating and locks it in the body. Reinstall stop tube and parts. Limit stop must be installed with offset at TOP (12 o'clock) position to obtain maximum hot water. The notched flat on the stem must point DOWN when mounting the handle.

To Adjust Temperature Limit Stops

CAUTION: Due to seasonal temperature change of the cold water supply, the temperature limit must be readjusted accordingly to maintain the desired maximum discharge temperature.

1.Rotate the handle counterclockwise to the stop, let the water run for several minutes to purge cool water from the hot water supply line, check the hot water temperature.

2.Rotate handle clockwise to off. Remove handle parts, see "Disassembly" and temperature limit stop, rotate the stop clockwise to decrease (counterclockwise to increase) maximum hot water temperature and reinstall into key stop.

3.For handle styles A & B replace handle, for style C replace handle adapter, do not use handle screws.

4.Rotate the handle or handle adapter counterclockwise to the stop, recheck maximum hot water temperature.

5.Repeat steps 2,3 & 4 until desired maximum temperature is achieved. Install handle parts, see Handle Attachment under "Trim" on following page.


ROTATE LIMIT


TEMPERATURE

STOP CLOCKWISE

KEY STOP


TO REDUCE


LIMIT STOP

FULL HOT POSITION


Page 3
Image 3
Moen TL182, TL181, TL183, TL191, 62300, 12242, 12342, 12189, 12341 Disassembly, Reassembly, To Adjust Temperature Limit Stops

62300, 12342, 12189, 12242, 12341 specifications

Moen has established itself as a leading brand in the realm of kitchen and bathroom fixtures, and its TL183CP, TL183P, TL182CP, TL182, and TL183 faucets are testament to the brand’s commitment to quality, innovation, and style. Each model showcases unique features and cutting-edge technologies that enhance user experience while ensuring aesthetic appeal.

The Moen TL183 series boasts a sleek, modern design characterized by its smooth lines and polished finishes, seamlessly integrating into various decor styles. The faucets are available in chrome, which provides a reflective, shiny surface, as well as other finishes, allowing homeowners to choose based on personal preference and kitchen or bathroom scheme.

A standout feature of these faucets is Moen’s Spot Resist technology. This innovative coating helps to minimize water spots and fingerprints, keeping the faucet looking clean and allowing for easy maintenance. This is particularly valuable in busy kitchens or bathrooms where aesthetics can quickly deteriorate.

The TL183 and TL182 models come equipped with the Duralock Quick Connect system. This technology simplifies installation, allowing homeowners to easily connect and disconnect the water supply lines without the need for additional tools. This not only saves time during installation but also provides peace of mind knowing that the connections are secure.

Another noteworthy characteristic is the incorporation of Moen’s Reflex system in the TL183P and TL182CP models. This advanced feature offers smooth operation of the spray head, allowing for greater flexibility and range of motion. The spray head retracts seamlessly, which prevents tangling and ensures that the user can easily switch between different spray modes, including a powerful spray for cleaning and a gentle stream for filling pots.

All models in the TL183 series are designed for comfort and usability, featuring ergonomic handles that allow for easy temperature adjustment. The inclusion of the lasting and durable cartridge technology ensures that the faucets maintain consistent performance over time without the risk of leaks.

In summary, the Moen TL183CP, TL183P, TL182CP, TL182, and TL183 faucets embody the perfect blend of style, technology, and functionality. With features like Spot Resist technology, Duralock Quick Connect, and the Reflex system, these faucets not only enhance the beauty of your sinks but also elevate the everyday experience of your kitchen or bathroom. They are a prime example of how innovation in design can lead to practical solutions in home interiors.