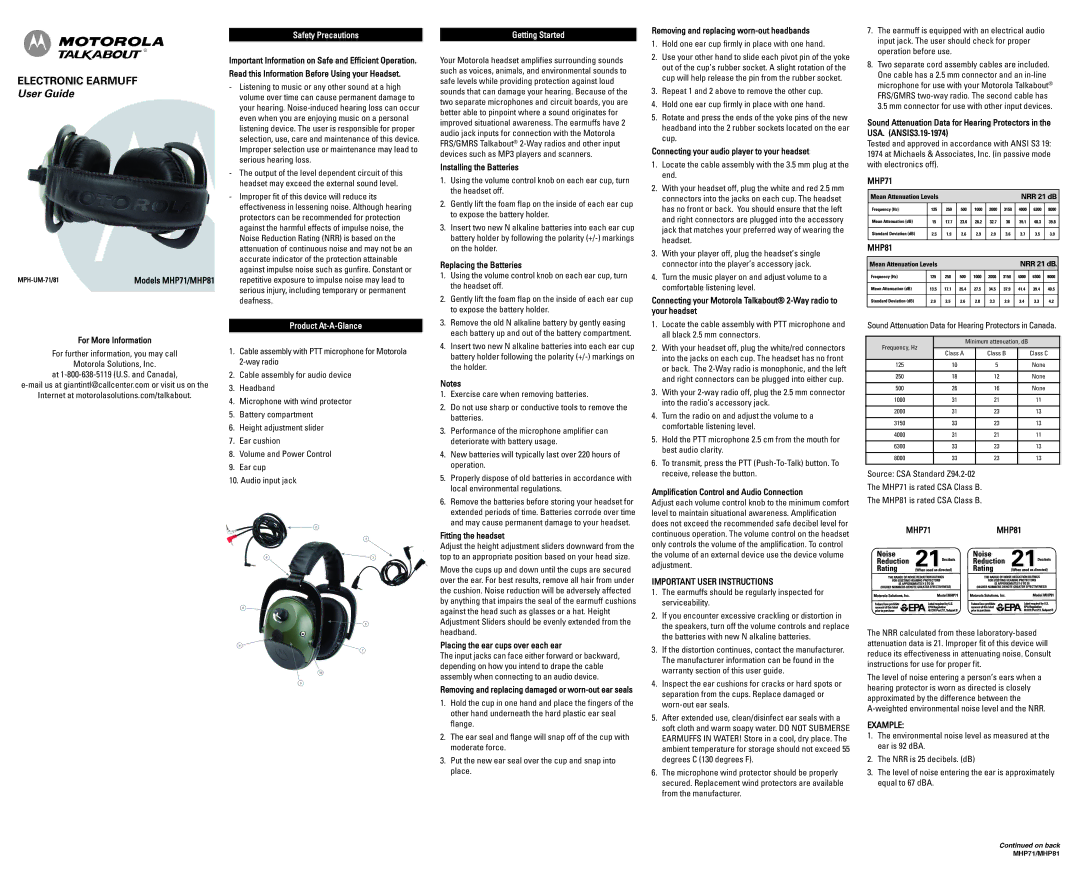
ELECTRONIC EARMUFF
User Guide
MPH-UM-71/81 | Models MHP71/MHP81 |
For More Information
For further information, you may call
Motorola Solutions, Inc.
at 1-800-638-5119 (U.S. and Canada),
e-mail us at giantintl@callcenter.com or visit us on the
Internet at motorolasolutions.com/talkabout.
Safety Precautions
Important Information on Safe and Efficient Operation. Read this Information Before Using your Headset.
-Listening to music or any other sound at a high volume over time can cause permanent damage to your hearing. Noise-induced hearing loss can occur even when you are enjoying music on a personal listening device. The user is responsible for proper selection, use, care and maintenance of this device. Improper selection use or maintenance may lead to serious hearing loss.
-The output of the level dependent circuit of this headset may exceed the external sound level.
-Improper fit of this device will reduce its effectiveness in lessening noise. Although hearing protectors can be recommended for protection against the harmful effects of impulse noise, the Noise Reduction Rating (NRR) is based on the attenuation of continuous noise and may not be an accurate indicator of the protection attainable against impulse noise such as gunfire. Constant or repetitive exposure to impulse noise may lead to serious injury, including temporary or permanent deafness.
Product At-A-Glance
1.Cable assembly with PTT microphone for Motorola 2-way radio
2.Cable assembly for audio device
3.Headband
4.Microphone with wind protector
5.Battery compartment
6.Height adjustment slider
7.Ear cushion
8.Volume and Power Control
9.Ear cup
10.Audio input jack
Getting Started
Your Motorola headset amplifies surrounding sounds such as voices, animals, and environmental sounds to safe levels while providing protection against loud sounds that can damage your hearing. Because of the two separate microphones and circuit boards, you are better able to pinpoint where a sound originates for improved situational awareness. The earmuffs have 2 audio jack inputs for connection with the Motorola FRS/GMRS Talkabout® 2-Way radios and other input devices such as MP3 players and scanners.
Installing the Batteries
1.Using the volume control knob on each ear cup, turn the headset off.
2.Gently lift the foam flap on the inside of each ear cup to expose the battery holder.
3.Insert two new N alkaline batteries into each ear cup battery holder by following the polarity (+/-) markings on the holder.
Replacing the Batteries
1.Using the volume control knob on each ear cup, turn the headset off.
2.Gently lift the foam flap on the inside of each ear cup to expose the battery holder.
3.Remove the old N alkaline battery by gently easing each battery up and out of the battery compartment.
4.Insert two new N alkaline batteries into each ear cup battery holder following the polarity (+/-) markings on the holder.
Notes
1.Exercise care when removing batteries.
2.Do not use sharp or conductive tools to remove the batteries.
3.Performance of the microphone amplifier can deteriorate with battery usage.
4.New batteries will typically last over 220 hours of operation.
5.Properly dispose of old batteries in accordance with local environmental regulations.
6.Remove the batteries before storing your headset for extended periods of time. Batteries corrode over time and may cause permanent damage to your headset.
Fitting the headset
Adjust the height adjustment sliders downward from the top to an appropriate position based on your head size.
Move the cups up and down until the cups are secured over the ear. For best results, remove all hair from under the cushion. Noise reduction will be adversely affected by anything that impairs the seal of the earmuff cushions against the head such as glasses or a hat. Height Adjustment Sliders should be evenly extended from the headband.
Placing the ear cups over each ear
The input jacks can face either forward or backward, depending on how you intend to drape the cable assembly when connecting to an audio device.
Removing and replacing damaged or worn-out ear seals
1.Hold the cup in one hand and place the fingers of the other hand underneath the hard plastic ear seal flange.
2.The ear seal and flange will snap off of the cup with moderate force.
3.Put the new ear seal over the cup and snap into place.
Removing and replacing worn-out headbands
1.Hold one ear cup firmly in place with one hand.
2.Use your other hand to slide each pivot pin of the yoke out of the cup’s rubber socket. A slight rotation of the cup will help release the pin from the rubber socket.
3.Repeat 1 and 2 above to remove the other cup.
4.Hold one ear cup firmly in place with one hand.
5.Rotate and press the ends of the yoke pins of the new headband into the 2 rubber sockets located on the ear cup.
Connecting your audio player to your headset
1.Locate the cable assembly with the 3.5 mm plug at the end.
2.With your headset off, plug the white and red 2.5 mm connectors into the jacks on each cup. The headset has no front or back. You should ensure that the left and right connectors are plugged into the accessory jack that matches your preferred way of wearing the headset.
3.With your player off, plug the headset’s single connector into the player’s accessory jack.
4.Turn the music player on and adjust volume to a comfortable listening level.
Connecting your Motorola Talkabout® 2-Way radio to your headset
1.Locate the cable assembly with PTT microphone and all black 2.5 mm connectors.
2.With your headset off, plug the white/red connectors into the jacks on each cup. The headset has no front or back. The 2-Way radio is monophonic, and the left and right connectors can be plugged into either cup.
3.With your 2-way radio off, plug the 2.5 mm connector into the radio’s accessory jack.
4.Turn the radio on and adjust the volume to a comfortable listening level.
5.Hold the PTT microphone 2.5 cm from the mouth for best audio clarity.
6.To transmit, press the PTT (Push-To-Talk) button. To receive, release the button.
Amplification Control and Audio Connection
Adjust each volume control knob to the minimum comfort level to maintain situational awareness. Amplification does not exceed the recommended safe decibel level for continuous operation. The volume control on the headset only controls the volume of the amplification. To control the volume of an external device use the device volume adjustment.
IMPORTANT USER INSTRUCTIONS
1.The earmuffs should be regularly inspected for serviceability.
2.If you encounter excessive crackling or distortion in the speakers, turn off the volume controls and replace the batteries with new N alkaline batteries.
3.If the distortion continues, contact the manufacturer. The manufacturer information can be found in the warranty section of this user guide.
4.Inspect the ear cushions for cracks or hard spots or separation from the cups. Replace damaged or worn-out ear seals.
5.After extended use, clean/disinfect ear seals with a soft cloth and warm soapy water. DO NOT SUBMERSE EARMUFFS IN WATER! Store in a cool, dry place. The ambient temperature for storage should not exceed 55 degrees C (130 degrees F).
6.The microphone wind protector should be properly secured. Replacement wind protectors are available from the manufacturer.
7.The earmuff is equipped with an electrical audio input jack. The user should check for proper operation before use.
8.Two separate cord assembly cables are included. One cable has a 2.5 mm connector and an in-line microphone for use with your Motorola Talkabout® FRS/GMRS two-way radio. The second cable has 3.5 mm connector for use with other input devices.
Sound Attenuation Data for Hearing Protectors in the USA. (ANSIS3.19-1974)
Tested and approved in accordance with ANSI S3 19: 1974 at Michaels & Associates, Inc. (in passive mode with electronics off).
MHP71
MHP81
Sound Attenuation Data for Hearing Protectors in Canada.
Frequency, Hz | | Minimum attenuation, dB | |
Class A | | Class B | | Class C |
| | |
125 | 10 | | 5 | | None |
| | | | | |
250 | 18 | | 12 | | None |
| | | | | |
500 | 26 | | 16 | | None |
| | | | | |
1000 | 31 | | 21 | | 11 |
| | | | | |
2000 | 31 | | 23 | | 13 |
| | | | | |
3150 | 33 | | 23 | | 13 |
| | | | | |
4000 | 31 | | 21 | | 11 |
| | | | | |
6300 | 33 | | 23 | | 13 |
| | | | | |
8000 | 33 | | 23 | | 13 |
| | | | | |
Source: CSA Standard Z94.2-02
The MHP71 is rated CSA Class B.
The MHP81 is rated CSA Class B.
MHP71MHP81
The NRR calculated from these laboratory-based attenuation data is 21. Improper fit of this device will reduce its effectiveness in attenuating noise. Consult instructions for use for proper fit.
The level of noise entering a person’s ears when a hearing protector is worn as directed is closely approximated by the difference between the A-weighted environmental noise level and the NRR.
EXAMPLE:
1.The environmental noise level as measured at the ear is 92 dBA.
2.The NRR is 25 decibels. (dB)
3.The level of noise entering the ear is approximately equal to 67 dBA.