•With engine on level ground, oil must be to FULL mark on dipstick. See Figure 10.
•Stop engine and wait several minutes before checking oil level. Remove oil fill cap and dipstick.
•Wipe dipstick clean, insert it into oil fill hole and tighten securely.
•Remove dipstick and check. If oil is not up to the FULL mark on dipstick, add oil.
A |
|
| B |
|
| Dipstick | Fill up if |
|
| needed | |
|
|
| |
| 8 | L |
|
| L |
| |
| o | U |
|
| z | F | C |
| . |
| |
|
|
| |
Read oil | D |
| Tighten |
D |
| ||
A |
| dipstick | |
level |
|
| |
|
|
|
Figure 10
Change Oil
Change engine oil after first two hours of operation and every 25 hours thereafter.
In order to change oil, you will have to first drain the used engine oil from the engine and then refill with fresh oil.
•Drain oil while engine is warm. Remove oil drain plug located at the bottom of the recoil starter of the engine. Catch oil in a suitable container.
•When engine is drained of all oil, replace drain plug securely.
•Remove the dipstick from the oil fill. For location of the oil fill, see Figure 6. Pour fresh oil slowly through the plug. Replace dipstick.
•Check and make sure that the level of oil is up to the FULL mark on the dipstick.
Service Spark Plug
Clean spark plug and reset the electrode gap to 0.030" at least once a season or every 100 hours of operation; replace every 200 hours of operation.
•Clean area around the spark plug base.
•Remove and inspect the spark plug.
•Replace the spark plug if electrodes are pitted, burned, or the porcelain is cracked. See Figure 11.
NOTE: Do not sandblast spark plug. Spark plug should be cleaned by scraping or wire brushing and washing with a commercial solvent.
Electrodes
.030” | Porcelain |
Gap |
Figure 11
Check V-Belts
Follow instructions below to check condition of drive belts every 50 hours of operation.
•Remove the plastic belt cover on the front of the engine by removing the
•Visually inspect for frayed, cracked, or excessively worn out belts. Replace, if necessary, following instructions on page 13.
SECTION 7: SERVICING YOUR SNOW THROWER
WARNING: Before servicing, repairing, or inspecting, disengage all controls and stop engine. Wait until all moving parts have come to a complete stop. Disconnect spark plug wire and ground it against the engine to prevent unintended starting. Always wear safety glasses during operation or while performing any adjustments or repairs.
Shave Plate and Skid Shoes
The shave plate and skid shoes on the bottom of the snow thrower are subject to wear. These should be checked periodically and replaced when necessary.
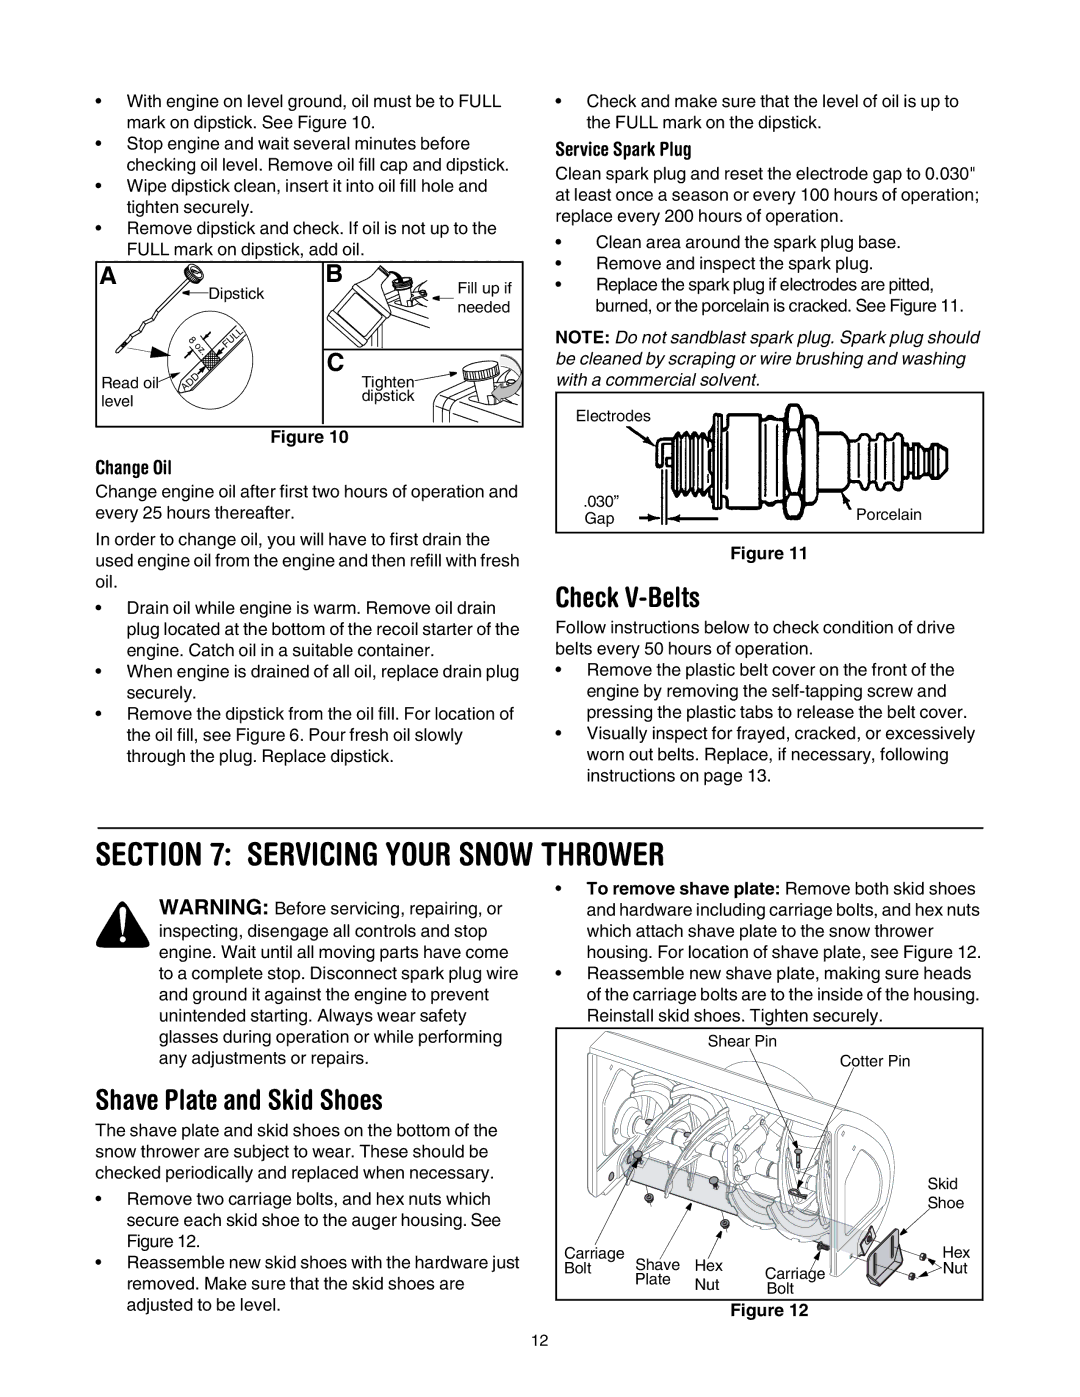
•Remove two carriage bolts, and hex nuts which secure each skid shoe to the auger housing. See Figure 12.
•Reassemble new skid shoes with the hardware just removed. Make sure that the skid shoes are adjusted to be level.
•To remove shave plate: Remove both skid shoes and hardware including carriage bolts, and hex nuts which attach shave plate to the snow thrower housing. For location of shave plate, see Figure 12.
•Reassemble new shave plate, making sure heads of the carriage bolts are to the inside of the housing. Reinstall skid shoes. Tighten securely.
|
| Shear Pin |
| |
|
|
|
| Cotter Pin |
|
|
|
| Skid |
|
|
|
| Shoe |
Carriage | Shave | Hex |
| Hex |
Bolt | Carriage | Nut | ||
| Plate | Nut |
| |
| Bolt |
| ||
|
|
| ||
Figure 12
12