SECTION 2: ASSEMBLING YOUR TILLER

This instruction manual covers several different model tillers. Follow only those instructions which pertain to your unit.

To Remove Unit From Carton

Remove staples, break glue on top flaps, or cut tape at carton end and peel along top flap to open carton.

Remove loose parts included with unit (i.e., operator’s manual, etc.).

Cut corners and lay carton down flat.

Remove packing material.

Roll or slide unit out of carton. Check carton thoroughly for loose parts.

Extend control cable and lay on the floor. Be careful not to bend or kink control cable.

IMPORTANT: The Engine is shipped WITHOUT GASOLINE or OIL. After assembly, see separate engine manual for proper fuel and engine oil recommendations.

NOTE: Left and right is determined from the operator’s position, standing behind the tiller.

Loose Parts In Carton

(1) Depth Stake

(1)Handle Assembly

(1)Shift Rod

(1)Handle Adjustment Rod (Model 420 series only)

NOTE: All hardware needed for assembly is attached to the loose parts or the tiller.

Tip the tiller forward so it rests on front counterweight.

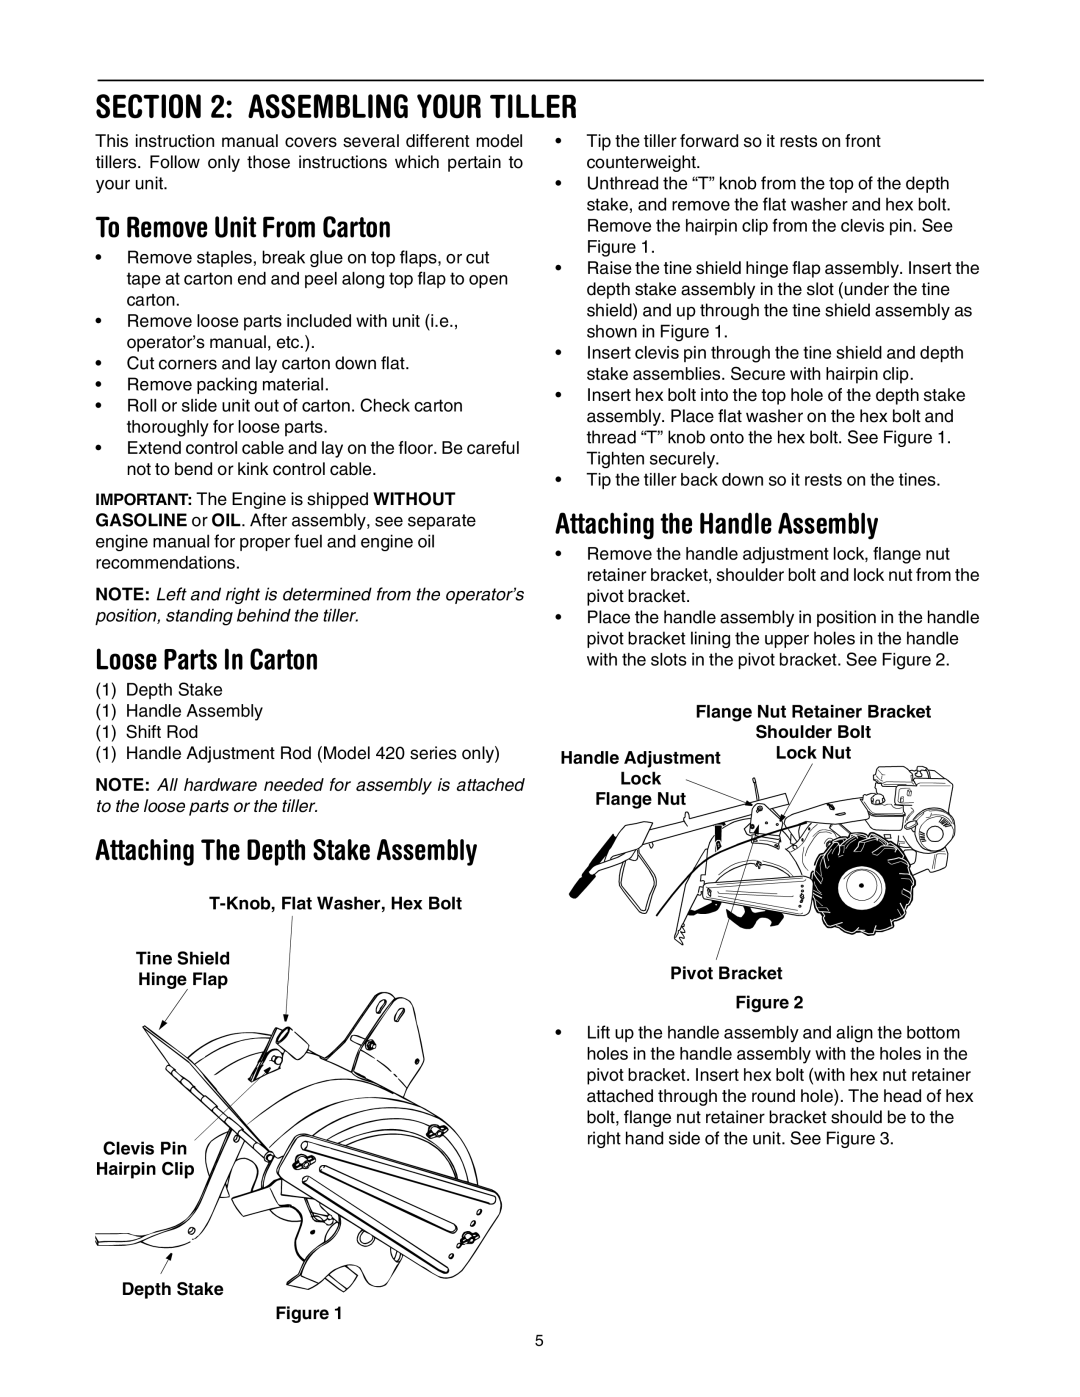
Unthread the “T” knob from the top of the depth stake, and remove the flat washer and hex bolt. Remove the hairpin clip from the clevis pin. See Figure 1.

Raise the tine shield hinge flap assembly. Insert the depth stake assembly in the slot (under the tine shield) and up through the tine shield assembly as shown in Figure 1.

Insert clevis pin through the tine shield and depth stake assemblies. Secure with hairpin clip.

Insert hex bolt into the top hole of the depth stake assembly. Place flat washer on the hex bolt and thread “T” knob onto the hex bolt. See Figure 1. Tighten securely.

Tip the tiller back down so it rests on the tines.

Attaching the Handle Assembly

Remove the handle adjustment lock, flange nut retainer bracket, shoulder bolt and lock nut from the pivot bracket.

Place the handle assembly in position in the handle pivot bracket lining the upper holes in the handle with the slots in the pivot bracket. See Figure 2.

Flange Nut Retainer Bracket

Shoulder Bolt

Handle Adjustment

Lock Nut


Lock


Flange Nut


Attaching The Depth Stake Assembly

T-Knob, Flat Washer, Hex Bolt

Tine Shield

Pivot Bracket

Hinge Flap


Clevis Pin

Hairpin Clip

Figure 2

Lift up the handle assembly and align the bottom holes in the handle assembly with the holes in the pivot bracket. Insert hex bolt (with hex nut retainer attached through the round hole). The head of hex bolt, flange nut retainer bracket should be to the right hand side of the unit. See Figure 3.

Depth Stake Figure 1

5

Page 5
Image 5
MTD 410 Thru 420 Assembling Your Tiller, To Remove Unit From Carton, Loose Parts In Carton, Attaching the Handle Assembly

410 Thru 420 specifications

The MTD 410 through 420 models represent a significant advancement in outdoor power equipment, tailored for both amateur and professional gardeners. These machines are designed with user efficiency and comfort in mind, boasting a variety of features, technologies, and characteristics that enhance their performance and usability.

One of the standout features of the MTD 410 to 420 series is their powerful engines. Equipped with reliable four-stroke engines, these mowers provide ample power to tackle various terrains and vegetation types. The engines are designed to offer superior fuel efficiency, lower emissions, and reduced noise pollution, making them eco-friendly choices for environmentally conscious users.

The cutting technology in the MTD series is noteworthy. With adjustable cutting heights ranging from one to four inches, users can customize the mower's height based on the specific needs of their lawn or garden. The sharp, durable blades ensure a clean cut, promoting healthier grass growth and a neat appearance.

Ergonomics are a key focus in the design of the MTD 410 through 420. The models feature cushioned seats and adjustable handlebars, allowing for comfortable operation over extended periods. Additionally, the lightweight construction of these mowers ensures easy maneuverability and reduces operator fatigue, making it ideal for larger properties.

Another essential aspect of these models is their innovative technology. The MTD 410 to 420 are equipped with a self-propelling feature that helps adjust the mowing speed to match the user's pace, making cutting grass less strenuous. Furthermore, many of these mowers include a mulching capability, allowing clippings to be finely chopped and returned to the lawn as natural fertilizer, which aids in lawn health and reduces waste.

Durability and maintenance ease are also prioritized in these models. The robust metal frames and high-quality components ensure longevity, while easily accessible parts simplify routine maintenance.

Overall, the MTD 410 through 420 series combines power, user comfort, and innovative technology to create a range of mowers that cater to both the casual gardener and the dedicated lawn care professional. Whether it’s for residential or commercial use, these models stand out for their performance and reliability in outdoor maintenance tasks.