DigiComp16booklet 1/23/03 12:01 PM Page 20

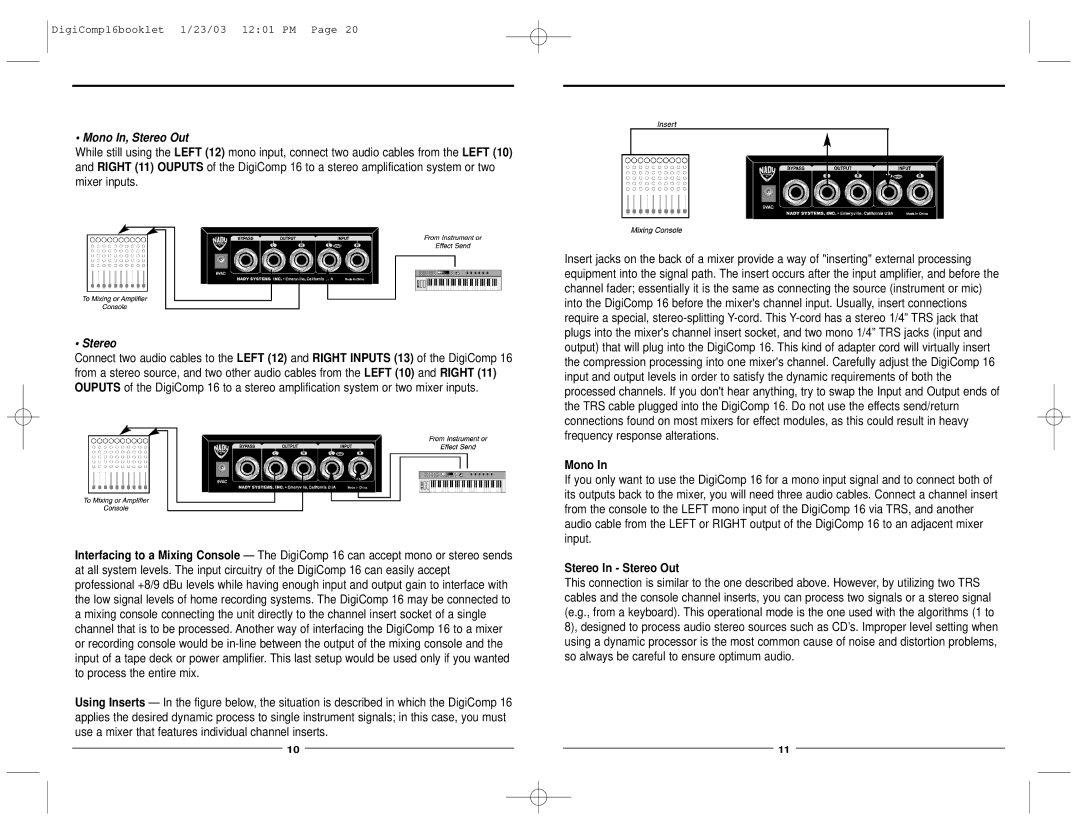
• Mono In, Stereo Out

While still using the LEFT (12) mono input, connect two audio cables from the LEFT (10) and RIGHT (11) OUPUTS of the DigiComp 16 to a stereo amplification system or two mixer inputs.

• Stereo

Connect two audio cables to the LEFT (12) and RIGHT INPUTS (13) of the DigiComp 16 from a stereo source, and two other audio cables from the LEFT (10) and RIGHT (11) OUPUTS of the DigiComp 16 to a stereo amplification system or two mixer inputs.

Interfacing to a Mixing Console — The DigiComp 16 can accept mono or stereo sends at all system levels. The input circuitry of the DigiComp 16 can easily accept professional +8/9 dBu levels while having enough input and output gain to interface with the low signal levels of home recording systems. The DigiComp 16 may be connected to a mixing console connecting the unit directly to the channel insert socket of a single channel that is to be processed. Another way of interfacing the DigiComp 16 to a mixer or recording console would be in-line between the output of the mixing console and the input of a tape deck or power amplifier. This last setup would be used only if you wanted to process the entire mix.

Using Inserts — In the figure below, the situation is described in which the DigiComp 16 applies the desired dynamic process to single instrument signals; in this case, you must use a mixer that features individual channel inserts.

10

Insert jacks on the back of a mixer provide a way of "inserting" external processing equipment into the signal path. The insert occurs after the input amplifier, and before the channel fader; essentially it is the same as connecting the source (instrument or mic) into the DigiComp 16 before the mixer's channel input. Usually, insert connections require a special, stereo-splitting Y-cord. This Y-cord has a stereo 1/4” TRS jack that plugs into the mixer's channel insert socket, and two mono 1/4” TRS jacks (input and output) that will plug into the DigiComp 16. This kind of adapter cord will virtually insert the compression processing into one mixer's channel. Carefully adjust the DigiComp 16 input and output levels in order to satisfy the dynamic requirements of both the processed channels. If you don't hear anything, try to swap the Input and Output ends of the TRS cable plugged into the DigiComp 16. Do not use the effects send/return connections found on most mixers for effect modules, as this could result in heavy frequency response alterations.

Mono In

If you only want to use the DigiComp 16 for a mono input signal and to connect both of its outputs back to the mixer, you will need three audio cables. Connect a channel insert from the console to the LEFT mono input of the DigiComp 16 via TRS, and another audio cable from the LEFT or RIGHT output of the DigiComp 16 to an adjacent mixer input.

Stereo In - Stereo Out

This connection is similar to the one described above. However, by utilizing two TRS cables and the console channel inserts, you can process two signals or a stereo signal (e.g., from a keyboard). This operational mode is the one used with the algorithms (1 to 8), designed to process audio stereo sources such as CD’s. Improper level setting when using a dynamic processor is the most common cause of noise and distortion problems, so always be careful to ensure optimum audio.

11

Page 10
Image 10
Nady Systems dig comp 16 owner manual Mono In, Stereo Out, Stereo In Stereo Out

dig comp 16 specifications

Nady Systems has long been recognized for its commitment to innovation in the field of wireless audio technology. Among its range of products, the dig comp 16 stands out as a sophisticated digital compressor that caters to musicians, sound engineers, and audio professionals seeking high-quality audio processing tools. This device integrates advanced technologies to provide superior sound control and dynamic processing.

One of the dig comp 16's main features is its 16 presets, which offer a wide variety of compression settings tailored to different instruments and vocal performances. This versatility enables users to select the ideal settings for any application, whether in the studio or during live performances. Each preset has been meticulously crafted to suit genres ranging from rock to jazz, ensuring that users can achieve their desired sound quickly and efficiently.

The dig comp 16 is equipped with an intuitive user interface, making it accessible for both beginners and seasoned professionals. The large LCD display clearly shows the chosen preset, gain reduction, threshold, attack, and release settings, allowing users to monitor their adjustments in real time. The control layout is designed for straightforward navigation, enabling quick tweaks without interrupting the flow of a live performance or studio session.

Incorporating advanced digital signal processing technologies, the dig comp 16 delivers high fidelity sound without introducing unwanted artifacts. Its low noise floor and high dynamic range make it suitable for a wide range of audio sources, preserving the integrity of recordings while providing the necessary dynamic control. The device also features adjustable parameters for fine-tuning the output, including ratio and makeup gain, allowing users to customize their sound to perfection.

Another notable characteristic of the dig comp 16 is its durability and robust build quality. Constructed with high-quality materials, the device is designed to withstand the rigors of frequent use in professional environments. This reliability ensures that the dig comp 16 is a trusted partner for audio engineers on tour or in the studio.

Overall, the Nady Systems dig comp 16 is a powerful tool for those in the audio field. Its combination of user-friendly features, advanced processing capabilities, and build quality makes it an excellent choice for achieving optimal sound control in various audio applications. Whether you're a seasoned professional or a hobbyist, the dig comp 16 promises to elevate your audio experience and help you craft the perfect mix.