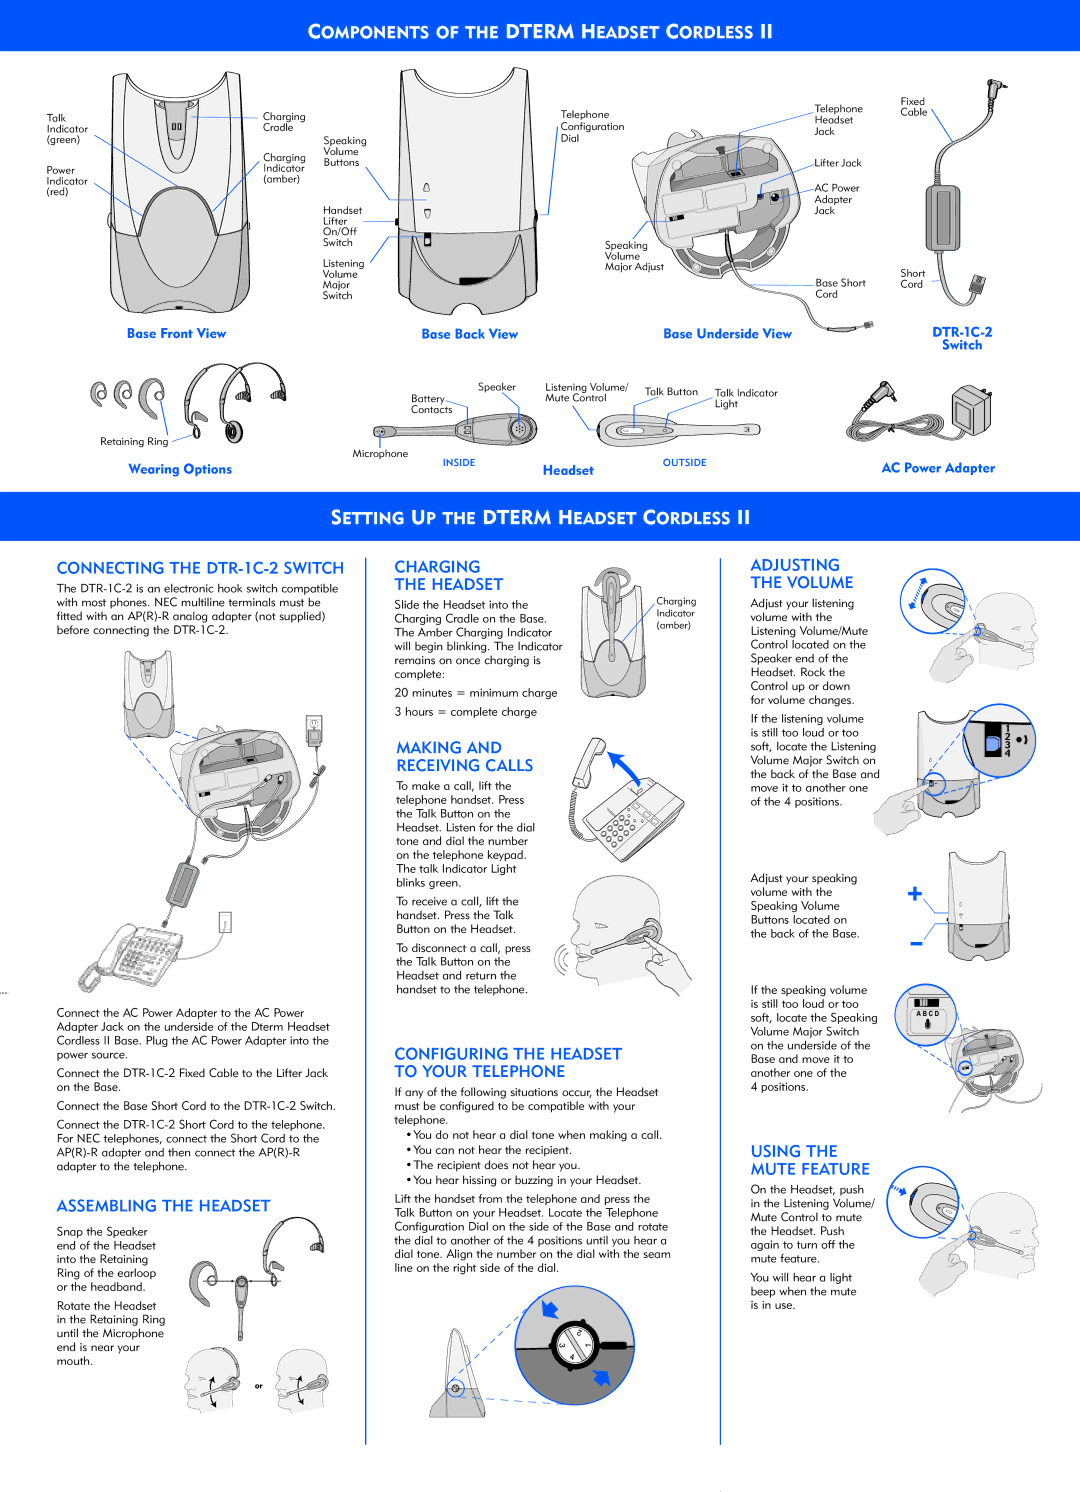
COMPONENTS OF THE DTERM HEADSET CORDLESS II
Talk Indicator (green)
Power Indicator (red)
Charging |
|
| |
Cradle |
|
| |
| Speaking | ||
Charging | Volume | ||
Buttons | |||
Indicator | |||
|
| ||
(amber) |
|
| |
| Handset | ||
| Lifter |
| |
|
| ||
| On/Off | ||
| Switch | ||
| Listening | ||
| Volume | ||
| Major | ||
| Switch | ||
| Telephone | Fixed | |
Telephone | Cable | ||
Headset | |||
Configuration |
| ||
Jack |
| ||
Dial |
| ||
|
| ||
| Lifter Jack |
| |
| AC Power |
| |
| Adapter |
| |
| Jack |
|
Speaking
Volume
Major Adjust
Short
Base Short Cord
Cord
Base Front View | Base Back View | Base Underside View |
|
|
|
| Switch |
| Speaker | Listening Volume/ | Talk Button | Talk Indicator |
| Battery | Mute Control | ||
|
| Light | ||
| Contacts |
|
| |
|
|
|
| |
Retaining Ring | Microphone |
|
|
|
|
| OUTSIDE |
| |
Wearing Options | INSIDE | Headset |
| |
|
|
|
AC Power Adapter
SETTING UP THE DTERM HEADSET CORDLESS II
CONNECTING THE DTR-1C-2 SWITCH
The
Connect the AC Power Adapter to the AC Power Adapter Jack on the underside of the Dterm Headset Cordless II Base. Plug the AC Power Adapter into the power source.
Connect the
Connect the Base Short Cord to the
Connect the
ASSEMBLING THE HEADSET
Snap the Speaker end of the Headset into the Retaining Ring of the earloop or the headband.
Rotate the Headset in the Retaining Ring until the Microphone end is near your mouth.
CHARGING
THE HEADSET
Slide the Headset into the | Charging | |
Charging Cradle on the Base. | Indicator | |
(amber) | ||
The Amber Charging Indicator | ||
|
will begin blinking. The Indicator remains on once charging is complete:
20 minutes = minimum charge
3 hours = complete charge
MAKING AND
RECEIVING CALLS
To make a call, lift the telephone handset. Press the Talk Button on the Headset. Listen for the dial tone and dial the number on the telephone keypad. The talk Indicator Light blinks green.
To receive a call, lift the handset. Press the Talk Button on the Headset.
To disconnect a call, press the Talk Button on the Headset and return the handset to the telephone.
CONFIGURING THE HEADSET
TO YOUR TELEPHONE
If any of the following situations occur, the Headset must be configured to be compatible with your telephone.
•You do not hear a dial tone when making a call. •You can not hear the recipient.
•The recipient does not hear you.
•You hear hissing or buzzing in your Headset.
Lift the handset from the telephone and press the Talk Button on your Headset. Locate the Telephone Configuration Dial on the side of the Base and rotate the dial to another of the 4 positions until you hear a dial tone. Align the number on the dial with the seam line on the right side of the dial.
ADJUSTING THE VOLUME
Adjust your listening volume with the Listening Volume/Mute Control located on the Speaker end of the Headset. Rock the Control up or down for volume changes.
If the listening volume is still too loud or too soft, locate the Listening Volume Major Switch on the back of the Base and move it to another one of the 4 positions.
Adjust your speaking volume with the Speaking Volume Buttons located on the back of the Base.
If the speaking volume is still too loud or too soft, locate the Speaking Volume Major Switch on the underside of the Base and move it to another one of the
4 positions.
USING THE MUTE FEATURE
On the Headset, push in the Listening Volume/ Mute Control to mute the Headset. Push again to turn off the mute feature.
You will hear a light beep when the mute is in use.
+
–
or