GS605AV_IG_08Dec09.fm Page 1 Tuesday, December 8, 2009 7:53 PM
)NSTALLATION 'UIDE
Estimated installation time:
Package Contents
The package includes:
•
•Power adapter
•Installation Guide (this document)
•Warranty/Support information card
Prepare to Install the Switch
Decide where you want to place the switch. Find a flat horizontal surface such as a table, desk or shelf.
Make sure the selected location is:
•Not in direct sunlight or near a heater or heating vent.
•Not cluttered or crowded. There should be at least 2 inches (5 cm) of clear space on all sides of the switch.
•Well ventilated (especially if it is in a closet).
Note: The switch is not designed to be stacked on top of other devices.
Depending on the speed of your network devices, you need a Category 3 (10 Mbps), Category 5 (100 Mbps), or Category 5e (1000 Mbps) Ethernet cable with
Install the Switch and Connect the Other Devices
1.Place the switch on a flat surface.
2.For each device, insert one end of an Ethernet cable into the port in the device and insert the other end into one of the Ethernet ports on the switch. If you have more devices to connect than the number of ports on the switch, connect the devices to another switch or hub and then connect that switch or hub to this switch.
3.If you add devices using another switch or hub, make sure the QoS category of the devices match the GS605AV port used by the switch or hub.
| Modem |
| Broadband |
GS605AV | Router |
|
High priorityrport: dark green
Medium priority ports: light green
Low priority ports: yellow
Note: The GS605AV will optimize audio/video streaming prioritization if it can recognize the pattern. If the GS605AV cannot recognize the pattern, you still can use
4.Connect the power adapter cord into the back of the switch and then plug the adapter into a power source (such as a wall socket or power strip).
5.Check the LEDs to confirm that the switch is connected correctly.
•The Power LED is lit.
•Each port on the back has associated with it a bicolor LED on the front.
–Green: 1000 Mbps link
–Amber: 10 Mbps or 100 Mbps link
–Blinking: Activity
Note: If any light does not operate as indicated, go to the Troubleshooting section.
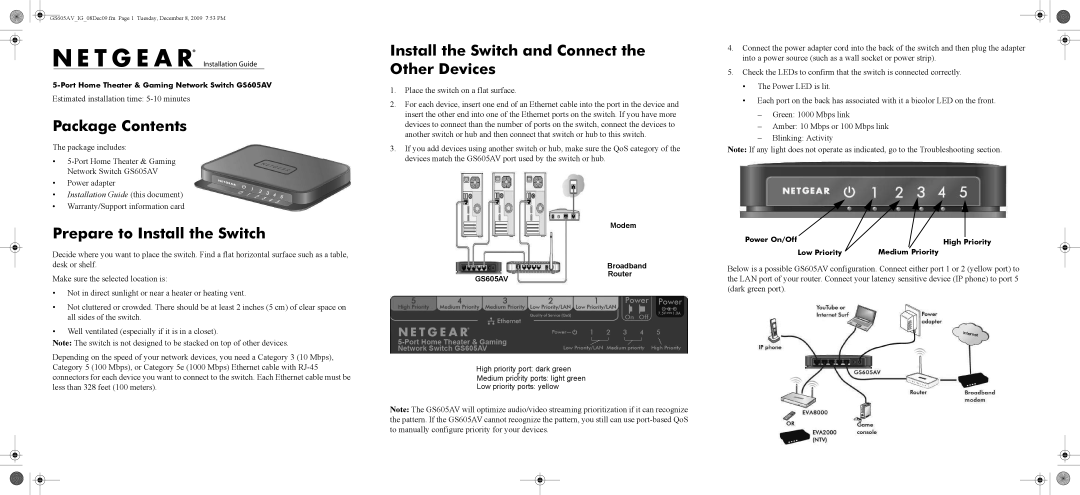
Power On/Off |
|
|
| |
High Priority | ||||
| ||||
Low Priority | Medium Priority | |||
Below is a possible GS605AV configuration. Connect either port 1 or 2 (yellow port) to the LAN port of your router. Connect your latency sensitive device (IP phone) to port 5 (dark green port).