Reinstalling the Burner Assembly:

1.Reinstall the gas manifold assembly to the burner box with the four (4) fasteners, which were removed earlier.

2.Carefully reinstall the burner box into the unit. After installing the burner, inspect the alignment of the burners with the heat exchanger tubes. The center of the burn- ers should be aligned with the center of the tubes.

3.Reconnect the gas piping to the gas valve.

4.Reconnect the wires to the gas valve termi- nals.

5.Reconnect the rubber pressure tubes to the gas valve and the burner box. Reinstall the burner access cover plate.

6.Reconnect the ignitor at the 2 position plug.

7.Reconnect the flame sensor wire to the burner box.

Pressure Gauge Installation

NOTE: For natural gas installations, the in- coming gas line pressure at the gas valve inlet must be between 4.5” WC and 10.0” WC. For LP gas installations, the incoming gas line pres- sure at the gas valve inlet must be between 11.0” WC and 14.0” WC. This pressure can be checked at the inlet end of the gas valve using a pressure gauge or U-tube manometer, which must be installed according to the manufacturer’s supplied instructions.

LIGHTING AND ADJUSTMENT OF THE APPLIANCE

1.Turn ON the gas at the manual valve, outside of the unit.

2.Check all gas connections for leaks with a soap and water solution. If the solution bubbles there is a gas leak which must be corrected. Do NOT use an open flame to check for gas leaks.

3.Turn ON the electrical power to the appli- ance.

4.Move the gas valve lever/knob to the “ON” position. The lever/knob must be moved to the end of its range of motion to insure the valve is completely open. Use only your hand to push in or turn the gas control valve. Never use tools.

Honeywell

A

T


N

OR

L

P


N


L

Valve


T

A


P


OTHER SIDE

PRESSURE


OF CAP


REGULATOR


CAP


A

T

N


N


T

A


M11678

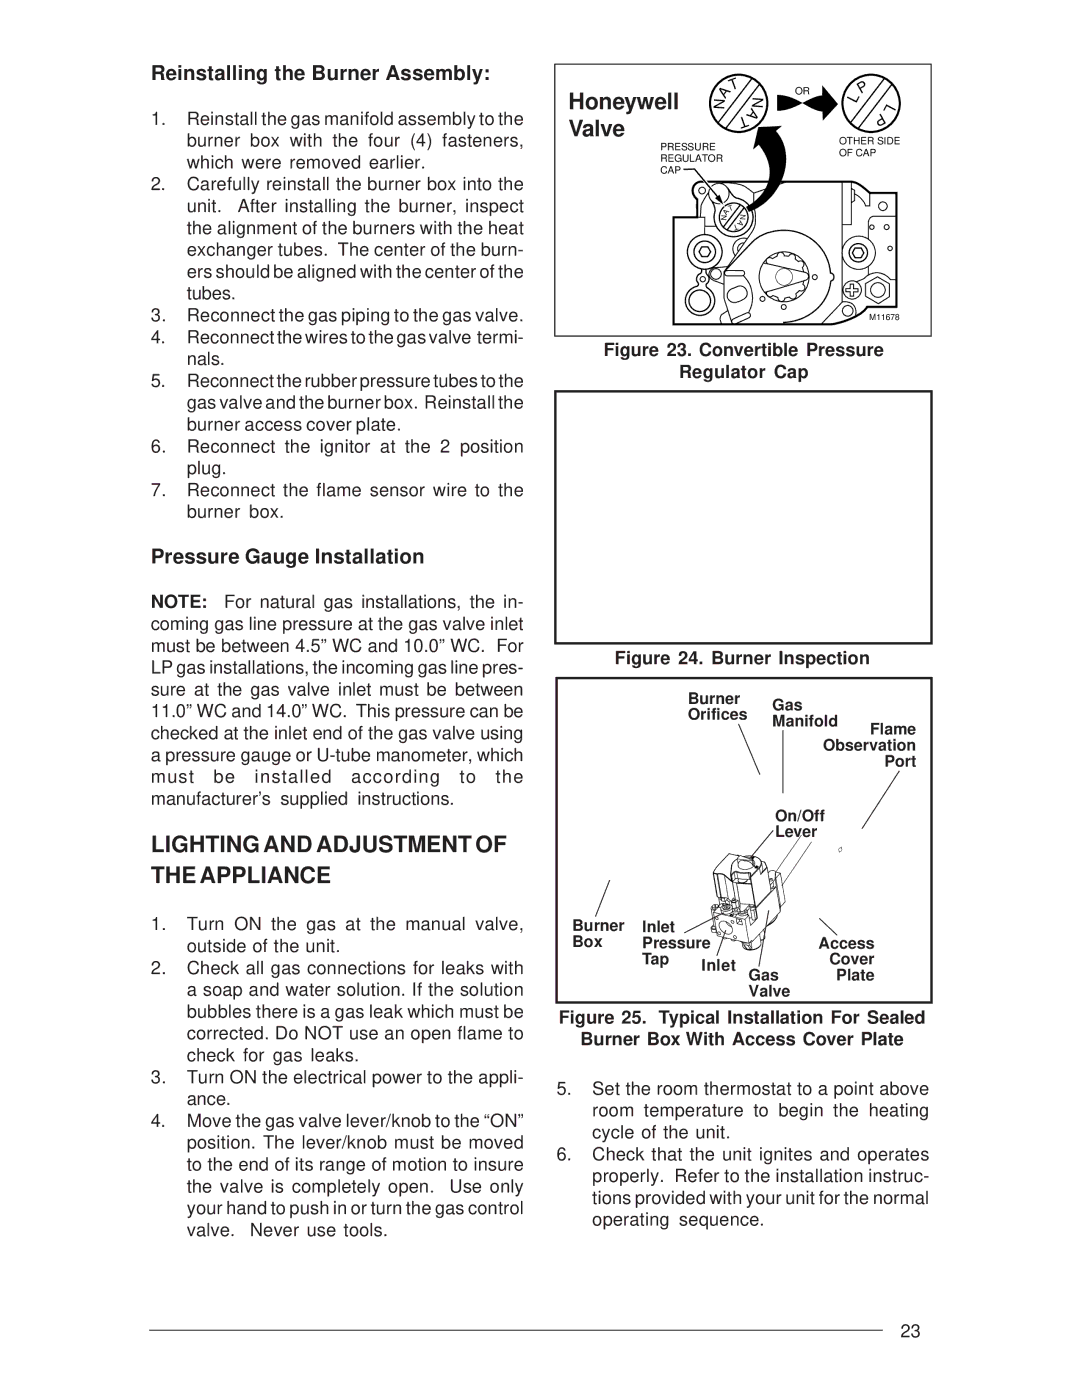
Figure 23. Convertible Pressure

Regulator Cap

Figure 24. Burner Inspection


Burner

Gas


Orifices


Manifold

Flame


Observation


Port


On/Off


Lever


Burner

Inlet


Box

Pressure


Access


Tap

Inlet


Cover


Gas

Plate


Valve


Figure 25. Typical Installation For Sealed

Burner Box With Access Cover Plate

5.Set the room thermostat to a point above room temperature to begin the heating cycle of the unit.

6.Check that the unit ignites and operates properly. Refer to the installation instruc- tions provided with your unit for the normal operating sequence.

23

Page 23
Image 23
Nordyne M3RL Series installation instructions Lighting and Adjustment of the Appliance, Convertible Pressure Regulator Cap

M3RL Series specifications

The Nordyne M3RL Series is a cutting-edge line of residential heating and cooling systems designed to enhance home comfort while emphasizing energy efficiency and reliability. Engineered with the latest technologies, the M3RL Series stands out as a premier choice for homeowners seeking optimal climate control, advanced features, and quiet operation.

One of the standout characteristics of the Nordyne M3RL Series is its high-efficiency performance. With Seasonal Energy Efficiency Ratios (SEER) that surpass industry standards, these systems deliver exceptional cooling power while using less energy. This efficiency not only translates to lower utility bills but also reduces the environmental footprint, making the M3RL Series an eco-friendly option.

Incorporating advanced inverter technology, the M3RL Series units operate at varying speeds, allowing them to adjust cooling and heating output to match the current demand. This feature ensures consistent temperature control while minimizing energy consumption. The systems are also equipped with a variable-speed compressor, which works in harmony with the inverter technology to provide seamless operation and quiet performance.

The M3RL Series showcases durability through its robust construction. The outdoor units feature a powder-coated finish to withstand the elements, while the indoor components are designed with high-quality materials to ensure longevity. The environmentally friendly refrigerant used in these systems further emphasizes Nordyne's commitment to sustainability.

Another notable aspect is the advanced control options available with the M3RL Series. Homeowners can choose from various thermostat solutions, including smart thermostats that offer remote control capabilities and programming features. This flexibility allows users to optimize their heating and cooling schedules, enhancing both comfort and efficiency.

In terms of installation, the M3RL Series is designed with versatility in mind. The compact and lightweight design of the units ensures ease of placement in various home layouts, while the comprehensive installation manuals and support from Nordyne make the process straightforward for HVAC professionals.

The Nordyne M3RL Series is truly a hallmark of modern home climate control, embodying efficiency, durability, and advanced technology. With its combination of high-performance features, user-friendly controls, and a commitment to sustainability, it provides an ideal solution for homeowners looking to enhance comfort while reducing energy costs. The M3RL Series represents a significant step forward in the evolution of residential heating and cooling systems.