IP Phone 1120SA installation
Caution: Your IP Phone 1120SA is shipped with the base locked in position. To avoid damaging your phone, press the
Step 1: Remove the stand cover. Pull upward on the center catch as indicated in Figure 3, and remove the stand cover. The cable routing tracks are now accessible.
Tilt Lever
Button
Center
Catch
cover |
| |
stand |
| |
the | Handset | |
cord channel | ||
Figure 3 Removing | ||
|
Step 2: Connect the AC power adapter. Connect the adapter to the AC adapter jack in the bottom of the phone. Form a small bend in the cable, and then thread the adapter cord through the channels in the stand.
Warning: Use your IP Phone 1120SA with the approved Nortel AC adapter (model #NTYS17SAGS) for this model of phone only.
Note: You must use
Step 3: Install the handset. Connect the end of the handset cable with the short straight section into the handset. Connect the end of the handset cable with the long straight section to the back of the phone, using the
Step 4: Install the Ethernet cable. Connect one end of the supplied Ethernet cable to the back of your phone using the
IP Phone 1120SA installation
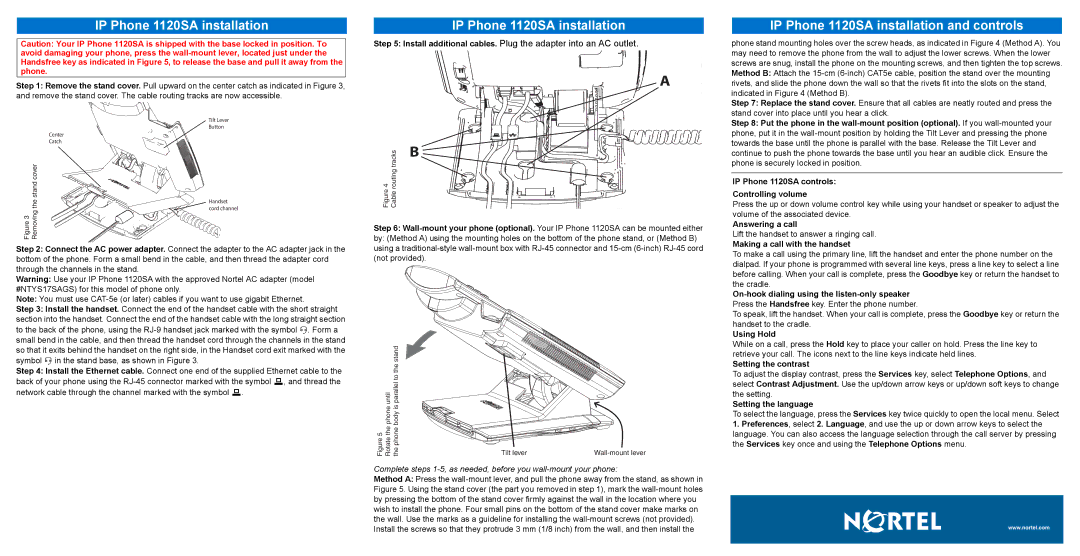
Step 5: Install additional cables. Plug the adapter into an AC outlet.
A
| routing tracks | B |
4 |
| |
Figure | Cable |
|
Step 6:
by: (Method A) using the mounting holes on the bottom of the phone stand, or (Method B) using a
until | parallel to the stand |
|
|
phone | body is |
|
|
Figure 5 Rotate the | the phone | Tilt lever |
Complete steps
Method A: Press the
IP Phone 1120SA installation and controls
phone stand mounting holes over the screw heads, as indicated in Figure 4 (Method A). You may need to remove the phone from the wall to adjust the lower screws. When the lower screws are snug, install the phone on the mounting screws, and then tighten the top screws. Method B: Attach the
Step 7: Replace the stand cover. Ensure that all cables are neatly routed and press the stand cover into place until you hear a click.
Step 8: Put the phone in the
IP Phone 1120SA controls:
Controlling volume
Press the up or down volume control key while using your handset or speaker to adjust the volume of the associated device.
Answering a call
Lift the handset to answer a ringing call.
Making a call with the handset
To make a call using the primary line, lift the handset and enter the phone number on the dialpad. If your phone is programmed with several line keys, press a line key to select a line before calling. When your call is complete, press the Goodbye key or return the handset to the cradle.
On-hook dialing using the listen-only speaker
Press the Handsfree key. Enter the phone number.
To speak, lift the handset. When your call is complete, press the Goodbye key or return the handset to the cradle.
Using Hold
While on a call, press the Hold key to place your caller on hold. Press the line key to retrieve your call. The icons next to the line keys indicate held lines.
Setting the contrast
To adjust the display contrast, press the Services key, select Telephone Options, and select Contrast Adjustment. Use the up/down arrow keys or up/down soft keys to change the setting.
Setting the language
To select the language, press the Services key twice quickly to open the local menu. Select
1.Preferences, select 2. Language, and use the up or down arrow keys to select the language. You can also access the language selection through the call server by pressing the Services key once and using the Telephone Options menu.