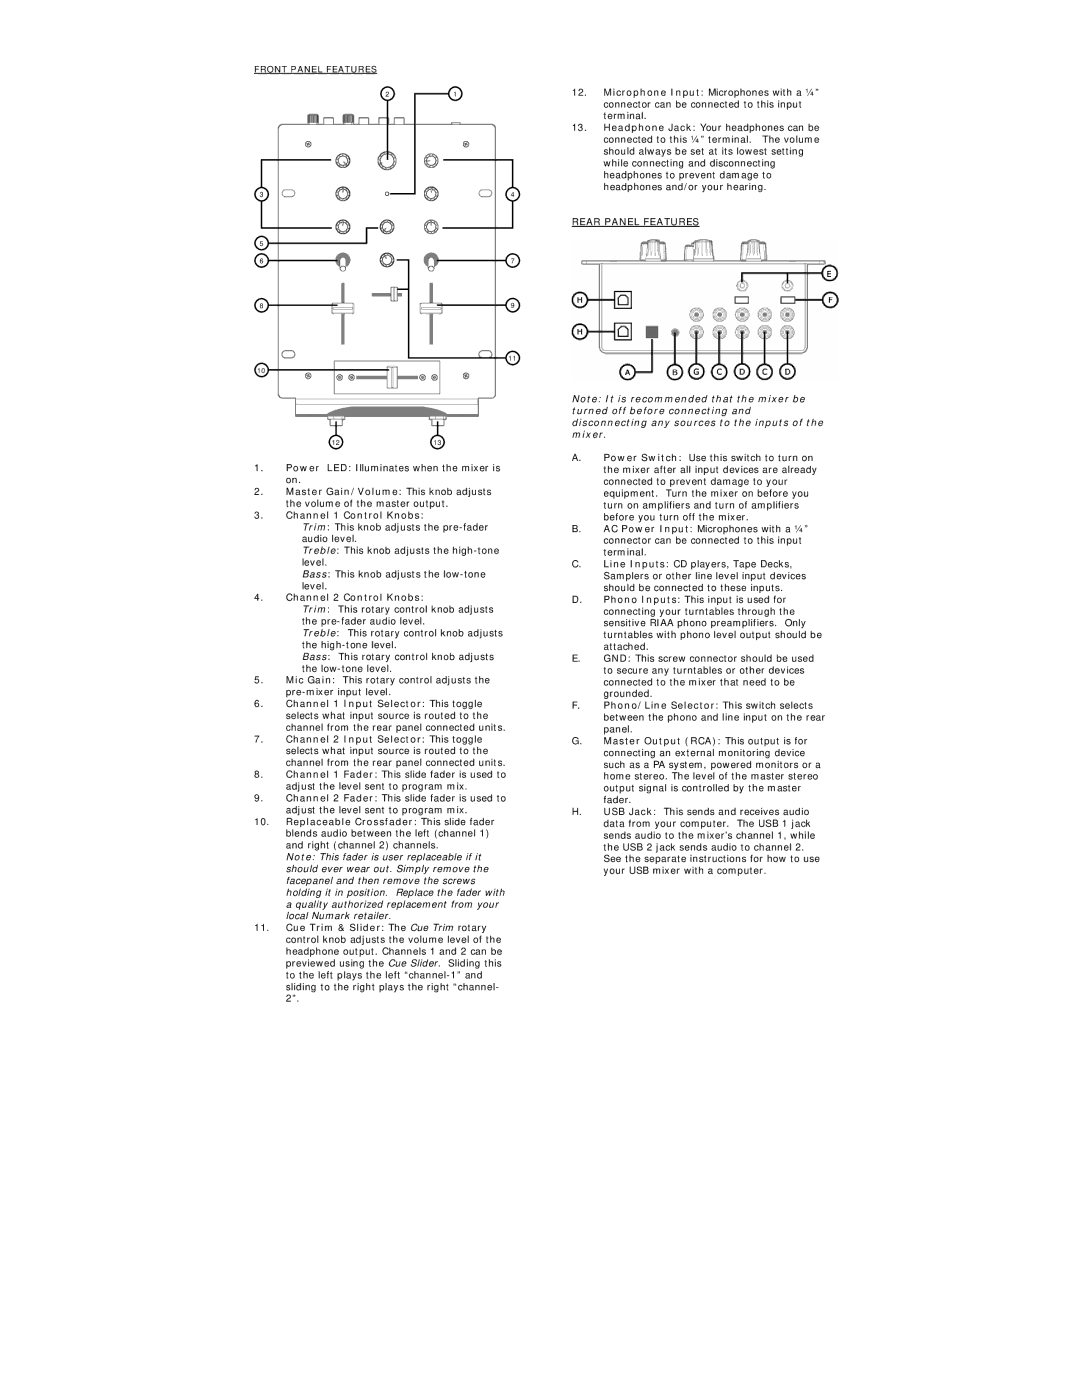
FRONT PANEL FEATURES
2
3
1
4
12.Microphone Input: Microphones with a ¼” connector can be connected to this input terminal.
13.Headphone Jack: Your headphones can be connected to this ¼” terminal. The volume should always be set at its lowest setting while connecting and disconnecting headphones to prevent damage to headphones and/or your hearing.
REAR PANEL FEATURES
5 |
|
6 | 7 |
8 | 9 |
| 11 |
10 |
|
1213
1.Power LED: Illuminates when the mixer is on.
2.Master Gain/Volume: This knob adjusts the volume of the master output.
3.Channel 1 Control Knobs:
Trim: This knob adjusts the
Treble: This knob adjusts the
Bass: This knob adjusts the
4.Channel 2 Control Knobs:
Trim: This rotary control knob adjusts the
Treble: This rotary control knob adjusts the
Bass: This rotary control knob adjusts the
5.Mic Gain: This rotary control adjusts the
6.Channel 1 Input Selector: This toggle selects what input source is routed to the channel from the rear panel connected units.
7.Channel 2 Input Selector: This toggle selects what input source is routed to the channel from the rear panel connected units.
8.Channel 1 Fader: This slide fader is used to adjust the level sent to program mix.
9.Channel 2 Fader: This slide fader is used to adjust the level sent to program mix.
10.Replaceable Crossfader: This slide fader blends audio between the left (channel 1) and right (channel 2) channels.
Note: This fader is user replaceable if it should ever wear out. Simply remove the facepanel and then remove the screws holding it in position. Replace the fader with a quality authorized replacement from your local Numark retailer.
11.Cue Trim & Slider: The Cue Trim rotary control knob adjusts the volume level of the headphone output. Channels 1 and 2 can be previewed using the Cue Slider. Sliding this to the left plays the left
Note: It is recommended that the mixer be turned off before connecting and disconnecting any sources to the inputs of the mixer.
A.Power Switch: Use this switch to turn on the mixer after all input devices are already connected to prevent damage to your equipment. Turn the mixer on before you turn on amplifiers and turn of amplifiers before you turn off the mixer.
B.AC Power Input: Microphones with a ¼” connector can be connected to this input terminal.
C.Line Inputs: CD players, Tape Decks, Samplers or other line level input devices should be connected to these inputs.
D.Phono Inputs: This input is used for connecting your turntables through the sensitive RIAA phono preamplifiers. Only turntables with phono level output should be attached.
E.GND: This screw connector should be used to secure any turntables or other devices connected to the mixer that need to be grounded.
F.Phono/Line Selector: This switch selects between the phono and line input on the rear panel.
G.Master Output (RCA): This output is for connecting an external monitoring device such as a PA system, powered monitors or a home stereo. The level of the master stereo output signal is controlled by the master fader.
H.USB Jack: This sends and receives audio data from your computer. The USB 1 jack sends audio to the mixer’s channel 1, while the USB 2 jack sends audio to channel 2.
See the separate instructions for how to use your USB mixer with a computer.