PLANNING DUCTWORK AND WIRING

Ductwork

1.Use 4" round duct.

2.Plan to run duct from discharge opening of fan to the outside. For best fan performance, make the duct run as short as possible and use a minimum number of elbows.

3.Use optional ducting accessories as required.

Wiring

Plan to run 120vAC house wiring (with ground) from the power source through a standard wall switch.

Preparation

1.Refer to Figure 1. Remove blower/power unit assembly from the housing.

(a)Unplug the power unit.

(b)Remove the screw (located next to plug-in receptacle) which holds blower/power unit mounting plate in place. Do not misplace this screw.

(c)Lift the mounting plate at the end near the plug-in receptacle until blower wheel clears the scroll.

(d)Remove plate by pulling its tabs out of slots in the housing. Set blower/power unit aside until needed.

2.Remove one of the wiring knockouts from housing.

MOUNTING THE HOUSING

Mounting Using Mounting Tabs

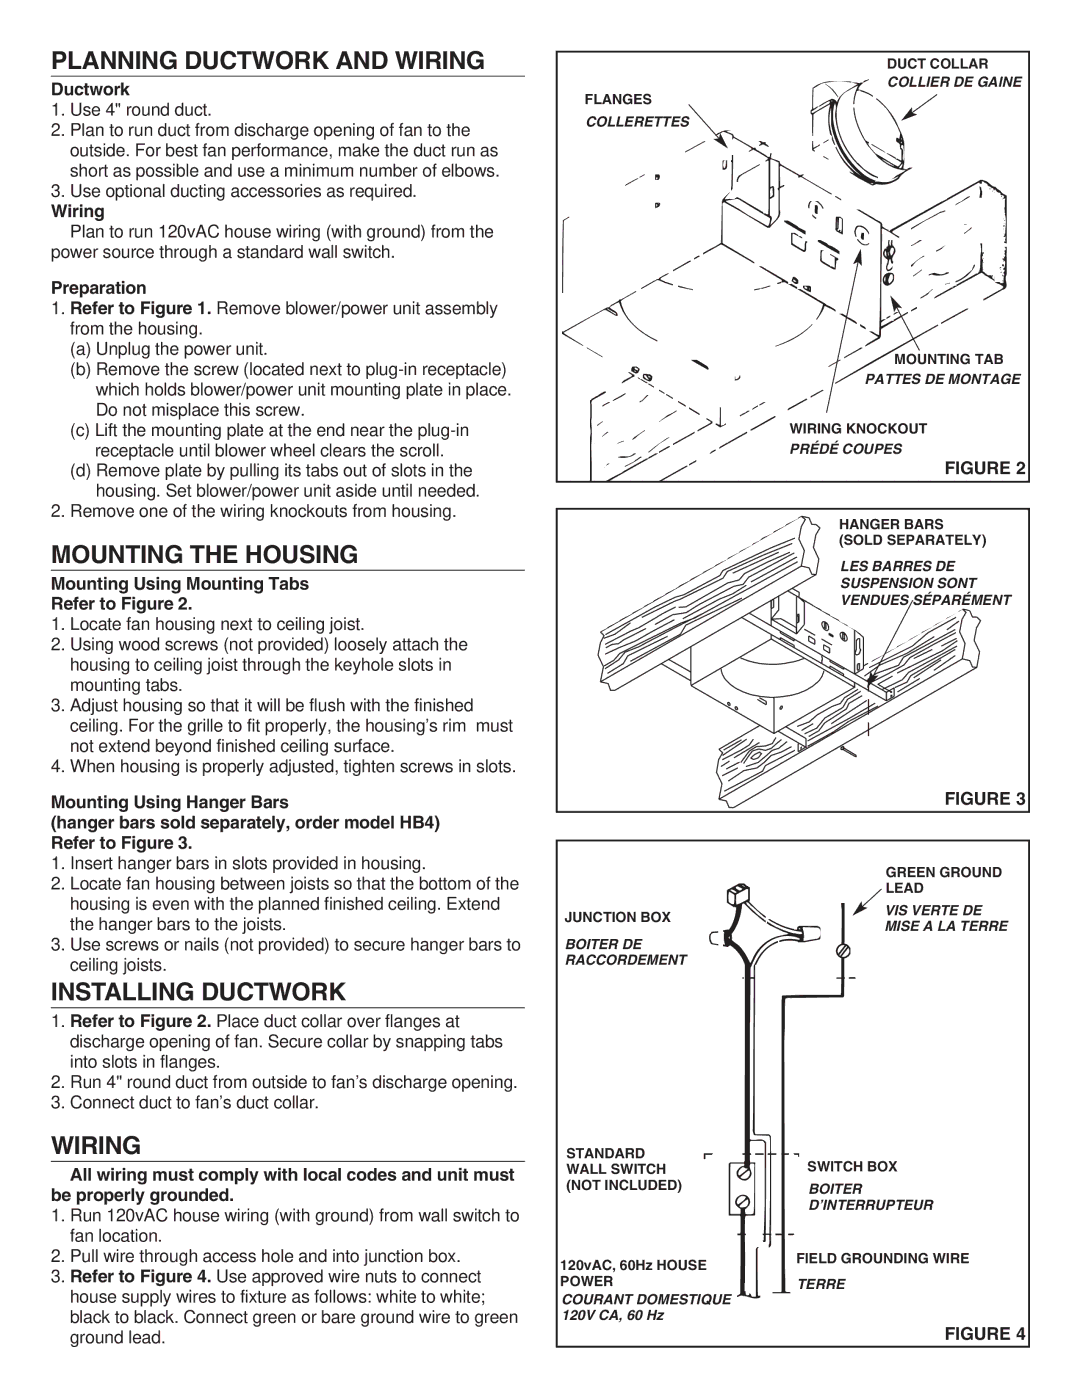
Refer to Figure 2.

1.Locate fan housing next to ceiling joist.

2.Using wood screws (not provided) loosely attach the housing to ceiling joist through the keyhole slots in mounting tabs.

3.Adjust housing so that it will be flush with the finished ceiling. For the grille to fit properly, the housing’s rim must not extend beyond finished ceiling surface.

4.When housing is properly adjusted, tighten screws in slots.

Mounting Using Hanger Bars

(hanger bars sold separately, order model HB4) Refer to Figure 3.

1.Insert hanger bars in slots provided in housing.

2.Locate fan housing between joists so that the bottom of the housing is even with the planned finished ceiling. Extend the hanger bars to the joists.

3.Use screws or nails (not provided) to secure hanger bars to ceiling joists.

INSTALLING DUCTWORK

1.Refer to Figure 2. Place duct collar over flanges at discharge opening of fan. Secure collar by snapping tabs into slots in flanges.

2.Run 4" round duct from outside to fan’s discharge opening.

3.Connect duct to fan’s duct collar.

WIRING

All wiring must comply with local codes and unit must be properly grounded.

1.Run 120vAC house wiring (with ground) from wall switch to fan location.

2.Pull wire through access hole and into junction box.

3.Refer to Figure 4. Use approved wire nuts to connect house supply wires to fixture as follows: white to white; black to black. Connect green or bare ground wire to green ground lead.

DUCT COLLAR

COLLIER DE GAINE

FLANGES

COLLERETTES

MOUNTING TAB

PATTES DE MONTAGE

WIRING KNOCKOUT

PRÉDÉ COUPES

FIGURE 2

HANGER BARS

(SOLD SEPARATELY)

LES BARRES DE

SUSPENSION SONT

VENDUES SÉPARÉMENT

FIGURE 3


GREEN GROUND


LEAD

JUNCTION BOX

VIS VERTE DE

MISE A LA TERRE


BOITER DE


RACCORDEMENT


STANDARD

SWITCH BOX

WALL SWITCH

(NOT INCLUDED)

BOITER


D’INTERRUPTEUR

120vAC, 60Hz HOUSE

FIELD GROUNDING WIRE


POWER

TERRE

COURANT DOMESTIQUE


120V CA, 60 Hz


FIGURE 4

Page 2
Image 2
NuTone 672R, 671R important safety instructions Planning Ductwork and Wiring, Mounting the Housing, Installing Ductwork

671R, 672R specifications

The NuTone 672R and 671R are advanced ventilation fan models designed to enhance indoor air quality while providing effective and reliable performance. Both models are popular choices for residential applications, offering unique features and technological advantages tailored to meet the needs of modern homeowners.

One of the main features of the NuTone 672R and 671R models is their powerful airflow capabilities. The 672R delivers an impressive CFM (cubic feet per minute) rating, making it suitable for larger bathrooms and spaces where efficient air exchange is essential. The 671R, while slightly less powerful, still offers substantial airflow and is ideal for smaller rooms. This ensures that excess moisture and odors are effectively removed, promoting a healthier indoor environment.

Both fans are designed with quiet operation in mind. NuTone incorporates a specially designed motor and innovative sound-dampening technology that significantly reduces noise levels during operation. This allows homeowners to enjoy the benefits of ventilation without the disruptive sound often associated with traditional exhaust fans. As a result, these models are perfect for use during nighttime or in tranquil spaces, such as bedrooms and reading nooks.

In addition to effective ventilation, the NuTone 672R and 671R feature an easy-to-install design. The fans come with a compact housing that fits into tight spaces, ensuring a seamless installation process. The inclusion of a durable and efficient motor contributes to the longevity of the fans, requiring less frequent maintenance and replacement.

Another essential aspect of these models is their energy efficiency. Both the 672R and 671R are designed to consume minimal power while delivering optimal performance. This energy-efficient operation not only helps reduce utility bills but also aligns with eco-friendly practices, making these fans a responsible choice for environmentally conscious homeowners.

Additionally, these fans come with built-in adjustable features, allowing users to customize the airflow according to their specific needs. The integrated switch options allow for easy control over ventilation levels, enabling optimal comfort throughout the home.

In summary, the NuTone 672R and 671R fans are exemplary ventilation solutions that combine powerful airflow, quiet operation, energy efficiency, and user-friendly features. These characteristics make them a preferred choice for homeowners seeking reliable and effective ventilation in their living spaces.