MODEL: RECESSED STEEL BATH
INSTALLATION INSTRUCTIONS
|
|
| MODEL | OVERALL SIZE | WALL OPENING | |||||
|
|
| NO. | W | H | D | W | H | D | |
For help, call us toll | B703850 | 245/8 | 193/16 | 4 | 233/8 | 18 | 31/2 | |||
| free! | B704850 | 237/8 | 195/16 | 41/4 | |||||
|
|
|
|
|
|
| ||||
|
| online at www.nutone.com/register |
|
|
| |||
| MIRROR CARE | Fig. 2 |
|
|
| Fig. 3 | Back Side | |
• | Use only clean warm water and a clean, |
| Door Pull Placement | Door Bumper | ||||
|
| Mirror Side |
| 3 | ||||
| soft, |
|
|
|
| Placement |
| |
|
|
| 1 | 14 " | ||||
• | DO NOT USE cleaners that contain |
|
|
|
| 1 |
| |
|
|
|
| 4 " |
| |||
| solutions of ammonia, vinegar or chlorine. |
|
| 1- |
| |||
|
|
| 1 |
|
|
|
|
|
• | DO NOT USE powdered cleaners or steel | Left Door | Right Door |
|
|
| ||
| wool. | Left Door | ||||||
|
| |||||||
• |
|
|
|
| ||||
Never spray cleaning agent directly on |
|
|
|
|
|
|
| |
| mirror, especially on exposed edges and | Fig. 1 |
|
|
|
|
|
|
| mirror backing. Apply cleaner to soft cloth |
|
|
|
|
|
|
|
| and wipe mirror. Dry mirror thoroughly. |
|
|
|
|
|
|
|
• | Keep mirror dry. A well ventilated bathroom is |
|
|
|
|
|
|
|
| important. |
|
|
| H |
|
|
|
|
|
|
|
|
|
|
| |
INSTALLATION of RECESSED CABINET | Approx. | D |
|
| 7 |
|
| |
64" to |
|
|
|
|
| |||
1. | Carefully remove all packing material. Place | Floor |
|
|
|
|
| |
|
|
| 6 |
|
| |||
|
|
|
|
|
| |||
| shelves and hardware package aside until needed. |
|
|
|
|
| 1 | |
|
|
|
|
|
|
| ||
2. Deteremine desired location of cabinet on wall. | W |
|
|
| 5 |
| ||
|
|
|
| 2 | ||||
|
|
|
|
| ||||
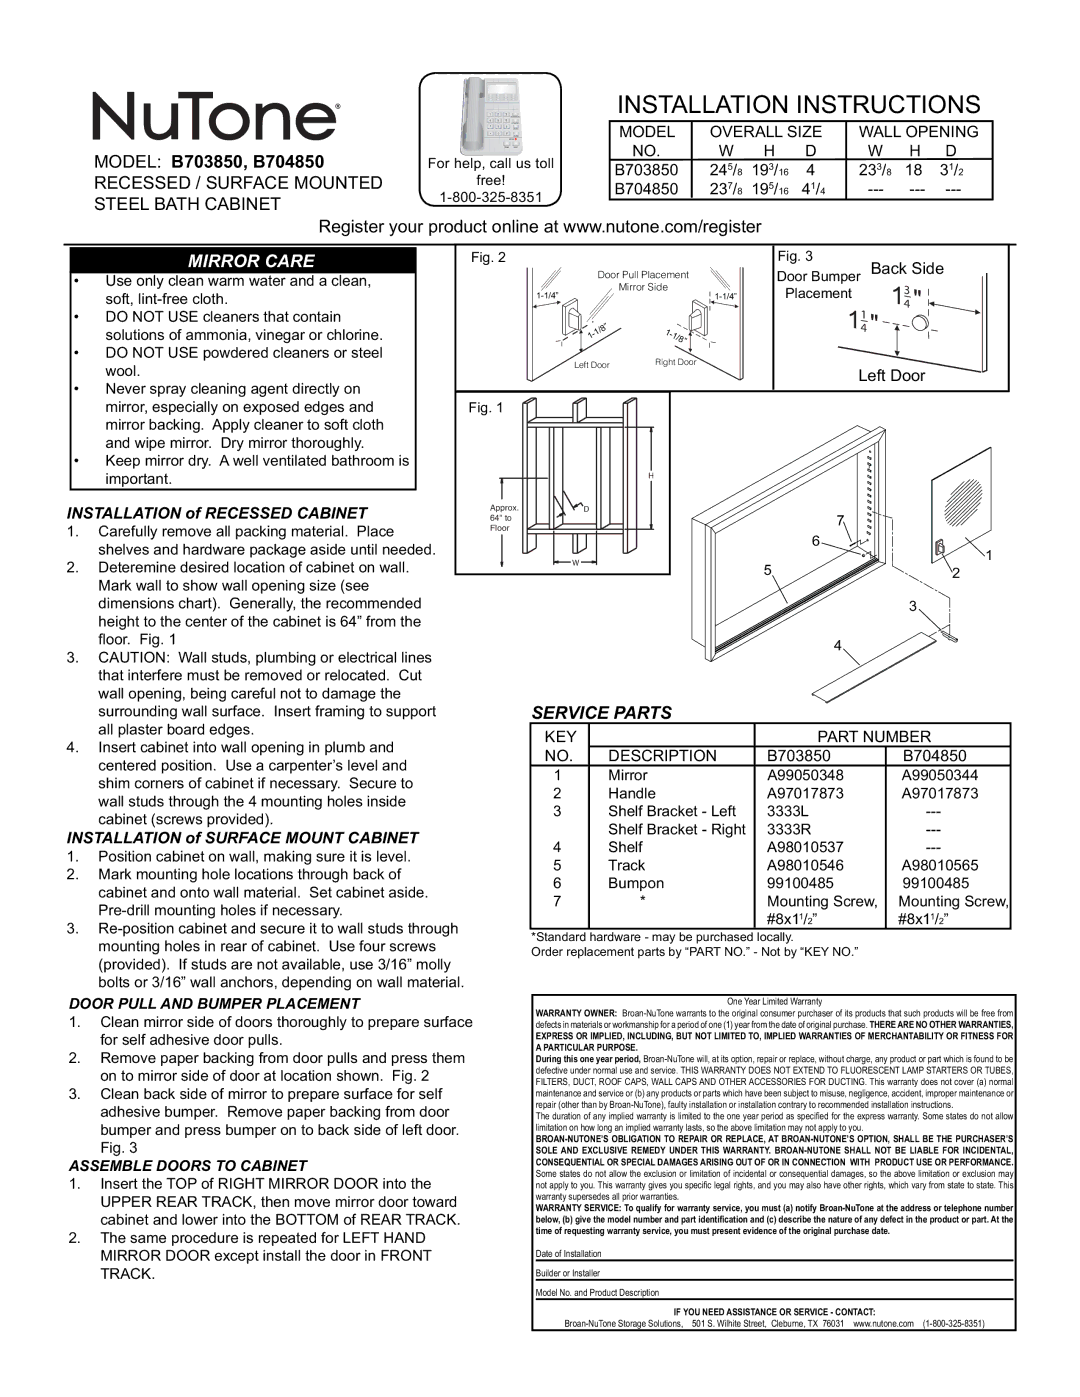
| Mark wall to show wall opening size (see |
|
|
|
|
|
|
|
| dimensions chart). Generally, the recommended |
|
|
|
|
|
| 3 |
| height to the center of the cabinet is 64” from the |
|
|
|
|
|
|
|
| fl oor. Fig. 1 |
|
|
|
| 4 |
|
|
3. | CAUTION: Wall studs, plumbing or electrical lines |
|
|
|
|
|
| |
|
|
|
|
|
|
| ||
| that interfere must be removed or relocated. Cut |
|
|
|
|
|
|
|
| wall opening, being careful not to damage the | SERVICE PARTS |
|
|
| |||
| surrounding wall surface. Insert framing to support |
|
|
| ||||
| all plaster board edges. | KEY |
|
|
| PART NUMBER | ||
4. | Insert cabinet into wall opening in plumb and |
|
|
| ||||
NO. |
| DESCRIPTION | B703850 |
| B704850 | |||
| centered position. Use a carpenter’s level and |
|
| |||||
| 1 |
| Mirror |
| A99050348 |
| A99050344 | |
| shim corners of cabinet if necessary. Secure to |
|
|
| ||||
| 2 |
| Handle | A97017873 |
| A97017873 | ||
| wall studs through the 4 mounting holes inside |
|
| |||||
| 3 |
| Shelf Bracket - Left | 3333L |
| |||
| cabinet (screws provided). |
|
| |||||
|
|
| Shelf Bracket - Right | 3333R |
| |||
INSTALLATION of SURFACE MOUNT CABINET |
|
|
| |||||
4 |
| Shelf |
| A98010537 |
| |||
1. | Position cabinet on wall, making sure it is level. |
|
|
| ||||
5 |
| Track |
| A98010546 |
| A98010565 | ||
2. | Mark mounting hole locations through back of |
|
|
| ||||
6 |
| Bumpon | 99100485 |
| 99100485 | |||
| cabinet and onto wall material. Set cabinet aside. |
|
| |||||
| 7 |
| * |
| Mounting Screw, | Mounting Screw, | ||
|
|
| ||||||
|
|
|
|
| #8x11/2” |
| #8x11/2” | |
3. |
|
|
|
|
| |||
*Standard hardware - may be purchased locally. |
|
| ||||||
| mounting holes in rear of cabinet. Use four screws |
|
| |||||
| Order replacement parts by “PART NO.” - Not by “KEY NO.” |
|
| |||||
| (provided). If studs are not available, use 3/16” molly |
|
|
|
|
|
|
|
| bolts or 3/16” wall anchors, depending on wall material. |
|
|
|
|
|
|
|
DOOR PULL AND BUMPER PLACEMENT
1.Clean mirror side of doors thoroughly to prepare surface for self adhesive door pulls.
2.Remove paper backing from door pulls and press them on to mirror side of door at location shown. Fig. 2
3.Clean back side of mirror to prepare surface for self
adhesive bumper. Remove paper backing from door bumper and press bumper on to back side of left door. Fig. 3
ASSEMBLE DOORS TO CABINET
1.Insert the TOP of RIGHT MIRROR DOOR into the UPPER REAR TRACK, then move mirror door toward cabinet and lower into the BOTTOM of REAR TRACK.
2.The same procedure is repeated for LEFT HAND MIRROR DOOR except install the door in FRONT TRACK.
One Year Limited Warranty
WARRANTY OWNER:
EXPRESS OR IMPLIED, INCLUDING, BUT NOT LIMITED TO, IMPLIED WARRANTIES OF MERCHANTABILITY OR FITNESS FOR A PARTICULAR PURPOSE.
During this one year period,
The duration of any implied warranty is limited to the one year period as specified for the express warranty. Some states do not allow limitation on how long an implied warranty lasts, so the above limitation may not apply to you.
WARRANTY SERVICE: To qualify for warranty service, you must (a) notify
Date of Installation
Builder or Installer
Model No. and Product Description
IF YOU NEED ASSISTANCE OR SERVICE - CONTACT: