Mini Infrared Thermomete
2
??Precise
??Switchable “WF temperature units
??Automatic data hold
??Laser target pointer switchable between laser dot and circle
1.SAFETY
Use extreme caution when the laser beam is turned On.
!Do not let the beam enter your eye, another person ’s eye or the eye of an animal.
!Be careful not to let the beam on a reflective surface strike your eye.
!Do not operate the laser light beam il presence of any gas which can explode.
2. GENERAL SPECIFICATIONS
Laser Warning
Label
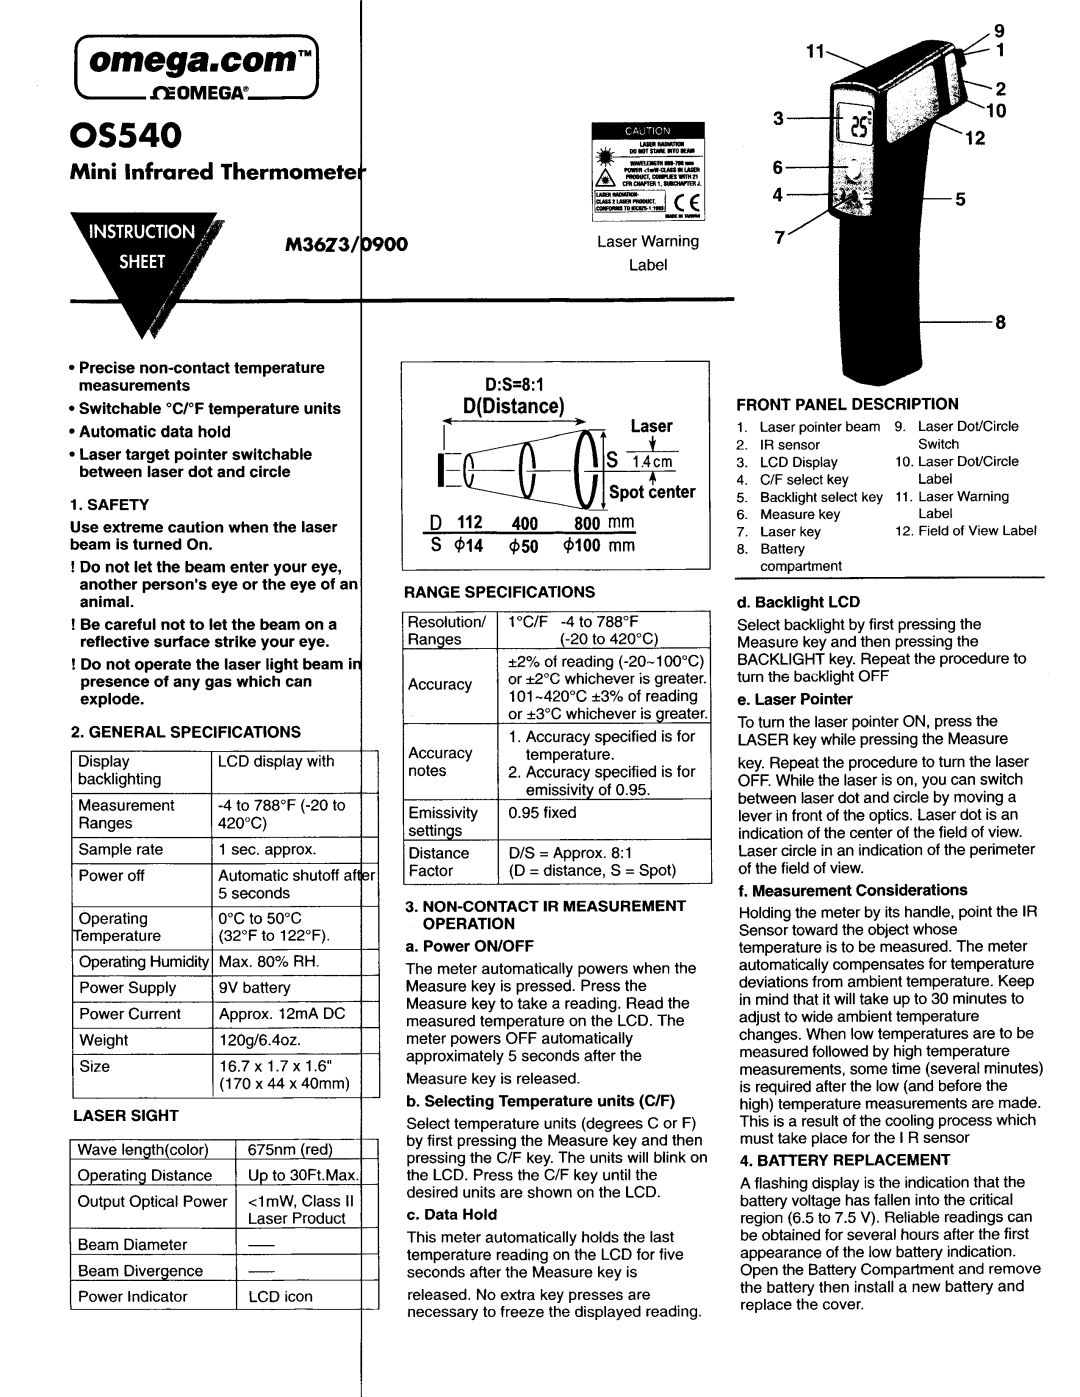
D:S=8:1
D(Distance)
D 112 400 800 mm
S $14 $50 $100 mm
RANGE SPECIFICATIONS
Resolution/ | 1 “C/F | |
Ranges | ||
| +2% of reading | |
Accuracy | or *2”C whichever is greater. | |
IOl | ||
| ||
| or +3X whichever is greater. |
1.Accuracy specified is for
Accuracy temperature.
notes | 2. Accuracy specified is for |
| emissivity of 0.95. |
4 -
FRONT PANEL DESCRIPTION
1. Laser pointer beam 9. Laser Dot/Circle
2. IR sensor |
| Switch | |
3. | LCD Display | 10. | Laser Dot/Circle |
4. | C/F select key |
| Label |
5. | Backlight select key 11. Laser Warning | ||
6. | Measure key |
| Label |
7. | Laser key | 12. | Field of View Label |
6.Battery compartment
d. Backlight LCD
Select backlight by first pressing the Measure key and then pressing the BACKLIGHT key. Repeat the procedure to turn the backlight OFF
e. Laser Pointer
To turn the laser pointer ON, press the LASER key while pressing the Measure
key. Repeat the procedure to turn the laser OFF. While the laser is on, you can switch between laser dot and circle by moving a
|
| Emissivity | 0.95 fixed | |
Sample rate | 1 sec. approx. | settings |
| |
Distance | D/S = Approx. 8:l | |||
Power off | Automatic shutoff al r | Factor | (D = distance, S = Spot) | |
| 5 seconds | 3. | ||
Operating | 0°C to 50°C | |||
OPERATION | ||||
remperature | (32°F to 122°F) | |||
a. Power ON/OFF | ||||
Operating Humidity Max. 80% RH. | ||||
The meter automatically powers when the | ||||
|
| |||
Power Supply | 9V battery | Measure key is pressed. Press the | ||
Power Current | Approx. 12mA DC | Measure key to take a reading. Read the | ||
measured temperature on the LCD. The | ||||
|
| |||
Weight | 12Ogl6.4oz. | meter powers OFF automatically | ||
Size | 16.7x1.7x1.6 ” | approximately 5 seconds after the | ||
Measure key is released. | ||||
| (170 x 44 x 40mm) | |||
lever in front of the optics. Laser dot is an indication of the center of the field of view. Laser circle in an indication of the perimeter of the field of view.
f. Measurement Considerations
Holding the meter by its handle, point the IR Sensor toward the object whose temperature is to be measured. The meter automatically compensates for temperature deviations from ambient temperature. Keep in mind that it will take up to 30 minutes to adjust to wide ambient temperature changes. When low temperatures are to be measured followed by high temperature measurements, some time (several minutes) is required after the low (and before the
LASER SIGHT |
|
Wave length(color) | 675nm (red) |
Operating Distance | Up to 30Ft.Max |
Output Optical Power | <I mW, Class II |
| Laser Product |
Beam Diameter | - |
Beam Divergence | - |
Power Indicator | LCD icon |
b. Selecting Temperature units (C/F)
Select temperature units (degrees C or F) by first pressing the Measure key and then pressing the C/F key. The units will blink on the LCD. Press the C/F key until the desired units are shown on the LCD.
c. Data Hold
This meter automatically holds the last temperature reading on the LCD for five seconds after the Measure key is
released. No extra key presses are necessary to freeze the displayed reading.
high) temperature measurements are made. This is a result of the cooling process which must take place for the I R sensor
4.BATTERY REPLACEMENT
A flashing display is the indication that the battery voltage has fallen into the critical region (6.5 to 7.5 V). Reliable readings can be obtained for several hours after the first appearance of the low battery indication. Open the Battery Compartment and remove the battery then install a new battery and replace the cover.