Omega Engineering TX801MInput Range Programming Table, How to Use the Maths Function Formulae

Models: TX801M

1 4
Download 4 pages 58.1 Kb
Page 4
Image 4
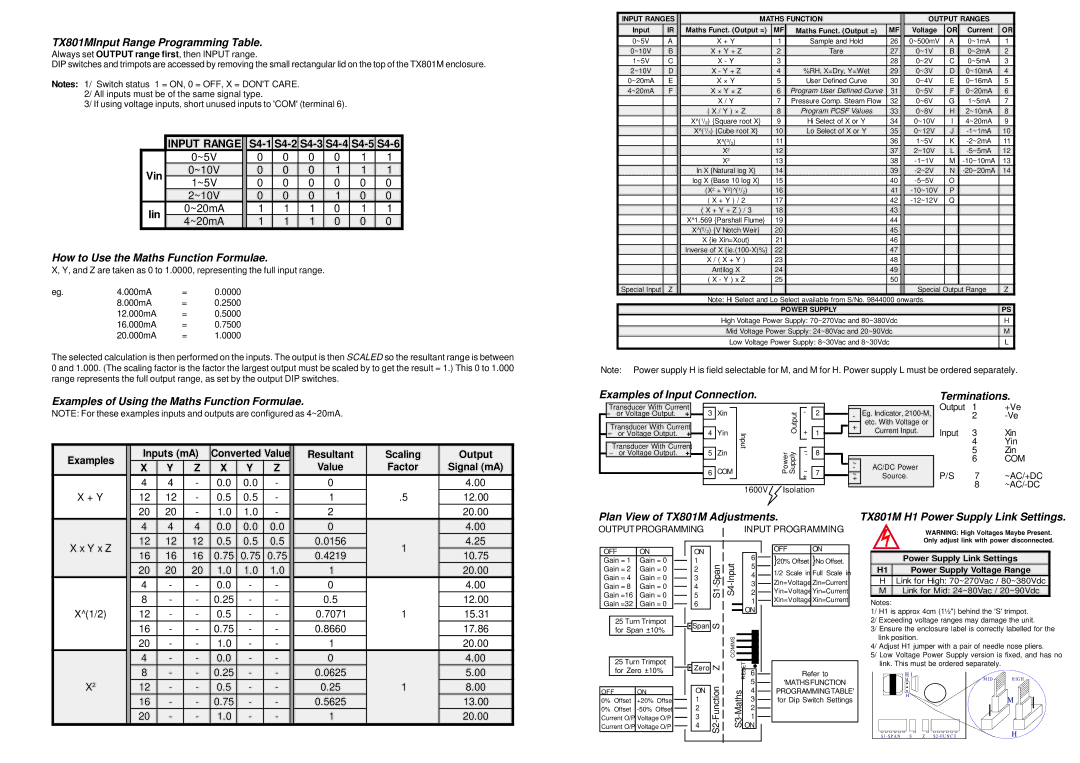
TX801MInput Range Programming Table.

TX801MInput Range Programming Table.

Always set OUTPUT range first, then INPUT range.

DIP switches and trimpots are accessed by removing the small rectangular lid on the top of the TX801M enclosure.

Notes: 1/ Switch status 1 = ON, 0 = OFF, X = DON'T CARE. 2/ All inputs must be of the same signal type.

3/ If using voltage inputs, short unused inputs to 'COM' (terminal 6).


INPUT RANGE


S4-1

S4-2

S4-3

S4-4

S4-5

S4-6


0~5V


0

0

0

0

1

1


Vin

0~10V


0

0

0

1

1

1


1~5V


0

0

0

0

0

0


2~10V


0

0

0

1

0

0


Iin

0~20mA


1

1

1

0

1

1


4~20mA


1

1

1

0

0

0


How to Use the Maths Function Formulae.

X, Y, and Z are taken as 0 to 1.0000, representing the full input range.

eg.

4.000mA

=

0.0000


8.000mA

=

0.2500


12.000mA

=

0.5000


16.000mA

=

0.7500


20.000mA

=

1.0000

The selected calculation is then performed on the inputs. The output is then SCALED so the resultant range is between 0 and 1.000. (The scaling factor is the factor the largest output must be scaled by to get the result = 1.) This 0 to 1.000 range represents the full output range, as set by the output DIP switches.

INPUT RANGES

MATHS FUNCTION


OUTPUT RANGES


Input

IR

Maths Funct. (Output =)

MF

Maths Funct. (Output =)

MF

Voltage

OR

Current

OR

0~5V

A

X + Y

1

Sample and Hold


26

0~500mV

A

0~1mA

1

0~10V

B

X + Y + Z

2

Tare


27

0~1V

B

0~2mA

2

1~5V

C

X - Y

3


28

0~2V

C

0~5mA

3

2~10V

D

X - Y + Z

4

%RH, X=Dry, Y=Wet


29

0~3V

D

0~10mA

4

0~20mA

E

X × Y

5

User Defined Curve


30

0~4V

E

0~16mA

5

4~20mA

F

X × Y × Z

6

Program User Defined Curve


31

0~5V

F

0~20mA

6


X / Y

7

Pressure Comp. Steam Flow


32

0~6V

G

1~5mA

7


( X / Y ) × Z

8

Program PCSF Values


33

0~8V

H

2~10mA

8


X^(1/2) {Square root X}

9

Hi Select of X or Y


34

0~10V

I

4~20mA

9


X^(1/3) {Cube root X}

10

Lo Select of X or Y


35

0~12V

J

-1~1mA

10


X^(3/2)

11


36

1~5V

K

-2~2mA

11


X2

12


37

2~10V

L

-5~5mA

12


X3

13


38

-1~1V

M

-10~10mA

13


ln X {Natural log X}

14


39

-2~2V

N

-20~20mA

14


log X {Base 10 log X}

15


40

-5~5V

O


(X2 + Y2)^(1/2)

16


41

-10~10V

P


( X + Y ) / 2

17


42

-12~12V

Q


( X + Y + Z ) / 3

18


43


X^1.569 {Parshall Flume}

19


44


X^(5/2) {V Notch Weir}

20


45


X {ie Xin=Xout}

21


46


Inverse of X {ie.(100-X)%}

22


47


X / ( X + Y )

23


48


Antilog X

24


49


( X - Y ) x Z

25


50


Special Input

Z


Special Output Range

Z


Note: Hi Select and Lo Select available from S/No. 9844000 onwards.


POWER SUPPLY


PS


High Voltage Power Supply: 70~270Vac and 80~380Vdc


H


Mid Voltage Power Supply: 24~80Vac and 20~90Vdc


M


Low Voltage Power Supply: 8~30Vac and 8~30Vdc


L


Note: Power supply H is field selectable for M, and M for H. Power supply L must be ordered separately.

Examples of Using the Maths Function Formulae.

NOTE: For these examples inputs and outputs are configured as 4~20mA.


Examples


Inputs (mA)

Converted Value


Resultant

Scaling

Output


X

Y

Z

X

Y

Z


Value

Factor

Signal (mA)


4

4

-

0.0

0.0

-


0


4.00


X + Y

12

12

-

0.5

0.5

-


1

.5

12.00


20

20

-

1.0

1.0

-


2


20.00


Examples of Input Connection.


Transducer With Current


or Voltage Output.

+


3

Xin

Input

Output

-


2


~


Transducer With Current


Transducer With Current


4

Yin


+

1


or Voltage Output.

+


or Voltage Output.

+


5

Zin


Power Supply

-

8


COM


~


6


7


+


1600V Isolation


Eg. Indicator, 2100-M,

-

+

etc. With Voltage or

Current Input.


~

AC/DC Power

-

~Source.

+

Terminations.

Output

1

+Ve


2

-Ve

Input

3

Xin


4

Yin


5

Zin


6

COM

P/S

7

~AC/+DC


8

~AC/-DC

Plan View of TX801M Adjustments.

TX801M H1 Power Supply Link Settings.


4

4

4

0.0

0.0

0.0


0


4.00


X x Y x Z


12

12

12

0.5

0.5

0.5


0.0156

1

4.25


16

16

16

0.75

0.75

0.75

0.4219

10.75


20

20

20

1.0

1.0

1.0


1


20.00


4

-

-

0.0

-

-


0


4.00


8

-

-

0.25

-

-


0.5


12.00


X^(1/2)


12

-

-

0.5

-

-


0.7071

1

15.31


16

-

-

0.75

-

-


0.8660


17.86


20

-

-

1.0

-

-

1


20.00


4

-

-

0.0

-

-


0


4.00


8

-

-

0.25

-

-


0.0625


5.00


X2


12

-

-

0.5

-

-


0.25

1

8.00


16

-

-

0.75

-

-


0.5625


13.00


20

-

-

1.0

-

-


1


20.00


OUTPUTPROGRAMMING


OFF

ON


ON

Gain = 1

Gain = 0


1


Gain = 2

Gain = 0


2


Gain = 4

Gain = 0


3


Gain = 8

Gain = 0


4


Gain =16

Gain = 0


5


Gain =32

Gain = 0


6


25 Turn Trimpot


for Span ±10%


Span


25 Turn Trimpot


for Zero ±10%


Zero


OFF


ON


ON

0% Offset


+20% Offset


1


0% Offset


-50% Offset


2


Current O/P

Voltage O/P


3


Current O/P

Voltage O/P


4


S1-Span


S4-Input


S


COMMS


Z


S2-Function


INPUT PROGRAMMING

OFF

ON

6}20% Offset }No Offset.

41/2 Scale in Full Scale in

3Zin=Voltage Zin=Current

2Yin=VoltageYin=Current

1Xin=VoltageXin=Current

ON


RESET

6


Refer to


5


'MATHSFUNCTION


Maths-S3


4


PROGRAMMINGTABLE'


ON


3


for Dip Switch Settings


2


1


WARNING: High Voltages Maybe Present.


Only adjust link with power disconnected.


Power Supply Link Settings


H1

Power Supply Voltage Range


HLink for High: 70~270Vac / 80~380Vdc

M Link for Mid: 24~80Vac / 20~90Vdc

Notes:

1/ H1 is approx 4cm (1½") behind the 'S' trimpot. 2/ Exceeding voltage ranges may damage the unit.

3/ Ensure the enclosure label is correctly labelled for the link position.

4/ Adjust H1 jumper with a pair of needle nose pliers.

5/ Low Voltage Power Supply version is fixed, and has no link. This must be ordered separately.

H 1

M I D

H I G H

M

H


M


S 1 - SP A N S Z S 2 - F U N C T


H

Page 4
Image 4
Omega Engineering TX801MInput Range Programming Table, How to Use the Maths Function Formulae, Terminations, S4-1, S4-2