I N S T R U

C T I O N M A N U A L

ADJUSTING THE SWITCHING POINTS (SP) AND RESET POINTS (RP)

a) Adjusting the switching point.

Case 1

or Case 2

Q

Q

p

p

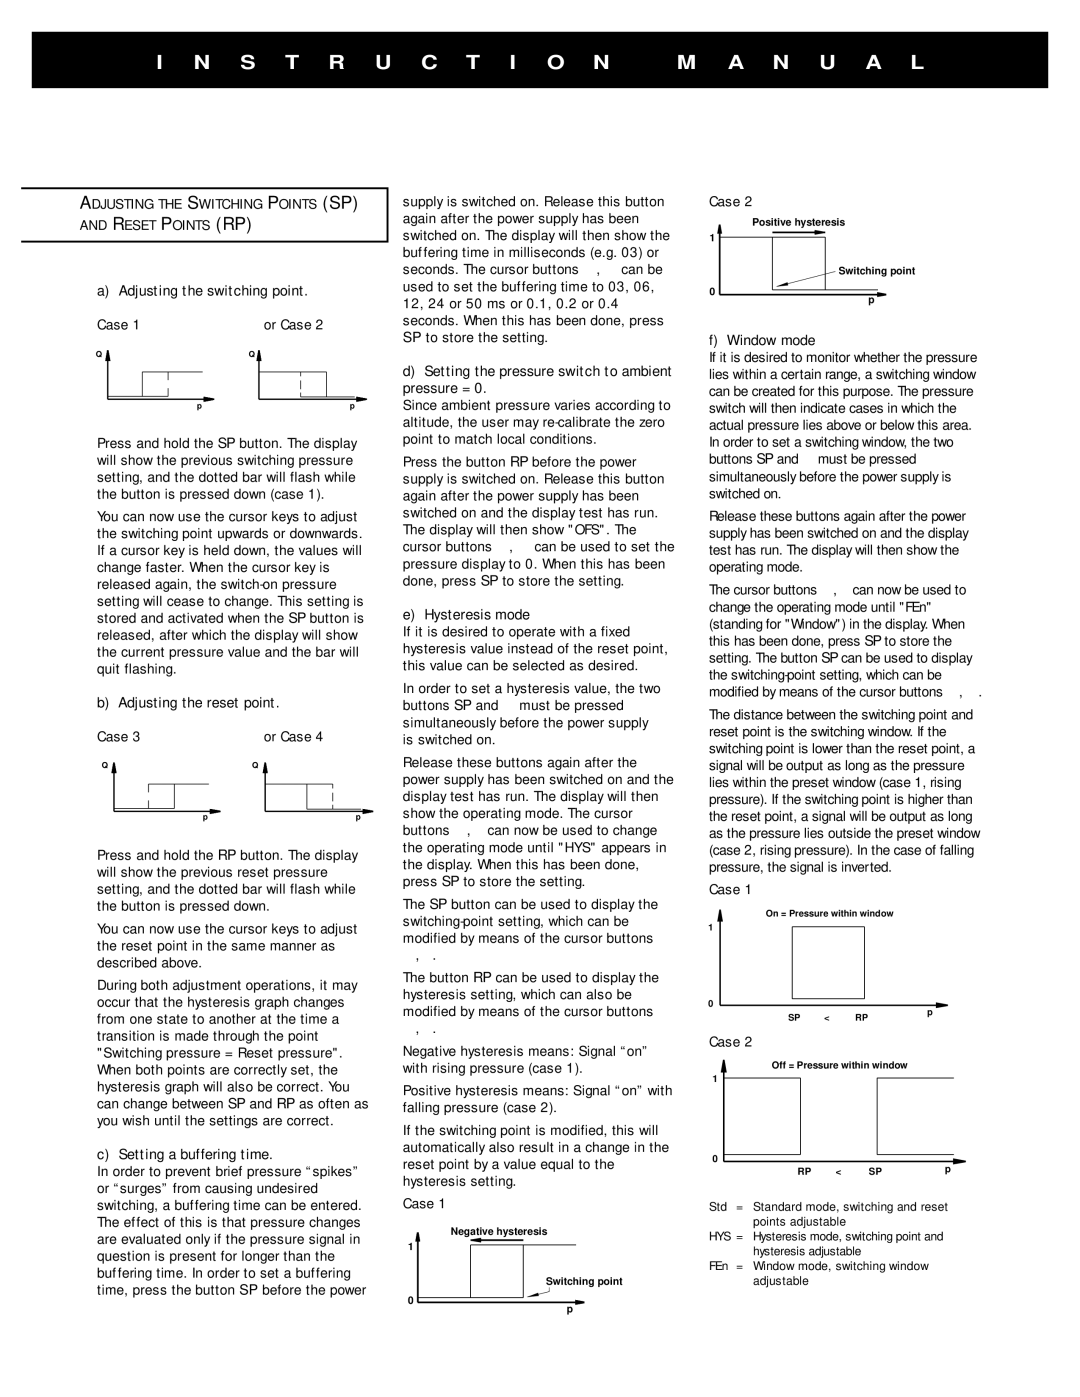
Press and hold the SP button. The display will show the previous switching pressure setting, and the dotted bar will flash while the button is pressed down (case 1).

You can now use the cursor keys to adjust the switching point upwards or downwards. If a cursor key is held down, the values will change faster. When the cursor key is released again, the switch-on pressure setting will cease to change. This setting is stored and activated when the SP button is released, after which the display will show the current pressure value and the bar will quit flashing.

b) Adjusting the reset point.

Case 3

or Case 4

Q

Q

p

p

Press and hold the RP button. The display will show the previous reset pressure setting, and the dotted bar will flash while the button is pressed down.

supply is switched on. Release this button again after the power supply has been switched on. The display will then show the buffering time in milliseconds (e.g. 03) or seconds. The cursor buttons , can be used to set the buffering time to 03, 06, 12, 24 or 50 ms or 0.1, 0.2 or 0.4 seconds. When this has been done, press SP to store the setting.

d)Setting the pressure switch to ambient pressure = 0.

Since ambient pressure varies according to altitude, the user may re-calibrate the zero point to match local conditions.

Press the button RP before the power supply is switched on. Release this button again after the power supply has been switched on and the display test has run. The display will then show "OFS". The cursor buttons , can be used to set the pressure display to 0. When this has been done, press SP to store the setting.

e) Hysteresis mode

If it is desired to operate with a fixed hysteresis value instead of the reset point, this value can be selected as desired.

In order to set a hysteresis value, the two buttons SP and must be pressed simultaneously before the power supply is switched on.

Release these buttons again after the power supply has been switched on and the display test has run. The display will then show the operating mode. The cursor buttons ,can now be used to change the operating mode until "HYS" appears in the display. When this has been done, press SP to store the setting.

The SP button can be used to display the switching-point setting, which can be

Case 2

Positive hysteresis

1

Switching point

0

p

f) Window mode

If it is desired to monitor whether the pressure lies within a certain range, a switching window can be created for this purpose. The pressure switch will then indicate cases in which the actual pressure lies above or below this area. In order to set a switching window, the two buttons SP and must be pressed simultaneously before the power supply is switched on.

Release these buttons again after the power supply has been switched on and the display test has run. The display will then show the operating mode.

The cursor buttons ,can now be used to change the operating mode until "FEn" (standing for "Window") in the display. When this has been done, press SP to store the setting. The button SP can be used to display the switching-point setting, which can be modified by means of the cursor buttons , .

The distance between the switching point and reset point is the switching window. If the switching point is lower than the reset point, a signal will be output as long as the pressure lies within the preset window (case 1, rising pressure). If the switching point is higher than the reset point, a signal will be output as long as the pressure lies outside the preset window (case 2, rising pressure). In the case of falling pressure, the signal is inverted.

Case 1

On = Pressure within window

You can now use the cursor keys to adjust the reset point in the same manner as described above.

During both adjustment operations, it may occur that the hysteresis graph changes from one state to another at the time a transition is made through the point "Switching pressure = Reset pressure".

modified by means of the cursor buttons

,.

The button RP can be used to display the hysteresis setting, which can also be modified by means of the cursor buttons

,.

Negative hysteresis means: Signal “on”

1

0

SP < RP

Case 2

p

When both points are correctly set, the

with rising pressure (case 1).

Off = Pressure within window

1

hysteresis graph will also be correct. You can change between SP and RP as often as you wish until the settings are correct.

c) Setting a buffering time.

In order to prevent brief pressure “spikes” or “surges” from causing undesired switching, a buffering time can be entered. The effect of this is that pressure changes are evaluated only if the pressure signal in question is present for longer than the buffering time. In order to set a buffering time, press the button SP before the power

Positive hysteresis means: Signal “on” with falling pressure (case 2).

If the switching point is modified, this will automatically also result in a change in the reset point by a value equal to the hysteresis setting.

Case 1

Negative hysteresis

1

Switching point

0

p

0

RP

<

SP

p

Std = Standard mode, switching and reset points adjustable

HYS = Hysteresis mode, switching point and hysteresis adjustable

FEn = Window mode, switching window adjustable

Page 5
Image 5
Omega Speaker Systems PSW32 manual S T R U I O N M a N U a L

PSW32 specifications

The Omega Speaker Systems PSW32 is an advanced subwoofer that exemplifies the perfect blend of innovative technology and superior audio performance. Designed for both audiophiles and casual listeners alike, it brings an immersive sound experience that enhances any home theater or music listening setup.

One of the standout features of the PSW32 is its 12-inch high-excursion polypropylene woofer. This driver is engineered to produce deep, rich bass tones that are both powerful and accurate, ensuring that every note is felt as much as it is heard. The woofer's larger surface area allows it to move significant amounts of air, resulting in impressive low-frequency response and reduced distortion even at higher volumes.

The PSW32 incorporates advanced technologies to optimize performance. Its internal Digital Signal Processing (DSP) ensures that the audio remains clean and precise, regardless of the volume levels. With built-in EQ settings, users can easily adjust the sound profile to match their personal preferences or the acoustics of their room, ensuring an ideal listening experience.

Furthermore, the subwoofer features a high-current amplifier rated at 300 watts RMS and 600 watts peak power, providing ample power to drive the woofer effectively. This dynamic power capability ensures that the subwoofer performs exceptionally well across a wide range of frequencies, from deep rumbling lows in movie soundtracks to tight bass lines in music.

The design of the PSW32 is as impressive as its performance. With a sleek, modern enclosure crafted from premium materials, it not only looks great but also minimizes resonance and cabinet noise, further enhancing audio fidelity. The subwoofer is available in multiple finishes, allowing it to blend seamlessly with various interior styles.

Connectivity is another key feature of the PSW32. It includes both line-level and speaker-level inputs, making it versatile enough to integrate with a variety of audio systems. Users can connect it to receivers, amplifiers, or even preamps with ease, ensuring compatibility with many audio setups.

In summary, the Omega Speaker Systems PSW32 is a remarkable subwoofer designed to elevate your audio experience. With its powerful 12-inch woofer, advanced DSP technology, high-current amplification, and customizable connectivity options, it stands as a solid choice for anyone looking to enrich their sound system with deep, resonant bass and crystal-clear audio clarity. Whether for movie nights or music sessions, the PSW32 delivers an outstanding performance that truly resonates with its listeners.