AV Component Hookup

See the other side of this sheet for the Speaker hookup.

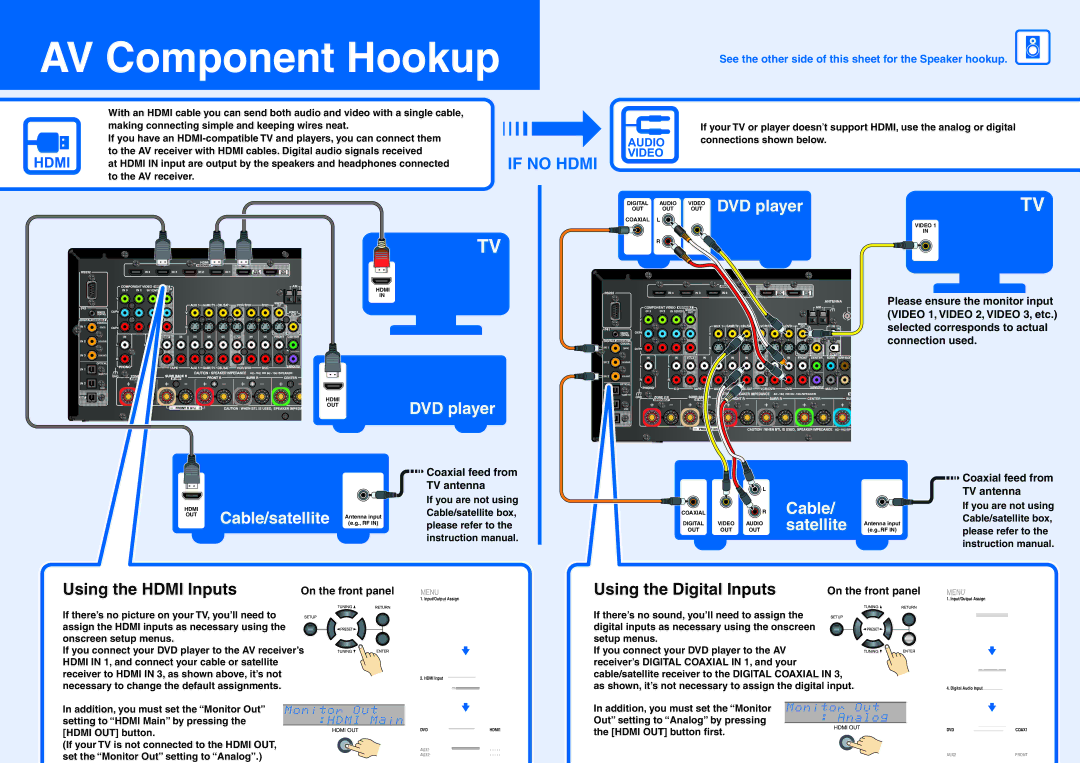
With an HDMI cable you can send both audio and video with a single cable, making connecting simple and keeping wires neat.

If you have an HDMI-compatible TV and players, you can connect them to the AV receiver with HDMI cables. Digital audio signals received

at HDMI IN input are output by the speakers and headphones connected to the AV receiver.

IF NO HDMI

TV

If your TV or player doesnt support HDMI, use the analog or digital connections shown below.

DIGITAL

AUDIO

VIDEO

DVD player

TV

OUT

OUT

OUT


COAXIAL

L


VIDEO 1


IN


R


HDMI

OUT

HDMI

IN

Please ensure the monitor input (VIDEO 1, VIDEO 2, VIDEO 3, etc.) selected corresponds to actual connection used.

DVD player


Coaxial feed from


TV antenna


If you are not using

HDMI

Cable/satellite


Cable/satellite box,

OUT

(e.g., RF IN)


Antenna input


please refer to the instruction manual.


L


COAXIAL


R

Cable/


OUT

OUT

OUT

satellite

(e.g..RF IN)

DIGITAL

VIDEO

AUDIO


Antenna input

Coaxial feed from TV antenna

If you are not using Cable/satellite box, please refer to the instruction manual.

Using the HDMI Inputs On the front panel

If there’s no picture on your TV, you’ll need to assign the HDMI inputs as necessary using the onscreen setup menus.

If you connect your DVD player to the AV receiver’s HDMI IN 1, and connect your cable or satellite receiver to HDMI IN 3, as shown above, it’s not necessary to change the default assignments.

In addition, you must set the “Monitor Out” setting to “HDMI Main” by pressing the [HDMI OUT] button.

(If your TV is not connected to the HDMI OUT, set the “Monitor Out” setting to “Analog”.)

MENU

1.Input/Output Assign

2.Speaker Setup

3.Audio Adjust

4.Source Setup

5.Listening Mode Preset

6.Miscellaneous

7.Hardware Setup

8.Lock Setup

1.Input/Output Assign

1.Monitor Out

2.HDMI Input

3.Component Video Input

4.Digital Audio Input

5.Analog Audio Input

1–2.

HDMI Input

DVD

HDMI1

VCR/DVR

HDMI2

CBL/SAT

HDMI3

GAME/TV

HDMI4

AUX1

- - - - -

AUX2

- - - - -


Using the Digital Inputs On the front panel

If there’s no sound, you’ll need to assign the digital inputs as necessary using the onscreen setup menus.

If you connect your DVD player to the AV receiver’s DIGITAL COAXIAL IN 1, and your cable/satellite receiver to the DIGITAL COAXIAL IN 3,

as shown, it’s not necessary to assign the digital input.

In addition, you must set the “Monitor Out” setting to “Analog” by pressing the [HDMI OUT] button first.

MENU

1.Input/Output Assign

2.Speaker Setup

3.Audio Adjust

4.Source Setup

5.Listening Mode Preset

6.Miscellaneous

7.Hardware Setup

8.Lock Setup

1.Input/Output Assign

1.Monitor Out

2.HDMI Input

3.Component Video Input

4.Digital Audio Input

5.Analog Audio Input

1–4.

Digital Audio Input

DVD

COAX1

VCR/DVR

COAX2

CBL/SAT

COAX3

GAME/TV

OPT1

AUX1

- - - - -

AUX2

FRONT


Page 2
Image 2
Onkyo SR876, NR906 instruction manual DVD player, Cable/satellite, Satellite

SR876, NR906 specifications

The Onkyo NR906 and SR876 are two prominent audio/video receivers that have garnered acclaim for their sound quality, versatility, and cutting-edge features. Designed for home theater enthusiasts, these models offer an exceptional way to enjoy both music and movies, making them ideal choices for those who desire an immersive audio experience.

The Onkyo NR906 is a 9.2-channel network receiver known for its robust audio performance. It supports advanced audio formats such as Dolby TrueHD and DTS-HD Master Audio, ensuring high-fidelity sound that brings cinematic experiences to life. One of its standout features is the ability to deliver 135 watts per channel, providing ample power to drive even the most demanding speakers. The NR906 also employs Audyssey MultEQ XT technology, which automatically calibrates the audio settings to optimize sound in any room, thereby ensuring a consistent listening experience regardless of the environment.

Streaming capabilities are another significant highlight of the NR906. With built-in Wi-Fi and Ethernet connectivity, users can access a wide range of internet radio stations, streaming services, and even local media files through DLNA compatibility. The receiver also supports high-resolution audio playback, enabling users to enjoy their favorite playlists in superior quality.

On the other hand, the Onkyo SR876, a 7.1-channel receiver, offers a unique blend of features tailored for the discerning audiophile. With the ability to output 130 watts per channel, it delivers powerful sound performance across a variety of audio sources. The SR876 utilizes a sophisticated advanced circuitry design to minimize distortion and enhance sound clarity, catering especially to the dynamics of movie soundtracks and music recordings.

Both receivers come equipped with HDMI 1.3a inputs to support the latest high-definition formats. The NR906 and SR876 feature upscaling capabilities to enhance standard-definition video to near-HD quality, ensuring that all video content looks its best regardless of the source.

In summary, both the Onkyo NR906 and SR876 represent high-quality options in the world of audio/video receivers. With their robust power outputs, extensive connectivity options, and advanced sound technologies, they provide excellent performance for home theaters while catering to a variety of audio preferences. These models are not just receivers; they are gateways to a more enriching audio-visual home experience.