AV Component Hookup

See the other side of this sheet for the Speaker hookup.

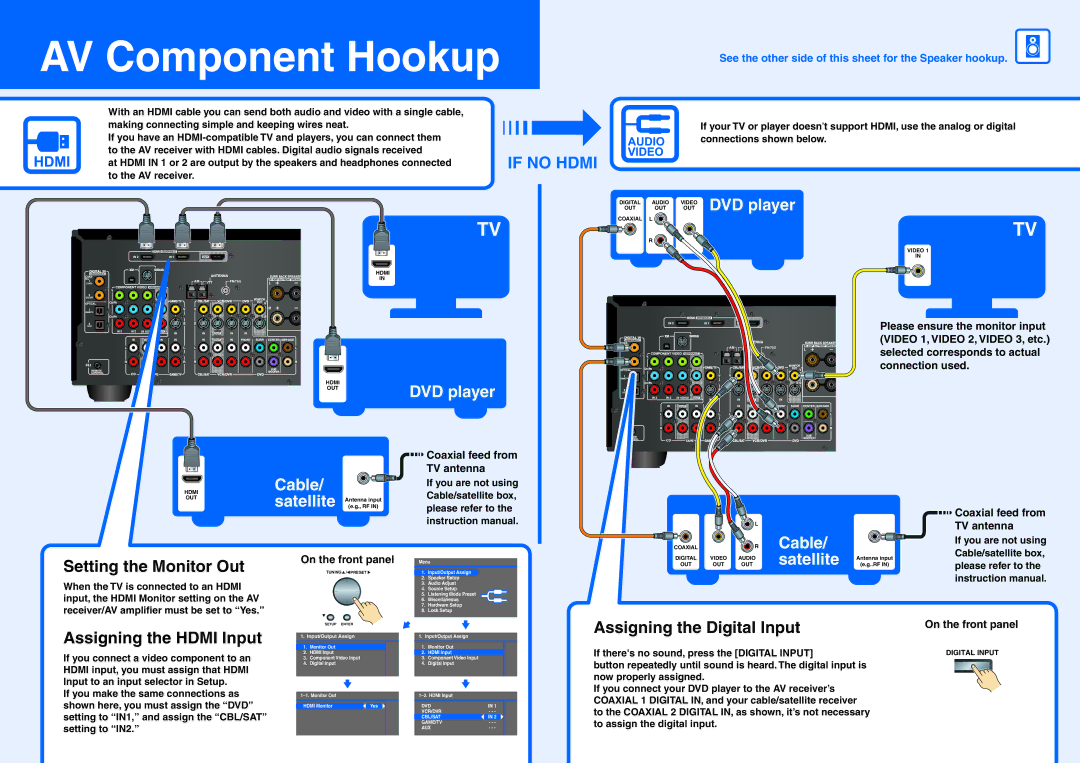
With an HDMI cable you can send both audio and video with a single cable, making connecting simple and keeping wires neat.

If you have an HDMI-compatible TV and players, you can connect them to the AV receiver with HDMI cables. Digital audio signals received

at HDMI IN 1 or 2 are output by the speakers and headphones connected to the AV receiver.

TV

HDMI

IN

IF NO HDMI

DIGITAL AUDIO VIDEO

OUT OUT OUT

COAXIAL L

R

If your TV or player doesnt support HDMI, use the analog or digital connections shown below.

DVD player

TV

VIDEO 1

IN

HDMI

OUT

DVD player


Coaxial feed from


Cable/


TV antenna

HDMI


If you are not using


OUT

satellite

(e.g., RF IN)


Cable/satellite box,


Antenna input


please refer to the


instruction manual.

Setting the Monitor Out

On the front panel

Menu

TUNING

PRESET

1.

Input/Output Assign


2.

Speaker Setup

When the TV is connected to an HDMI


3.

Audio Adjust


4.

Source Setup

input, the HDMI Monitor setting on the AV


5.

Listening Mode Preset


6.

Miscellaneous

receiver/AV amplifier must be set to “Yes.”


7.

Hardware Setup


8.

Lock Setup

Please ensure the monitor input (VIDEO 1, VIDEO 2, VIDEO 3, etc.) selected corresponds to actual connection used.


Coaxial feed from


L


TV antenna


COAXIAL


R

Cable/


If you are not using


Cable/satellite box,

OUT

OUT

OUT

satellite

(e.g..RF IN)

please refer to the

DIGITAL

VIDEO

AUDIO


Antenna input


instruction manual.

SETUP ENTER

Assigning the Digital Input

On the front panel

Assigning the HDMI Input

If you connect a video component to an HDMI input, you must assign that HDMI Input to an input selector in Setup.

If you make the same connections as shown here, you must assign the “DVD” setting to “IN1,” and assign the “CBL/SAT” setting to “IN2.”

1.Input/Output Assign

1.Monitor Out

2.HDMI Input

3.Component Video Input

4.Digital Input

1–1. Monitor Out


HDMI Monitor


Yes


1.Input/Output Assign

1.Monitor Out

2.HDMI Input

3.Component Video Input

4.Digital Input

1–2. HDMI Input

DVD


IN 1


VCR/DVR

- - -


CBL/SAT


IN 2


GAME/TV

- - -


AUX

- - -


If there's no sound, press the [DIGITAL INPUT]

button repeatedly until sound is heard. The digital input is now properly assigned.

If you connect your DVD player to the AV receiver’s COAXIAL 1 DIGITAL IN, and your cable/satellite receiver to the COAXIAL 2 DIGITAL IN, as shown, it’s not necessary to assign the digital input.

DIGITAL INPUT

Page 2
Image 2
Onkyo TX-SR605, TX-SA8560, TX-SA605 operating instructions AV Component Hookup

TX-SR605, TX-SA605, TX-SA8560 specifications

The Onkyo TX-SR605, TX-SA8560, and TX-SA605 are standout performers in the realm of home theater systems, delivering an exceptional audio-visual experience. These receivers integrate advanced technologies and myriad features to enhance home entertainment, making them a compelling choice for audiophiles and casual listeners alike.

Starting with the TX-SR605, it is a solid 7.1-channel AV receiver that boasts a powerful output of 100 watts per channel. This model supports Dolby TrueHD and DTS-HD Master Audio, ensuring high-definition audio playback that complements modern movies and music. The TX-SR605 features an extensive array of inputs, including HDMI, component, composite, and optical audio, allowing for seamless connectivity with various devices such as Blu-ray players, gaming consoles, and streaming services. Its advanced video processing capabilities enable 1080p video upscaling, enhancing the viewing experience on any compatible display.

Moving on to the TX-SA8560, this 9.2-channel receiver takes home theater systems to new heights. It features advanced amplification with a powerful output of 130 watts per channel, delivering immersive soundscapes that fill the room. The TX-SA8560 also supports Dolby Atmos and DTS:X, offering multidimensional audio that places viewers at the center of the action. With its Zone 2 and Zone 3 capability, users can enjoy different audio sources in separate areas of the house. The receiver is equipped with an intuitive graphical user interface, making setup and navigation user-friendly, while a comprehensive set of calibration tools ensures optimal sound quality tailored to individual room acoustics.

Lastly, the TX-SA605 is a versatile 7.2-channel receiver that emphasizes flexibility. It offers a robust 100 watts per channel output and delivers 4K video pass-through for the latest Ultra HD content. With built-in Wi-Fi and Bluetooth connectivity, streaming music from various services is easy and hassle-free. The TX-SA605 also features an Enhanced Audio Return Channel (eARC), allowing for higher quality audio transmission back to the receiver from compatible TVs.

In summary, the Onkyo TX-SR605, TX-SA8560, and TX-SA605 are engineered to take home entertainment to the next level. With their combination of power, cutting-edge audio technologies, and user-friendly features, these receivers cater to diverse listening preferences and setups. Whether watching movies, playing video games, or enjoying music, these models provide a rich, immersive experience that is sure to please any home theater enthusiast.