Wireless Weather Station with
Temperature / Humidity Display and
Model: BAR388HGA
USER MANUAL
INTRODUCTION
Thank you for selecting this Oregon ScientificTM Wireless Weather Station with Temperature / Humidity Display and
NOTE Please keep this manual handy as you use your new product. It contains practical
CLOCK OVERVIEW
FRONT VIEW
�
1.![]() /
/ ![]() : Increase / decrease setting; activate / deactivate clock reception signal
: Increase / decrease setting; activate / deactivate clock reception signal
2.MODE: Change settings / display
3.CHANNEL: Switch remote sensor display
4.MEM: View current, maximum and minimum temperature / humidity
5.PRESSURE: Select pressure unit; set altitude
6.HEAT INDEX: Display heat index
7.TEMP / HUMIDITY HI / LO ![]() : Change settings or enable / disable hi or lo temperature / humidity alarm for channel 1
: Change settings or enable / disable hi or lo temperature / humidity alarm for channel 1
8.°C / °F: Select temperature unit
9.RESET: Reset unit to default settings
10.Battery compartment
LCD DISPLAY
Weather Forecast Area:
| � |
| � |
� | � |
| |
� |
|
� | � |
1.Pressure trend
2.Weather forecast
3.Comfort zone
4.Pressure icon
5.Altitude icon
6.Pressure / altitude unit
7.Heat index icon
Outdoor Temperature Area:
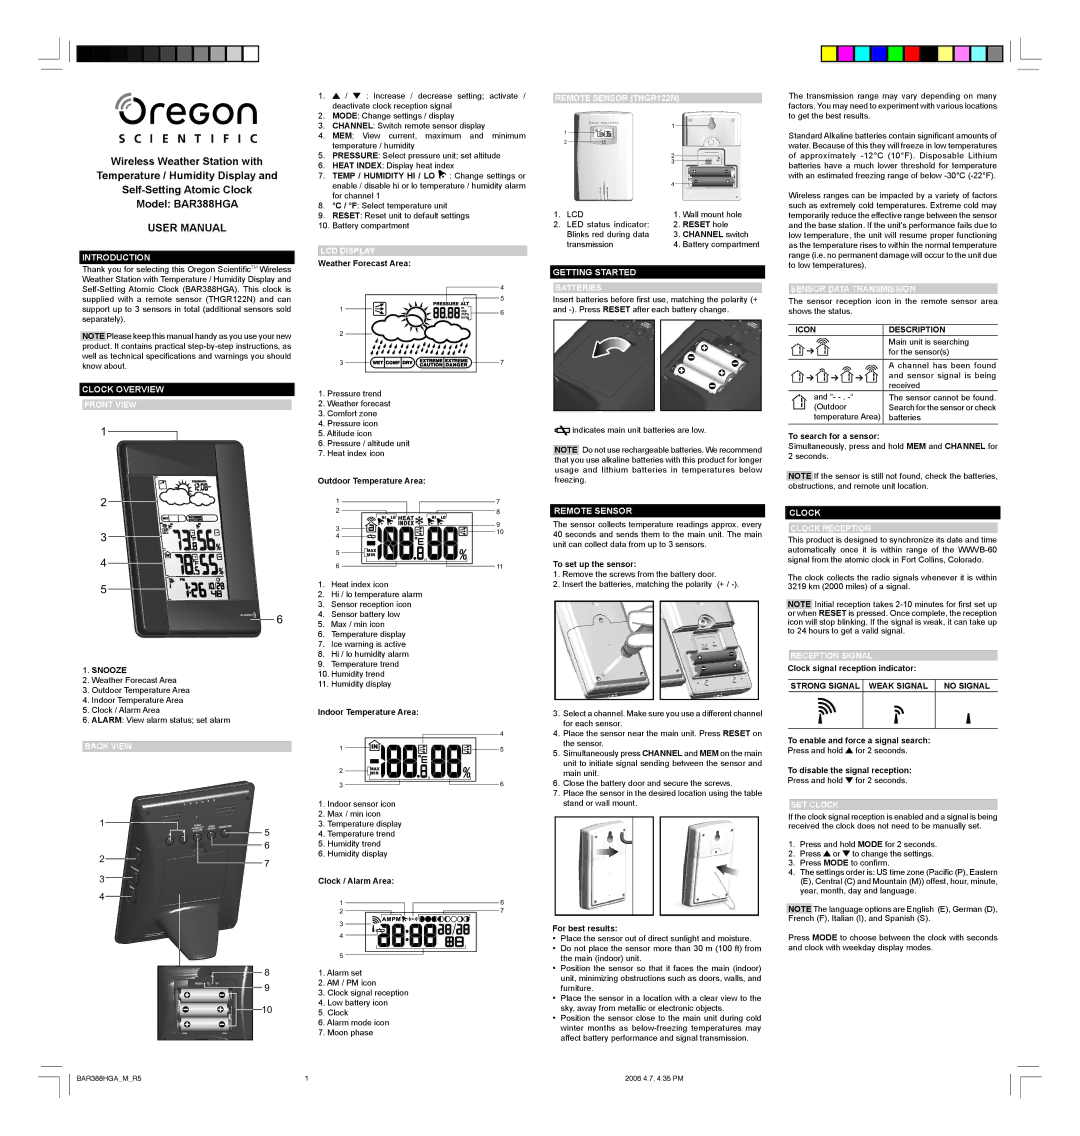
REMOTE SENSOR (THGR122N)
� ![]()
�
1. | LCD | 1. | Wall mount hole |
2. | LED status indicator: | 2. | RESET hole |
| Blinks red during data | 3. | CHANNEL switch |
| transmission | 4. | Battery compartment |
GETTING STARTED
BATTERIES
Insert batteries before first use, matching the polarity (+ and
![]() indicates main unit batteries are low.
indicates main unit batteries are low.
NOTE Do not use rechargeable batteries. We recommend that you use alkaline batteries with this product for longer usage and lithium batteries in temperatures below freezing.
The transmission range may vary depending on many factors. You may need to experiment with various locations to get the best results.
Standard Alkaline batteries contain significant amounts of water. Because of this they will freeze in low temperatures of approximately
Wireless ranges can be impacted by a variety of factors such as extremely cold temperatures. Extreme cold may temporarily reduce the effective range between the sensor and the base station. If the unit's performance fails due to low temperature, the unit will resume proper functioning as the temperature rises to within the normal temperature range (i.e. no permanent damage will occur to the unit due to low temperatures).
SENSOR DATA TRANSMISSION
The sensor reception icon in the remote sensor area shows the status.
ICON | DESCRIPTION |
| Main unit is searching |
| for the sensor(s) |
|
|
| A channel has been found |
| and sensor signal is being |
| received |
and “- | The sensor cannot be found. |
(Outdoor | Search for the sensor or check |
temperature Area) | batteries |
To search for a sensor:
Simultaneously, press and hold MEM and CHANNEL for 2 seconds.
NOTE If the sensor is still not found, check the batteries, obstructions, and remote unit location.
�
�![]()
� �![]()
![]()
![]() �
�
1.SNOOZE
2.Weather Forecast Area
3.Outdoor Temperature Area
4.Indoor Temperature Area
5.Clock / Alarm Area
6.ALARM: View alarm status; set alarm
BACK VIEW
�
�
�
� | � |
| |
� |
|
�
�
�
��
� | � | |
� | � | |
� | � | |
�� | ||
� | ||
| ||
� |
| |
� | �� |
1.Heat index icon
2.Hi / lo temperature alarm
3.Sensor reception icon
4.Sensor battery low
5.Max / min icon
6.Temperature display
7.Ice warning is active
8.Hi / lo humidity alarm
9.Temperature trend
10.Humidity trend
11.Humidity display
Indoor Temperature Area:
| � |
� | � |
� |
|
� | � |
1.Indoor sensor icon
2.Max / min icon
3.Temperature display
4.Temperature trend
5.Humidity trend
6.Humidity display
Clock / Alarm Area:
� | � |
� | � |
� |
|
� |
|
� |
|
1.Alarm set
2.AM / PM icon
3.Clock signal reception
4.Low battery icon
5.Clock
6.Alarm mode icon
7.Moon phase
REMOTE SENSOR
The sensor collects temperature readings approx. every 40 seconds and sends them to the main unit. The main unit can collect data from up to 3 sensors.
To set up the sensor:
1.Remove the screws from the battery door.
2.Insert the batteries, matching the polarity (+ /
3.Select a channel. Make sure you use a different channel for each sensor.
4.Place the sensor near the main unit. Press RESET on the sensor.
5.Simultaneously press CHANNEL and MEM on the main unit to initiate signal sending between the sensor and main unit.
6.Close the battery door and secure the screws.
7.Place the sensor in the desired location using the table stand or wall mount.
For best results:
•Place the sensor out of direct sunlight and moisture.
•Do not place the sensor more than 30 m (100 ft) from the main (indoor) unit.
•Position the sensor so that it faces the main (indoor) unit, minimizing obstructions such as doors, walls, and furniture.
•Place the sensor in a location with a clear view to the sky, away from metallic or electronic objects.
•Position the sensor close to the main unit during cold winter months as
CLOCK
CLOCK RECEPTION
This product is designed to synchronize its date and time automatically once it is within range of the
The clock collects the radio signals whenever it is within 3219 km (2000 miles) of a signal.
NOTE Initial reception takes
RECEPTION SIGNAL
Clock signal reception indicator:
STRONG SIGNAL WEAK SIGNAL NO SIGNAL
To enable and force a signal search:
Press and hold ![]() for 2 seconds.
for 2 seconds.
To disable the signal reception:
Press and hold ![]() for 2 seconds.
for 2 seconds.
SET CLOCK
If the clock signal reception is enabled and a signal is being received the clock does not need to be manually set.
1.Press and hold MODE for 2 seconds.
2.Press ![]() or
or ![]() to change the settings.
to change the settings.
3.Press MODE to confirm.
4.The settings order is: US time zone (Pacific (P), Eastern (E), Central (C) and Mountain (M)) offest, hour, minute, year, month, day and language.
NOTE The language options are English (E), German (D),
French (F), Italian (I), and Spanish (S).
Press MODE to choose between the clock with seconds and clock with weekday display modes.
BAR388HGA_M_R5 | 1 | 2006.4.7, 4:35 PM |