PEDOMETER WITH CALORIE COUNTER
MODEL : PE316CA
INSTRUCTION MANUAL
LR4![]() 3
3![]()
![]()
1.5V
LR43![]()
![]()
1.5V
FIG. A
LR43
1.5V
LR43 |
1.5V |
FIG. B
FIG. C
FIG. D | FIG.E |
FIG. F | FIG. G |
FIG. H
FIG. I | FIG. J |
ENGLISH
PEDOMETER WITH CALORIE COUNTER
INSTRUCTION MANUAL
INTRODUCTION
Thank you for purchasing the
The features and functions of the
FEATURES
1.Liquid crystal display (LCD)
A
2.Total steps taken
Maintains a running total of the total number of steps
3.Total distance traveled
Calculates the total distance walked or ran
4.Stride length adjustment
Allows the user to input their own length of stride
5.Calorie measurement
Calculates the number of consumed calories
6.Body weight adjustment
Allows the user to input their own weight used in the determination of the number of calories consumed
7.Real Time Clock (12 Hour format) Hour / minute display format
8.EL Backlight
Allows for easy reading in dim light.
9.Motion sensitivity adjustment
Allows the user to adjust the sensitivity of motion for increased step counting accuracy.
LOCATION AND FUNCTION OF PARTS [FIG. A]
A.LCD
B.CALO Button
Calorie measurement and weight display mode
C.DIST Button
Total distance and stride length display mode
D.Backlight [ ![]() ] Button Activates backlight
] Button Activates backlight
E.RESET Button
Resets steps taken, total distance, and calories consumed
F.HR / + Button
-Changes hour digits
-Use to increase personal weight and stride adjustment
G.MIN / - Button
-Changes minute digits
-Use to decrease personal weight and stride adjustment.
H.Motion Sensitivity Slide Switch
Increases or decreases the unit’s response to motion
I.Battery Compartment
Insert two (2 pieces) LR43 size batteries ( included )
J.Belt Clip
Clips to belt or clothing
K.Cover
Protects LCD panel
LCover Release Button
Press to open protective cover
OPENING THE COVER
Holding the pedometer upright, grasp the clip with one hand and press the COVER RELEASE button with the other.
BATTERY INSTALLATION: MAIN UNIT
1.Gently press and pull the battery compartment door.
2.Insert two (2 pieces) LR43 size 1.5V batteries or equivalent.[FIG. B]
3.Securely close the battery door cover.
Note: If not disposed of properly, batteries can be harmful. Protect the environment by taking exhausted batteries to authorized disposal stations.
HOW TO WEAR THE PEDOMETER
Attach the
Note: Improper positioning of the pedometer may result in incorrect measurements.
HOW TO SET THE TIME
1.Changing the hour digits. Using a stylus or other blunt object gently press the HR / + Button to adjust the hours displayed.
2.Changing the minute digits. Place a stylus or blunt object onto the MIN/ - button and press. Using a stylus or other blunt object gently press the MIN / - Button to adjust the minutes displayed.
THE STEP DISPLAY MODE
Once batteries are installed, the LCD will show the STEP display. [FIG. D]
The upper line displays shows the clock and the lower line shows the total number of steps taken.
To clear the total steps taken:
Press RESET, the total steps returns to zero.
MEASURING STEPS CORRECTLY
Adjusting the motion sensitivity slide switch:
To count the number of steps taken, the PE316CA uses an internal motion sensitive slide device. To make the unit more or less sensitive to motion, reposition the motion sensitivity slide switch. To determine the proper amount of motion sensitivity for an individual walking pattern, experiment with different settings.
THE DISTANCE DISPLAY MODE
Press DIST, to enter the total distance display. When the total distance is displayed, the top line will first show the
5 seconds, the stride length display will default back to the time display.
[FIG. E & F]
To clear the total distance:
Press RESET, the total distance returns to zero.
To return to STEP display:
Press DIST after upper line switches to clock display
MEASURING DISTANCE CORRECTLY
Correctly measuring distance depends on accurately setting the average length of an individual stride (stride length) and properly setting the internal
Total Distance = steps taken x average step length
To enter the length of a stride:
1.Press DIST. to view the STRIDE length display.
2.Using a stylus or other blunt object gently press the HR / + Button to increase the stride length or the MIN / - Button to decrease the stride length.
Stride length can be set between 30 to 150 cm (or 11 to 60 inches).
Note: if no changes are made to the Stride function, the upper line of the display will automatically return to the CLOCK display after five seconds.
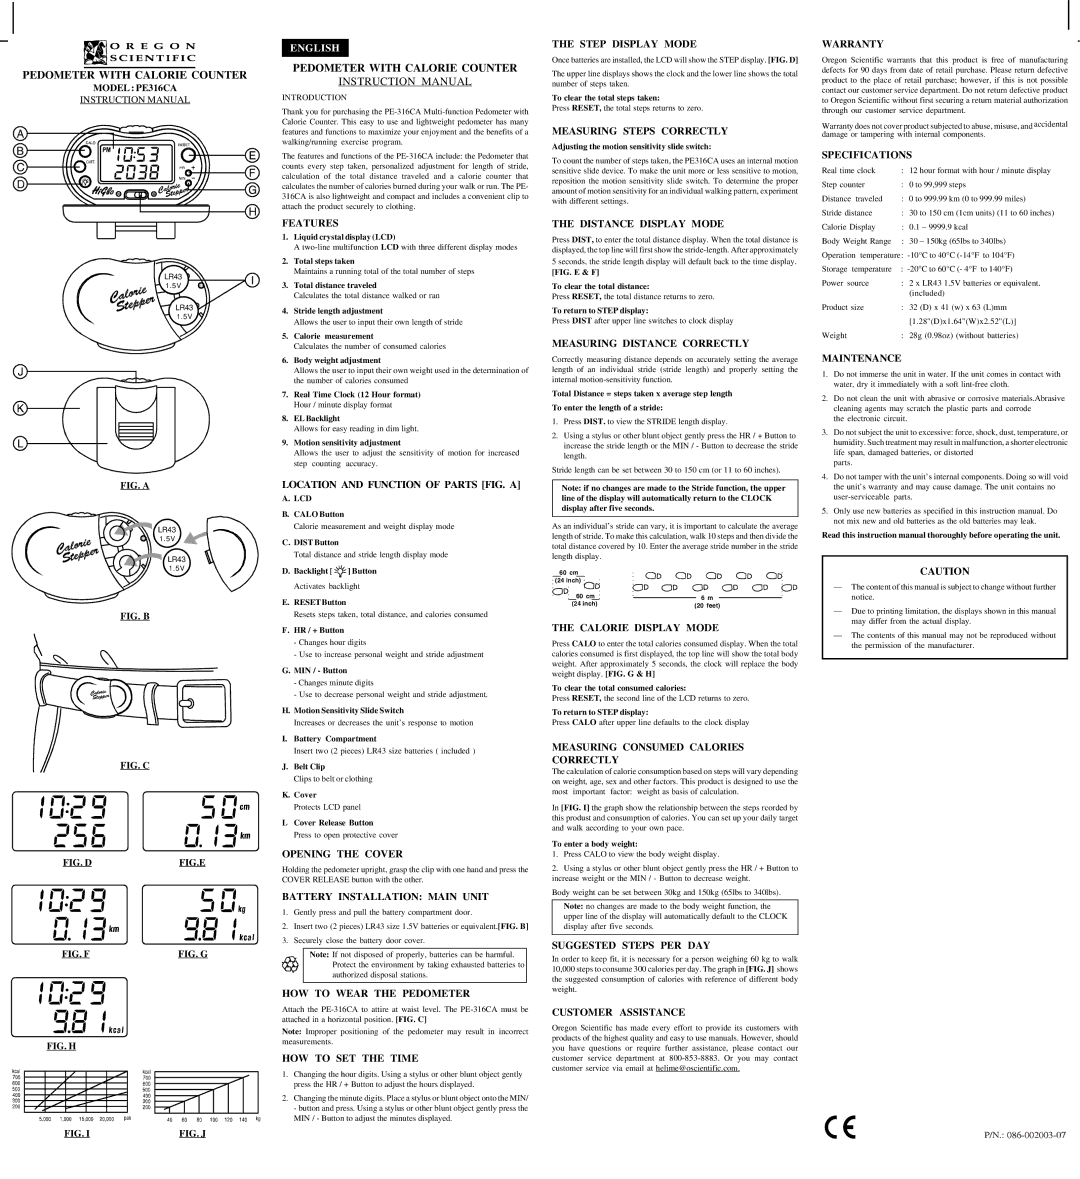
As an individual’s stride can vary, it is important to calculate the average length of stride. To make this calculation, walk 10 steps and then divide the total distance covered by 10. Enter the average stride number in the stride length display.
60 cm
(24 inch) |
| |
60 cm | 6 m | |
(24 inch) | ||
(20 feet) | ||
|
THE CALORIE DISPLAY MODE
Press CALO to enter the total calories consumed display. When the total calories consumed is first displayed, the top line will show the total body weight. After approximately 5 seconds, the clock will replace the body weight display. [FIG. G & H]
To clear the total consumed calories:
Press RESET, the second line of the LCD returns to zero.
To return to STEP display:
Press CALO after upper line defaults to the clock display
MEASURING CONSUMED CALORIES CORRECTLY
The calculation of calorie consumption based on steps will vary depending on weight, age, sex and other factors. This product is designed to use the most important factor: weight as basis of calculation.
In [FIG. I] the graph show the relationship between the steps rcorded by this produst and consumption of calories. You can set up your daily target and walk according to your own pace.
To enter a body weight:
1.Press CALO to view the body weight display.
2.Using a stylus or other blunt object gently press the HR / + Button to increase weight or the MIN / - Button to decrease weight.
Body weight can be set between 30kg and 150kg (65lbs to 340lbs).
Note: no changes are made to the body weight function, the upper line of the display will automatically default to the CLOCK display after five seconds.
SUGGESTED STEPS PER DAY
In order to keep fit, it is necessary for a person weighing 60 kg to walk 10,000 steps to consume 300 calories per day. The graph in [FIG. J] shows the suggested consumption of calories with reference of different body weight.
CUSTOMER ASSISTANCE
Oregon Scientific has made every effort to provide its customers with products of the highest quality and easy to use manuals. However, should you have questions or require further assistance, please contact our customer service department at
WARRANTY
Oregon Scientific warrants that this product is free of manufacturing defects for 90 days from date of retail purchase. Please return defective product to the place of retail purchase; however, if this is not possible contact our customer service department. Do not return defective product to Oregon Scientific without first securing a return material authorization through our customer service department.
Warranty does not cover product subjected to abuse, misuse, and accidental damage or tampering with internal components.
SPECIFICATIONS
Real time clock | : 12 hour format with hour / minute display |
Step counter | : 0 to 99,999 steps |
Distance traveled | : 0 to 999.99 km (0 to 999.99 miles) |
Stride distance | : 30 to 150 cm (1cm units) (11 to 60 inches) |
Calorie Display | : 0.1 – 9999.9 kcal |
Body Weight Range | : 30 – 150kg (65lbs to 340lbs) |
Operation temperature:
Storage temperature | : |
Power source | : 2 x LR43 1.5V batteries or equivalent. |
| (included) |
Product size | : 32 (D) x 41 (w) x 63 (L)mm |
| [1.28"(D)x1.64"(W)x2.52"(L)] |
Weight | : 28g (0.98oz) (without batteries) |
MAINTENANCE
1.Do not immerse the unit in water. If the unit comes in contact with water, dry it immediately with a soft
2.Do not clean the unit with abrasive or corrosive materials.Abrasive cleaning agents may scratch the plastic parts and corrode
the electronic circuit.
3.Do not subject the unit to excessive: force, shock, dust, temperature, or humidity. Such treatment may result in malfunction, a shorter electronic life span, damaged batteries, or distorted
parts.
4.Do not tamper with the unit’s internal components. Doing so will void the unit’s warranty and may cause damage. The unit contains no
5.Only use new batteries as specified in this instruction manual. Do not mix new and old batteries as the old batteries may leak.
Read this instruction manual thoroughly before operating the unit.
CAUTION
—The content of this manual is subject to change without further notice.
—Due to printing limitation, the displays shown in this manual may differ from the actual display.
—The contents of this manual may not be reproduced without the permission of the manufacturer.