RM383P / RM383PU / RM383PA / RA383P
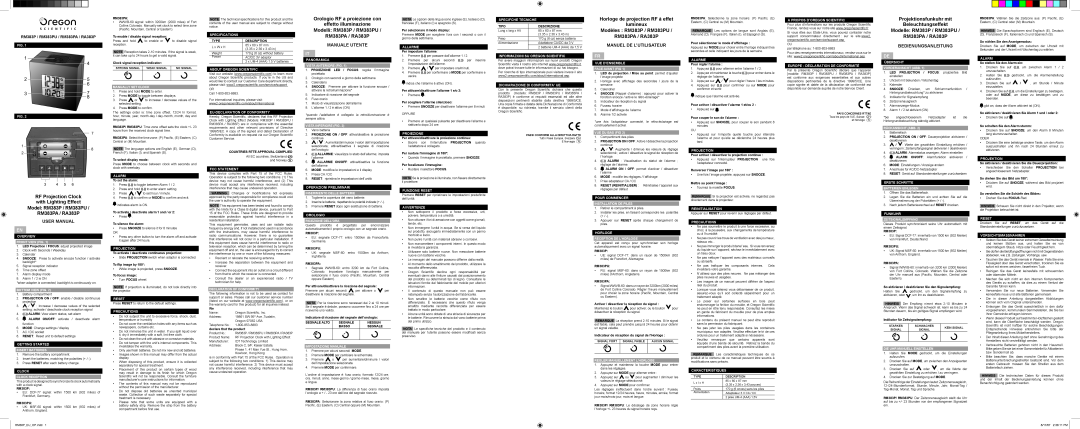
FIG. 1
1
4
2 | 5 |
| 6 |
3 | 7 |
| 8 |
FIG. 2
| 7 |
1 | 8 |
�� | |
2 |
|
��� |
|
���������� |
|
34 5 6
RF Projection Clock
with Lighting Effect
Model: RM383P / RM383PU /
RM383PA / RA383P
USER MANUAL
EN
OVERVIEW
FRONT VIEW (FIG. 1)
1.LED Projection / FOCUS: adjust projected image
2.Clock with Seconds / Weekday
3.Calendar
4.SNOOZE: Press to activate snooze function / activate backlight*
5.Signal reception indicator
6.Time zone offset
7.Alarm display mode
8.Alarm 1 / 2 is ON
*when adapter is connected, backlight is continuously on.
BOTTOM VIEW (FIG. 2)
1.Battery compartment
2.PROJECTION ON / OFF: enable / disable continuous projection
3./ : Increase / decrease values of the selected setting; activate / deactivate clock reception signal
4.((.)) ALARM: View alarm status; set alarm
5.ALARM ON/OFF: activate / deactivate alarm
function
6.MODE: Change settings / display
7.AC / DC socket
8.RESET: Reset unit to default settings
GETTING STARTED
INSERT BATTERIES
1.Remove the battery compartment.
2.Insert the batteries, matching the polarities (+ /
3.Press RESET after each battery change.
CLOCK
CLOCK RECEPTION
This product is designed to synchronize its clock automatically with a clock signal.
RM383P:
•EU:
RM383PU:
•UK:
Anthorn, England.
RM383PA:
•
To enable / disable signal reception:
Press and hold | to enable or | to disable signal |
reception. |
|
|
NOTE Reception takes
Clock signal reception indicator:
STRONG SIGNAL | WEAK SIGNAL | NO SIGNAL |
|
|
|
MANUALLY SET CLOCK
1.Press and hold MODE to enter.
2.Press MODE to toggle between displays.
3. Press | or | to increase / decrease values of the |
selected setting. |
| |
4.Press MODE to confirm.
The settings order is: time zone offset, 12/24 hr format, hour, minute, year,
RM383P/ RM383PU: Time zone offset sets the clock +/- 23 hours from the received clock signal time.
RM383PA: Select the time zone: (P) Pacific, (E) Eastern, (C) Central or (M) Mountain.
NOTE The language options are English (E), German (D), French (F), Italian (I), and Spanish (S).
To select display mode:
Press MODE to choose between clock with seconds and clock with weekday.
ALARM
To set the alarm:
1.Press ((.)) to toggle between Alarm 1 / 2.
2.Press and hold ((.)) to enter alarm setting.
3.Press ![]() /
/ ![]() to set hour / minute.
to set hour / minute.
4.Press ((.)) to confirm or MODE to confirm and exit.
![]() indicates alarm is ON.
indicates alarm is ON.
To activate / deactivate alarm 1 and / or 2:
•Press ![]() .
.
To silence the alarm:
•Press SNOOZE to silence it for 8 minutes
OR
•Press any other button to turn the alarm off and activate it again after 24 hours.
PROJECTION
To activate / deactivate continuous projection:
•Slide PROJECTION switch when adaptor is connected.
To flip image by 180°:
•While image is projected, press SNOOZE.
To focus image:
•Turn FOCUS wheel.
NOTE If projection is illuminated, do not look directly into the projector.
RESET
Press RESET to return to the default settings.
PRECAUTIONS
•Do not subject the unit to excessive force, shock, dust, temperature or humidity
•Do not cover the ventilation holes with any items such as newspapers, curtains etc.
•Do not immerse the unit in water. If you spill liquid over it, dry it immediately with a soft,
•Do not clean the unit with abrasive or corrosive materials.
•Do not tamper with the unit’s internal components. This invalidates the warranty.
•Only use fresh batteries. Do not mix new and old batteries.
•Images shown in this manual may differ from the actual display.
•When disposing of this product, ensure it is collected separately for special treatment.
•Placement of this product on certain types of wood may result in damage to its finish for which Oregon Scientific will not be responsible. Consult the furniture manufacturer's care instructions for information.
•The contents of this manual may not be reproduced without the permission of the manufacturer.
•Do not dispose old batteries as unsorted municipal waste. Collection of such waste separately for special treatment is necessary.
•Please note that some units are equipped with a battery safety strip. Remove the strip from the battery compartment before first use.
NOTE The technical specifications for this product and the contents of the user manual are subject to change without notice.
SPECIFICATIONS
TYPE | DESCRIPTION | |
L x W x H | 85 x 60 x 87 mm | |
(3.35 x 2.36 x 3.43 in) | ||
| ||
Weight | 170 g (6 oz) without battery | |
Power | AC/DC 3V adaptor | |
| 2 x |
ABOUT OREGON SCIENTIFIC
Visit our website (www.oregonscientific.com) to learn more about Oregon Scientific products. If you’re in the US and would like to contact our Customer Care department directly, please visit: www2.oregonscientific.com/service/support
OR
Call
For international inquiries, please visit: www2.oregonscientific.com/about/international
Hereby, Oregon Scientific, declares that this RF Projection Clock with Lighting Effect (Models: RM383P / RM383PU / RM383PA / RA383P) are in compliance with the essential requirements and other relevant provisions of Directive 1999/5/EC. A copy of the signed and dated Declaration of Conformity is available on request via our Oregon Scientific Customer Service.
COUNTRIES RTTE APPROVAL COMPLIED
All EC countries, Switzerland CH and Norway N
FCC STATEMENT
This device complies with Part 15 of the FCC Rules. Operation is subject to the following two conditions: (1) This device may not cause harmful interference, and (2) This device must accept any interference received, including interference that may cause undesired operation.
WARNING Changes or modifications not expressly approved by the party responsible for compliance could void the user’s authority to operate the equipment.
NOTE This equipment has been tested and found to comply with the limits for a Class B digital device, pursuant to Part 15 of the FCC Rules. These limits are designed to provide reasonable protection against harmful interference in a residential installation.
This equipment generates, uses and can radiate radio frequency energy and, if not installed and used in accordance with the instructions, may cause harmful interference to radio communications. However, there is no guarantee that interference will not occur in a particular installation. If this equipment does cause harmful interference to radio or television reception, which can be determined by turning the equipment off and on, the user is encouraged to try to correct the interference by one or more of the following measures:
•Reorient or relocate the receiving antenna.
•Increase the separation between the equipment and receiver.
•Connect the equipment into an outlet on a circuit different from that to which the receiver is connected.
•Consult the dealer or an experienced radio / TV technician for help.
DECLARATION OF CONFORMITY
The following information is not to be used as contact for support or sales. Please call our customer service number (listed on our website at www.oregonscientific.com), or on the warranty card for this product) for all inquiries instead.
We |
|
Name: | Oregon Scientific, Inc. |
Address: | 19861 SW 95th Ave.,Tualatin, |
| Oregon 97062 USA |
Telephone No.: | |
declare that the product | |
Product No.: | RM383P / RM383PU / RM383PA / RA383P |
Product Name: | RF Projection Clock with Lighting Effect |
Manufacturer: | IDT Technology Limited |
Address: | Block C, 9/F, Kaiser Estate, |
| Phase 1, 41 Man Yue St., Hung Hom, |
| Kowloon, Hong Kong |
is in conformity with Part 15 of the FCC Rules. Operation is subject to the following two conditions: 1) This device may not cause harmful interference. 2) This device must accept any interference received, including interference that may cause undesired operation.
Orologio RF a proiezione con
effetto illuminazione
Modelli: RM383P / RM383PU /
RM383PA / RA383P
MANUALE UTENTE
IT
PANORAMICA
VISTA ANTERIORE (FIG. 1)
1.PROIEZIONE LED / FOCUS: regola l’immagine proiettata
2.Orologio con secondi e giorno della settimana
3.Calendario
4.SNOOZE: Premere per attivare la funzione snooze / attivare la retroilluminazione*
5.Indicatore di ricezione del segnale
6.Fuso orario
7.Modo di visualizzazione dell’allarme
8.L’allarme 1 / 2 è attivo (ON)
*quando l’adattatore è collegato la retroilluminazione è sempre attiva.
VISTA INFERIORE (FIG. 2)
1.Vano batteria
2.PROIEZIONE ON / OFF: attiva/disattiva la proiezione continua
3./ : Aumenta/diminuisce I valori dell’impostazione selezionata; attiva/disattiva il segnale di ricezione dell’orologio
4.((.)) ALLARME: visualizza lo stato dell’allarme; imposta l’allarme
5.ALLARME ON/OFF: attiva/disattiva la funzione dell’allarme
6.MODE: modifica le impostazioni e il display
7.Presa CA / DC
8.RESET: ripristina le impostazioni dell’unità
OPERAZIONI PRELIMINARI
INSERIMENTO DELLE BATTERIE
1.Togliere la copertura del vano batterie.
2.Inserire le batterie, rispettando le polarità indicate (+ /
3.Premere RESET dopo ogni sostituzione di batteria.
OROLOGIO
RICEZIONE DELL’ORA
Questo prodotto è progettato per sincronizzare automaticamente il proprio orologio con un segnale orario.
RM383P:
•EU: segnale
RM383PU:
•UK: segnale
RM383PA:
•Segnale
Per attivare/disattivare la ricezione del segnale:
Premere per alcuni secondi | per attivare o | per |
disattivare la ricezione del segnale. |
|
|
NOTA Per la ricezione sono necessari dai 2 ai 10 minuti. Se il segnale è debole, possono occorrere fino a 24 ore per riceverne uno valido.
Indicatore di ricezione del segnale dell’orologio:
SEGNALE ALTO | SEGNALE | NESSUN |
| BASSO | SEGNALE |
|
|
|
|
|
|
IMPOSTAZIONE MANUALE
1.Premere per alcuni secondi MODE.
2.Premere MODE per cambiare le schermate.
3. Premere o per aumentare/diminuire I valori dell’impostazione selezionata.
4.Premere MODE per confermare.
L’ordine di impostazione è: fuso orario, formato 12/24 ore, ora, minuti, anno,
RM383P/ RM383PU: La differenza di fuso orario imposta l’orologio a + / - 23 ore dall’ora del segnale ricevuto.
RM383PA: Selezionare la zona relativa al fuso orario: (P) Pacific, (E) Eastern, (C) Central oppure (M) Mountain.
NOTA Le opzioni della lingua sono inglese (E), tedesco (D), francese (F), italiano (I) e spagnolo (S).
Per selezionare il modo display:
Premere MODE per scegliere l’ora con I secondi o con il giorno della settimana.
ALLARME
Per impostare l’allarme:
1.Premere ((.)) per passare dall’allarme 1 / 2.
2.Premere per alcuni secondi ((.)) per inserire l’impostazione dell’allarme.
3. Premere | / | per impostare ora/minuti. |
4.Premere ((.)) per confermare o MODE per confermare e uscire.
indica che l’allarme è attivo (ON).
Per attivare/disattivare l’allarme 1 e/o 2:
• Premere .
Per scegliere l’allarme silenzioso:
•Premere SNOOZE per disattivare l’allarme per 8 minuti
OPPURE
•Premere un qualsiasi pulsante per disattivare l’allarme e riattivarlo dopo 24 ore.
PROIEZIONE
Per attivare/disattivare la proiezione continua:
•Scorre con l’interruttore PROJECTION quando l’adattatore è collegato.
Per ruotare l’immagine di 180º:
•Quando l’immagine è proiettata, premere SNOOZE.
Per focalizzare l’immagine:
•Ruotare il selettore FOCUS.
NOTA Se la proiezione è illuminata, non fissare direttamente il proiettore.
FUNZIONE RESET
Premere RESET per ripristinare le impostazioni predefinite dell’unità.
AVVERTENZE
•Non sottoporre il prodotto a forza eccessiva, urti, polvere, temperatura o a umidità.
•Non otturare i fori di aerazione con oggetti come giornali, tende, etc.
•Non immergere l’unità in acqua. Se si versa del liquido sul prodotto, asciugarlo immediatamente con un panno morbido e liscio.
•Non pulire l’unità con materiali abrasivi o corrosivi.
•Non manomettere i componenti interni. In questo modo si invalida la garanzia.
•Utilizzare solo batterie nuove. Non mescolare batterie nuove con batterie vecchie.
•Le immagini del manuale possono differire dalla realtà.
•Al momento dello smaltimento del prodotto, utilizzare la raccolta differenziata.
•Oregon Scientific declina ogni responsabilità per eventuali danni alle finiture causati dal posizionamento del prodotto su determinati tipi di legno. Consultare le istruzioni fornite dal fabbricante del mobile per ulteriori informazioni.
•Il contenuto di questo manuale non può essere ristampato senza l’autorizzazione del fabbricante.
•Non smaltire le batterie vecchie come rifiuto non differenziato. È necessario che questo rifiuto venga smaltito mediante raccolta differenziata per essere trattato in modo particolare.
•Alcune unità sono dotate di una striscia di sicurezza per le batterie. Rimuovere la striscia dal vano batterie prima del primo utilizzo.
NOTA Le specifiche tecniche del prodotto e il contenuto del manuale per l’utente possono essere modificati senza preavviso.
SPECIFCHE TECNICHE
TIPO | DESCRIZIONE |
Lung x larg x Alt | 85 x 60 x 87 mm |
| (3.35 x 2.36 x 3.43 in) |
Peso | 170 g (6 oz) senza batteria |
|
|
Alimentazione | Adattatore CA/DC da 3 V |
| 2 batterie |
INFORMAZIONI SU OREGON SCIENTIFIC
Per avere maggiori informazioni sui nuovi prodotti Oregon Scientific visita il nostro sito internet www.oregonscientific.it, dove potrai trovare tutte le informazioni di cui hai bisogno.
Per ricerche di tipo internazionale puoi visitare invece il sito www2.oregonscientific.com/about/international.asp.
DICHIARAZIONE DI CONFORMITA’ UE
Con la presente Oregon Scientific dichiara che questo prodotto (modello: RM383P / RM383PU / RM383PA / RA383P) è conforme ai requisiti essenziali ed alle altre disposizioni pertinenti stabilite dalla direttiva 1999/5/CE. Una copia firmata e datata della Dichiarazione di Conformità
èdisponibile, su richiesta, tramite il servizio clienti della Oregon Scientific.
PAESI CONFORMI ALLA DIRETTIVA R&TTE
Tutti i Paesi Europei, Svizzera CH
E Norvegia N
Horloge de projection RF à effet
lumineux
Modèles : RM383P / RM383PU /
RM383PA / RA383P
MANUEL DE L’UTILISATEUR
FR
VUE D’ENSEMBLE
FACE AVANT (FIG 1)
1.LED de projection / Mise au point: permet d’ajuster l’image projetée
2.Horloge avec affichage des secondes / jours de la semaine
3.Calendrier
4.SNOOZE (Rappel d’alarme) : appuyez pour activer la fonction snooze / active le
5.Indicateur de réception du signal
6.Fuseau horaire
7.Mode d’affichage de l’alarme
8.Alarme 1/2 activée
*une fois l’adaptateur connecté, le
VUE DU BAS (FIG 2)
1.Compartiment des piles
2.PROJECTION ON / OFF : Active / désactive la projection continue
3./ : Augmente / diminue les valeurs du réglage sélectionné ; active / désactive le signal de réception de l’horloge.
4.((.)) ALARM : Visualisation du statut de l’alarme ; réglage de l’alarme.
5.ALARM ON / OFF: permet d’activer / désactiver l’alarme
6.MODE : modifie les réglages / l’affichage
7.Prise adaptateur CA / CC
8.RESET (REINITIALISER) : Réinitialise l’appareil aux réglages par défaut
POUR COMMENCER
INSTALLATION DE PILES
1.Retirer le compartiment à piles.
2.Installer les piles, en faisant correspondre les polarités (+ /
3.Appuyer sur RESET après chaque changement de piles.
HORLOGE
RÉCEPTION DE L’HORLOGE
Cet appareil est conçu pour synchroniser son horloge automatiquement avec un signal horaire.
RM383P:
•UE: signal
RM383PU:
•RU: signal
RM383PA:
•Signal
Activer / désactiver la réception du signal :
Maintenez le bouton | pour activer, ou le bouton | pour |
désactiver la réception du signal. |
| |
REMARQUE La réception prend
Indicateur de réception du signal de l’Horloge :
SIGNAL FORT | SIGNAL FAIBLE | AUCUN SIGNAL |
|
|
|
REGLER MANUELLEMENT L’HORLOGE
1.Appuyez et maintenez la touche MODE pour entrer dans les réglages.
2.Appuyez sur MODE pour alterner entre :
3.Appuyez sur ![]() ou
ou ![]() pour augmenter / diminuer les valeurs le réglage sélectionné.
pour augmenter / diminuer les valeurs le réglage sélectionné.
4.Appuyez sur MODE pour confirmer.
Les réglages s’effectuent dans l’ordre suivant : Fuseau horaire, format 12/24 heures, heure, minutes, année, format
RM383P/ RM383PU: Le décalage de zone horaire règle l’horloge +/- 23 heures du signal horaire reçu.
RM383PA: Sélectionne la zone horaire: (P) Pacific, (E) Eastern, (C) Central ou (M) Mountain.
REMARQUE Les options de langue sont Anglais (E), Alemand (D), Français (F), Italien (I), et Espagnol (S).
Pour sélectionner le mode d’affichage :
Appuyez sur MODE pour choisir entre l’horloge indiquant les secondes et celle indiquant les jours de la semaine.
ALARME
Pour régler l’alarme :
1.Appuyez ((.)) pour alterner entre l’alarme 1 / 2.
2.Appuyez et maintenez la touche ((.)) pour entrer dans le réglage de l’alarme.
3. Appuyez sur | / | pour régler l’heure / les minutes. |
4.Appuyez sur ((.)) pour confirmer ou sur MODE pour confirmer et sortir.
indique que l’alarme est activée.
Pour activer / désactiver l’alarme 1 et/ou 2 :
• Appuyez sur .
Pour couper le son de l’alarme :
•Appuyez sur SNOOZE, pour couper le son pendant 8 minutes
OU
•Appuyez sur n’importe quelle touche pour éteindre l’alarme et pour qu’elle se déclenche 24 heures plus tard.
PROJECTION
Pour activer / désactiver la projection continue :
•Appuyez sur l'interrupteur PROJECTION une fois l’adaptateur connecté.
Renverser l’image par 180° :
•Une fois l’image projetée, appuyez sur SNOOZE.
Mettre au point l’image :
•Tournez la molette FOCUS.
REMARQUE Si la projection est activée, ne regardez pas directement dans le projecteur.
REINITIALISATION
Appuyer sur RESET pour revenir aux réglages par défaut.
PRECAUTIONS
•Ne pas soumettre le produit à une force excessive, au choc, à la poussière, aux changements de température ou à l’humidité.
•Ne pas couvrir les trous de ventilation avec des journaux, rideaux etc…
•Ne pas immerger le produit dans l’eau. Si vous renversez du liquide sur l’appareil,
•Ne pas nettoyer l’appareil avec des matériaux corrosifs ou abrasifs.
•Ne pas trafiquer les composants internes. Cela invalidera votre garantie.
•N’utilisez que des piles neuves. Ne pas mélanger des piles neuves et usagées.
•Les images de ce manuel peuvent différer de l’aspect réel du produit.
•Lorsque vous désirez vous débarrasser de ce produit,
•Le poser sur certaines surfaces en bois peut endommager la finition du meuble, et Oregon Scientific ne peut en être tenu responsable. Consultez les mises en garde du fabricant du meuble pour de plus amples informations.
•Le contenu du présent manuel ne peut être reproduit sans la permission du fabriquant.
•Ne pas jeter les piles usagées dans les containers municipaux non adaptés Veuillez effectuer le tri de ces ordures pour un traitement adapté si nécessaire.
•Veuillez remarquer que certains appareils sont équipés d’une bande de sécurité. Retirez la bande du compartiment des piles avant la première utilisation.
REMARQUE Les caractéristiques techniques de ce produit et le contenu de ce manuel peuvent être soumis à modifications sans préavis.
CARACTERISTIQUES
TYPE | DESCRIPTION | |
L x l x H | 85 x 60 x 87 mm | |
(3,35 x 2,36 x 3,43 pouces) | ||
| ||
|
| |
Poids | 170 g (6 onces) sans les piles | |
Alimentation | Adaptateur 3 V CA / CC | |
| 2 piles |
A PROPOS D’OREGON SCIENTIFIC
Pour plus d‘informations sur les produits Oregon Scientific France,
Si vous êtes aux
OU
par téléphone au:
Pour des renseignements internationaux, rendez vous sur le site: www2.oregonscientific.com/about/international.asp.
EUROPE - DÉCLARATION DE CONFORMITÉ
Par la présente Oregon Scientific déclare que l’appareil [modèle: RM383P / RM383PU / RM383PA / RA383P] est conforme aux exigences essentielles et aux autres dispositions pertinentes de la directive 1999/5/CE. Une copie signée et datée de la déclaration de conformité est disponible sur demande auprès de notre Service Client.
PAYS CONCERNES RTT&E Tous les pays de l’UE, Suisse CH
et Norvège N
Projektionsfunkuhr mit
Beleuchtungseffekt
Modelle: RM383P / RM383PU /
RM383PA / RA383P
BEDIENUNGSANLEITUNG
DE
ÜBERSICHT
VORDERANSICHT (ABB. 1)
1.LED PROJECTION / FOCUS: projiziertes Bild einstellen
2.Uhrzeit mit Sekunden / Wochentag
3.Kalender
4.SNOOZE: Drücken, um Schlummerfunktion / Hintergrundbeleuchtung* zu aktivieren
5.Indikator für Signalempfang
6.Zeitzonenausgleich
7.
8.Alarm 1 / 2 ist aktiviert (ON)
*bei angeschlossenem Netzadapter ist die Hintergrundbeleuchtung ständig aktiviert.
RÜCKANSICHT (ABB. 2)
1.Batteriefach
2.PROJECTION ON / OFF: Dauerprojektion aktivieren / deaktivieren
3./ : Werte der gewählten Einstellung erhöhen / verringern; Zeitempfangssignal aktivieren / deaktivieren
4.((.)) ALARM: Alarmstatus anzeigen; Alarm einstellen
5.ALARM ON/OFF: Alarmfunktion aktivieren / deaktivieren
6.MODE: Einstellungen / Anzeige ändern
7.Anschluss für
8.RESET: Gerät auf Standardeinstellungen zurücksetzen
ERSTE SCHRITTE
BATTERIEN EINLEGEN
1.Öffnen Sie das Batteriefach.
2.Legen Sie die Batterien ein und achten Sie auf die Übereinstimmung der Polaritäten (+ /
3.Nach jedem Batteriewechsel auf RESET drücken.
FUNKUHR
ZEITSIGNALEMPFANG
Dieses Produkt synchronisiert seine Uhr automatisch mit einem Zeitsignal.
RM383P:
•EU: Signal
RM383PU:
•UK: Signal
RM383PA:
•Signal
So aktivieren / deaktivieren Sie den Signalempfang:
Halten Sie | gedrückt, um den Signalempfang zu |
aktivieren, oder | , um ihn zu deaktivieren. |
HINWEIS Der Empfang nimmt etwa
Indikator für Zeitsignalempfang:
STARKES | SCHWACHES | KEIN SIGNAL | |
SIGNAL | SIGNAL | ||
| |||
|
|
| |
|
|
|
DIE UHR MANUELL EINSTELLEN
1.Halten Sie MODE gedrückt, um die Einstellungen aufzurufen.
2.Drücken Sie auf MODE, um zwischen den Anzeigearten umzuschalten.
3. Drücken Sie auf oder , um die Werte der gewählten Einstellung zu erhöhen / zu verringern.
4.Drücken Sie zur Bestätigung auf MODE.
Die Reihenfolge der Einstellungen lautet: Zeitzonenausgleich,
RM383P/ RM383PU: Der Zeitzonenausgleich stellt die Uhr auf bis zu +/- 23 Stunden von der empfangenen Signalzeit ein.
RM383PA: Wählen Sie die Zeitzone aus: (P) Pacific, (E) Eastern, (C) Central oder (M) Mountain.
HINWEIS Die Sprachoptionen sind Englisch (E), Deutsch (D), Französisch (F), Italienisch (I) und Spanisch (S).
So wählen Sie den Anzeigemodus:
Drücken Sie auf MODE, um zwischen der Uhrzeit mit Sekunden und der Uhrzeit mit Wochentag zu wählen.
ALARM
So stellen Sie den Alarm ein:
1.Drücken Sie auf ((.)), um zwischen Alarm 1 / 2 umzuschalten.
2.Halten Sie ((.)) gedrückt, um die Alarmeinstellung aufzurufen.
3. Drücken Sie auf | / | , um Stunde / Minute |
einzustellen. |
|
|
4.Drücken Sie auf ((.)), um die Einstellungen zu bestäigen, oder auf MODE, um diese zu bestätigen und zu beenden.
gibt an, dass der Alarm aktiviert ist (ON).
So aktivieren / deaktivieren Sie Alarm 1 und / oder 2:
• Drücken Sie auf .
So schalten Sie den Alarm stumm:
•Drücken Sie auf SNOOZE, um den Alarm 8 Minuten lang stummzuschalten
ODER
•Drücken Sie eine beliebige andere Taste, um den Alarm auszuschalten und ihn nach 24 Stunden erneut zu aktivieren.
PROJEKTION
So aktivieren / deaktivieren Sie die Dauerprojektion:
•Verschieben Sie den Schalter PROJECTION bei angeschlossenem Netzadapter.
So drehen Sie das Bild um 180°:
•Drücken Sie auf SNOOZE, während das Bild projiziert wird.
So verstellen Sie die Schärfe des Bildes:
•Drehen Sie das
HINWEIS Schauen Sie nicht direkt in den Projektor, wenn die Projektion beleuchtet ist.
RESET
Drücken Sie auf RESET, um das Gerät auf die Standardeinstellungen zurückzusetzen.
VORSICHTSMASSNAHMEN
•Setzen Sie das Gerät keiner extremen Gewalteinwirkung und keinen Stößen aus, und halten Sie es von übermäßigem Staub, Hitze oder Feuchtigkeit fern.
•Sie dürfen die Belüftungsöffnungen nicht mit Gegenständen abdecken, wie z.B. Zeitungen, Vorhänge, usw.
•Tauchen Sie das Gerät niemals in Wasser. Falls Sie eine Flüssigkeit über das Gerät verschütten, trocknen Sie es sofort mit einem weichen, faserfreien Tuch.
•Reinigen Sie das Gerät keinesfalls mit scheuernden oder ätzenden Mitteln.
•Machen Sie sich nicht an den internen Komponenten des Geräts zu schaffen, da dies zu einem Verlust der Garantie führen kann.
•Verwenden Sie nur neue Batterien. Verwenden Sie keinesfalls neue und alte Batterien gemeinsam.
•Die in dieser Anleitung dargestellten Abbildungen können sich vom Original unterscheiden.
•Entsorgen Sie das Gerät ausschließlich in den dafür vorgesehenen, kommunalen Sammelstellen, die Sie bei Ihrer Gemeinde erfragen können.
•Wenn dieses Produkt auf bestimmte Holzflächen gestellt wird, kann die Oberfläche beschädigt werden. Oregon Scientific ist nicht haftbar für solche Beschädigungen. Entsprechende Hinweise entnehmen Sie bitte der Pflegeanleitung Ihres Möbelherstellers.
•Der Inhalt dieser Anleitung darf ohne Genehmigung des Herstellers nicht vervielfältigt werden.
•Verbrauchte Batterien gehören nicht in den Hausmüll. Bitte geben Sie sie bei einer Sammelstelle für Altbatterien bzw. Sondermüll ab.
•Bitte beachten Sie, dass manche Geräte mit einem Batterieunterbrechungsstreifen bestückt sind. Vor dem ersten Gebrauch müssen Sie den Streifen aus dem Batteriefach ziehen.
HINWEIS Die technischen Daten für dieses Produkt und der Inhalt der Bedienungsanleitung können ohne Benachrichtigung geändert werden.
RM38P_EU_OP.indd 1
8/17/07 2:38:11 PM