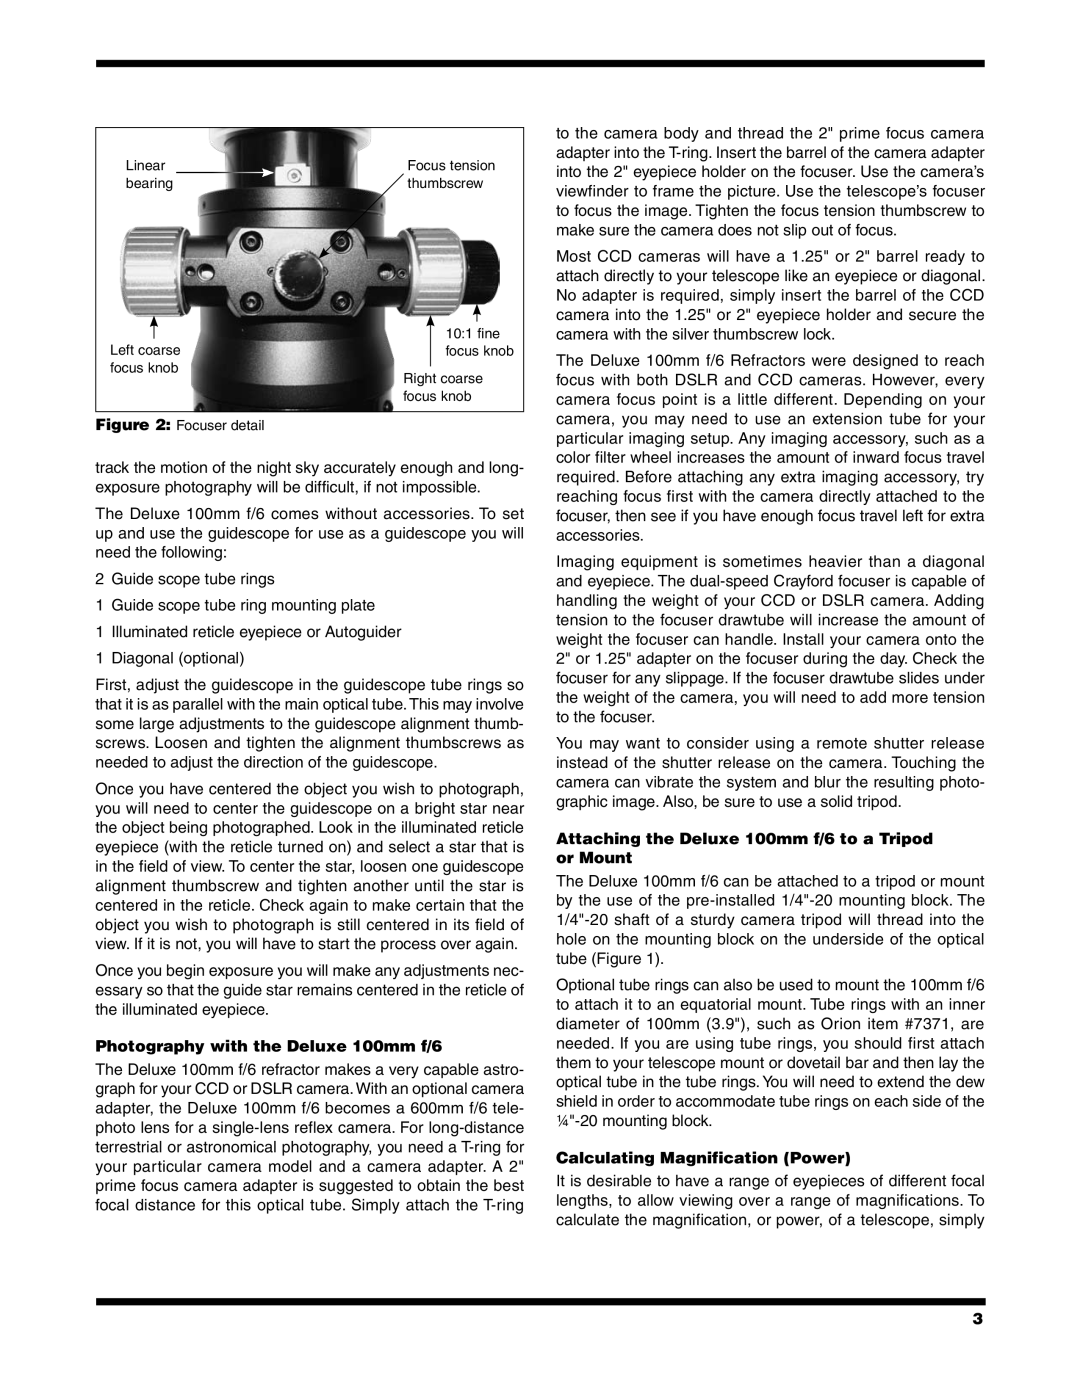
Linear |
| Focus tension |
bearing |
| thumbscrew |
10:1 fine
Left coarsefocus knob
focus knob
Right coarse focus knob
Figure 2: Focuser detail
track the motion of the night sky accurately enough and long- exposure photography will be difficult, if not impossible.
The Deluxe 100mm f/6 comes without accessories. To set up and use the guidescope for use as a guidescope you will need the following:
2 Guide scope tube rings
1 Guide scope tube ring mounting plate
1Illuminated reticle eyepiece or Autoguider
1Diagonal (optional)
First, adjust the guidescope in the guidescope tube rings so that it is as parallel with the main optical tube. This may involve some large adjustments to the guidescope alignment thumb- screws. Loosen and tighten the alignment thumbscrews as needed to adjust the direction of the guidescope.
Once you have centered the object you wish to photograph, you will need to center the guidescope on a bright star near the object being photographed. Look in the illuminated reticle eyepiece (with the reticle turned on) and select a star that is in the field of view. To center the star, loosen one guidescope alignment thumbscrew and tighten another until the star is centered in the reticle. Check again to make certain that the object you wish to photograph is still centered in its field of view. If it is not, you will have to start the process over again.
Once you begin exposure you will make any adjustments nec- essary so that the guide star remains centered in the reticle of the illuminated eyepiece.
Photography with the Deluxe 100mm f/6
The Deluxe 100mm f/6 refractor makes a very capable astro- graph for your CCD or DSLR camera. With an optional camera adapter, the Deluxe 100mm f/6 becomes a 600mm f/6 tele- photo lens for a
to the camera body and thread the 2" prime focus camera adapter into the
Most CCD cameras will have a 1.25" or 2" barrel ready to attach directly to your telescope like an eyepiece or diagonal. No adapter is required, simply insert the barrel of the CCD camera into the 1.25" or 2" eyepiece holder and secure the camera with the silver thumbscrew lock.
The Deluxe 100mm f/6 Refractors were designed to reach focus with both DSLR and CCD cameras. However, every camera focus point is a little different. Depending on your camera, you may need to use an extension tube for your particular imaging setup. Any imaging accessory, such as a color filter wheel increases the amount of inward focus travel required. Before attaching any extra imaging accessory, try reaching focus first with the camera directly attached to the focuser, then see if you have enough focus travel left for extra accessories.
Imaging equipment is sometimes heavier than a diagonal and eyepiece. The
You may want to consider using a remote shutter release instead of the shutter release on the camera. Touching the camera can vibrate the system and blur the resulting photo- graphic image. Also, be sure to use a solid tripod.
Attaching the Deluxe 100mm f/6 to a Tripod or Mount
The Deluxe 100mm f/6 can be attached to a tripod or mount by the use of the
Optional tube rings can also be used to mount the 100mm f/6 to attach it to an equatorial mount. Tube rings with an inner diameter of 100mm (3.9"), such as Orion item #7371, are needed. If you are using tube rings, you should first attach them to your telescope mount or dovetail bar and then lay the optical tube in the tube rings. You will need to extend the dew shield in order to accommodate tube rings on each side of the
Calculating Magnification (Power)
It is desirable to have a range of eyepieces of different focal lengths, to allow viewing over a range of magnifications. To calculate the magnification, or power, of a telescope, simply
3