The dovetail mounting plate now connected to the ShortTube 80-A connects to the equatorial mount’s dovetail holder. The dovetail holder has two securing knobs to keep the dovetail plate securely in place. Be sure to loosen these two knobs prior to attaching the telescope. While grasping the telescope firmly, place the dovetail mounting plate into the mount’s dovetail holder and tighten the clamping knobs to secure the optical tube.

An equatorial mount is desirable for astronomical viewing as it allows easy manual and/or motorized electronic track- ing of celestial objects as the Earth rotates. Setting circles on equatorial mounts also enable you to locate objects by their celestial coordinates (right ascension and declina- tion), which can be found in many observing books and star atlases.

Note: If you are using an Orion EQ-1 or EQ-2 equatorial mount, the dovetail mounting plate is not needed for attach- ing the telescope. Simply mount the telescope to your EQ-1 or EQ-2 mount by attaching the tube rings directly to the mount head and then placing the telescope into the tube rings. Be sure to tighten the silver tube ring clamping knobs to secure the telescope.

The ShortTube 80-A can also be easily mounted on altaz- imuth mounts like the Orion VersaGo which utilizes a dove- tail holder like Orion equatorial mounts. Follow the previous directions to couple the telescope to the mounting plate with the tube rings, and to attach the mounting plate to the VersaGo mount’s dovetail holder.

Alternatively, the ShortTube 80-A can be mounted on any standard camera tripod that has a 1⁄4"-20 stud. As described previously, attach the included tube rings to the dovetail mounting plate using the included hardware and then place the optical tube into the rings. Be sure to tighten the silver clamping knob on each tube ring to secure the telescope. The camera tripod’s 1⁄4"-20 stud will thread directly into the threaded holes on the bottom of the dovetail mounting plate.

Focusing

The ShortTube 80-A is equipped with a precision rack- and-pinion focuser. When you first look in the eyepiece, the image you see may be fuzzy, or out of focus. If so, gently turn one of the focusing wheels with your fingers until the image becomes sharp. You will have to readjust the focus when aiming at subjects of varying distances, or after changing eyepieces. Make sure the focus lock thumbscrew is loosened before focusing. After focusing, you can tighten it to lock the telescope’s focus into place.

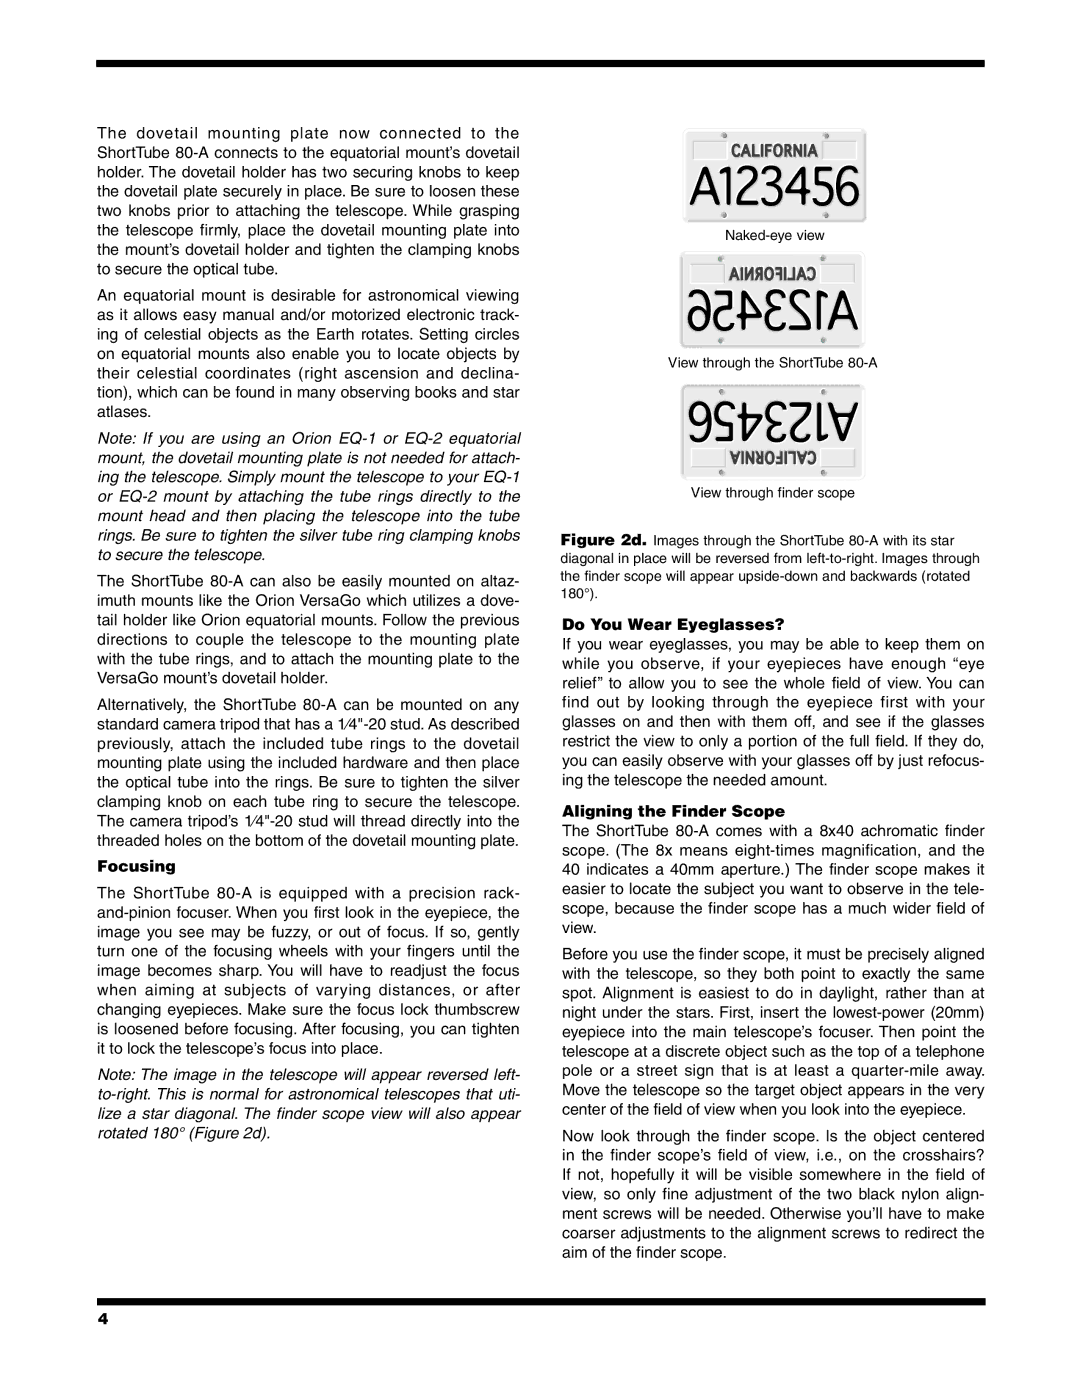
Note: The image in the telescope will appear reversed left- to-right. This is normal for astronomical telescopes that uti- lize a star diagonal. The finder scope view will also appear rotated 180° (Figure 2d).

Naked-eye view

View through the ShortTube 80-A

View through finder scope

Figure 2d. Images through the ShortTube 80-A with its star diagonal in place will be reversed from left-to-right. Images through the finder scope will appear upside-down and backwards (rotated 180°).

Do You Wear Eyeglasses?

If you wear eyeglasses, you may be able to keep them on while you observe, if your eyepieces have enough “eye relief” to allow you to see the whole field of view. You can find out by looking through the eyepiece first with your glasses on and then with them off, and see if the glasses restrict the view to only a portion of the full field. If they do, you can easily observe with your glasses off by just refocus- ing the telescope the needed amount.

Aligning the Finder Scope

The ShortTube 80-A comes with a 8x40 achromatic finder scope. (The 8x means eight-times magnification, and the 40 indicates a 40mm aperture.) The finder scope makes it easier to locate the subject you want to observe in the tele- scope, because the finder scope has a much wider field of view.

Before you use the finder scope, it must be precisely aligned with the telescope, so they both point to exactly the same spot. Alignment is easiest to do in daylight, rather than at night under the stars. First, insert the lowest-power (20mm) eyepiece into the main telescope’s focuser. Then point the telescope at a discrete object such as the top of a telephone pole or a street sign that is at least a quarter-mile away. Move the telescope so the target object appears in the very center of the field of view when you look into the eyepiece.

Now look through the finder scope. Is the object centered in the finder scope’s field of view, i.e., on the crosshairs? If not, hopefully it will be visible somewhere in the field of view, so only fine adjustment of the two black nylon align- ment screws will be needed. Otherwise you’ll have to make coarser adjustments to the alignment screws to redirect the aim of the finder scope.

4

Page 4
Image 4
Orion 80-A instruction manual Focusing, Do You Wear Eyeglasses?, Aligning the Finder Scope

80-A specifications

The Orion 80-A is a cutting-edge agricultural drone designed to enhance the efficiency and effectiveness of modern farming practices. Combining advanced technologies and a robust design, the Orion 80-A stands out as a reliable tool for precision agriculture.

One of the key features of the Orion 80-A is its high-resolution imaging capabilities. Equipped with a multi-spectral camera, the drone can capture detailed images across different wavelengths. This allows farmers to monitor crop health, assess water stress, and identify nutrient deficiencies. The ability to gather this data in real-time enables prompt decision-making, leading to improved crop yields and resource management.

The drone boasts an impressive flight time of up to 60 minutes, thanks to its powerful battery and energy-efficient design. This extended flight capability allows for the mapping of larger fields without the need for frequent recharging, maximizing productivity during critical field assessments. Additionally, it features an autopilot system that enables automated flight paths and sophisticated data collection, which is particularly useful for terrain mapping and monitoring agricultural practices over time.

Another notable characteristic of the Orion 80-A is its rugged construction. Built to withstand harsh environments, the drone is equipped with durable materials that ensure longevity and resilience in the field. With dust and weatherproof ratings, it can operate in various weather conditions, providing essential data regardless of environmental factors.

User-friendly software complements the Orion 80-A, making it accessible even to those with minimal technical expertise. The accompanying application offers intuitive controls for flight planning, data collection, and analysis, ensuring that farmers can easily interpret the results and apply them to their operations. Furthermore, the integration of artificial intelligence in the software enhances data processing, providing actionable insights through advanced analytics.

In summary, the Orion 80-A represents a significant advancement in agricultural technology. Its high-resolution imaging, extended flight time, rugged design, and user-friendly interface come together to deliver a powerful tool for improving agricultural practices. As precision farming continues to evolve, the Orion 80-A is well-positioned to meet the growing demands of the agricultural industry, enabling farmers to increase efficiency, reduce waste, and enhance sustainability in their operations.