faint. Many observers own at least one 2" eyepiece in order to achieve the widest field of view possible for deep
To use 2" eyepieces, simply loosen the thumb screw on the star diagonal that secures the 1.25" adapter, and remove the adapter. Insert a 2" eyepiece directly into the diagonal, and secure it in place with the thumb screw on the diagonal. You are now ready to observe with the 2" eyepiece. If you attempt to place a 2" eyepiece directly into the focuser drawtube with- out using the star diagonal, images will not come into focus. If you wish to view with 2" eyepieces without using the diagonal, you will need to purchase an optional 2" extension tube.
Note About Chromatic Aberration
Chromatic aberration literally means color distortion. Whenever light passes through one material to another, light of differ- ent wavelengths (color) is bent by different amounts. This is
aproblem that plagues
The 80mm ED is designed to minimize chromatic aberration. The objective lens is actually comprised of two individual lens- es, called elements, one of which is made of ED
6.Setting Up and Using the Equatorial Mount
When you look at the night sky, you no doubt have noticed that the stars appear to move slowly from east to west over time. That apparent motion is caused by the Earth’s rotation (from west to east). An equatorial mount (Figure 8) is designed to compensate for that motion, allowing you to easily “track” the movement of astronomical objects, thereby keeping them from drifting out of your telescope’s field of view while you’re observing.
This is accomplished by slowly rotating the telescope on its right ascension (R.A.) axis, using only the R.A.
Polar Alignment
For Northern Hemisphere observers, approximate polar align- ment is achieved by pointing the mount’s right ascension axis
| Little Dipper | |||
| (in Ursa Minor) | |||
Big Dipper | N.C.P. | |||
|
|
|
| |
(in Ursa Major) |
|
|
| Polaris |
|
|
| ||
|
|
|
| |
Pointer |
|
|
| Cassiopeia |
Stars |
|
|
| |
|
|
|
| |
Figure 9. To find Polaris in the night sky, look north and find the Big Dipper. Extend an imaginary line from the two "Pointer Stars" in the bowl of the Big Dipper. Go about five times the distance between those stars and you'll reach Polaris, which lies within 1° of the north celestial pole (NCP).
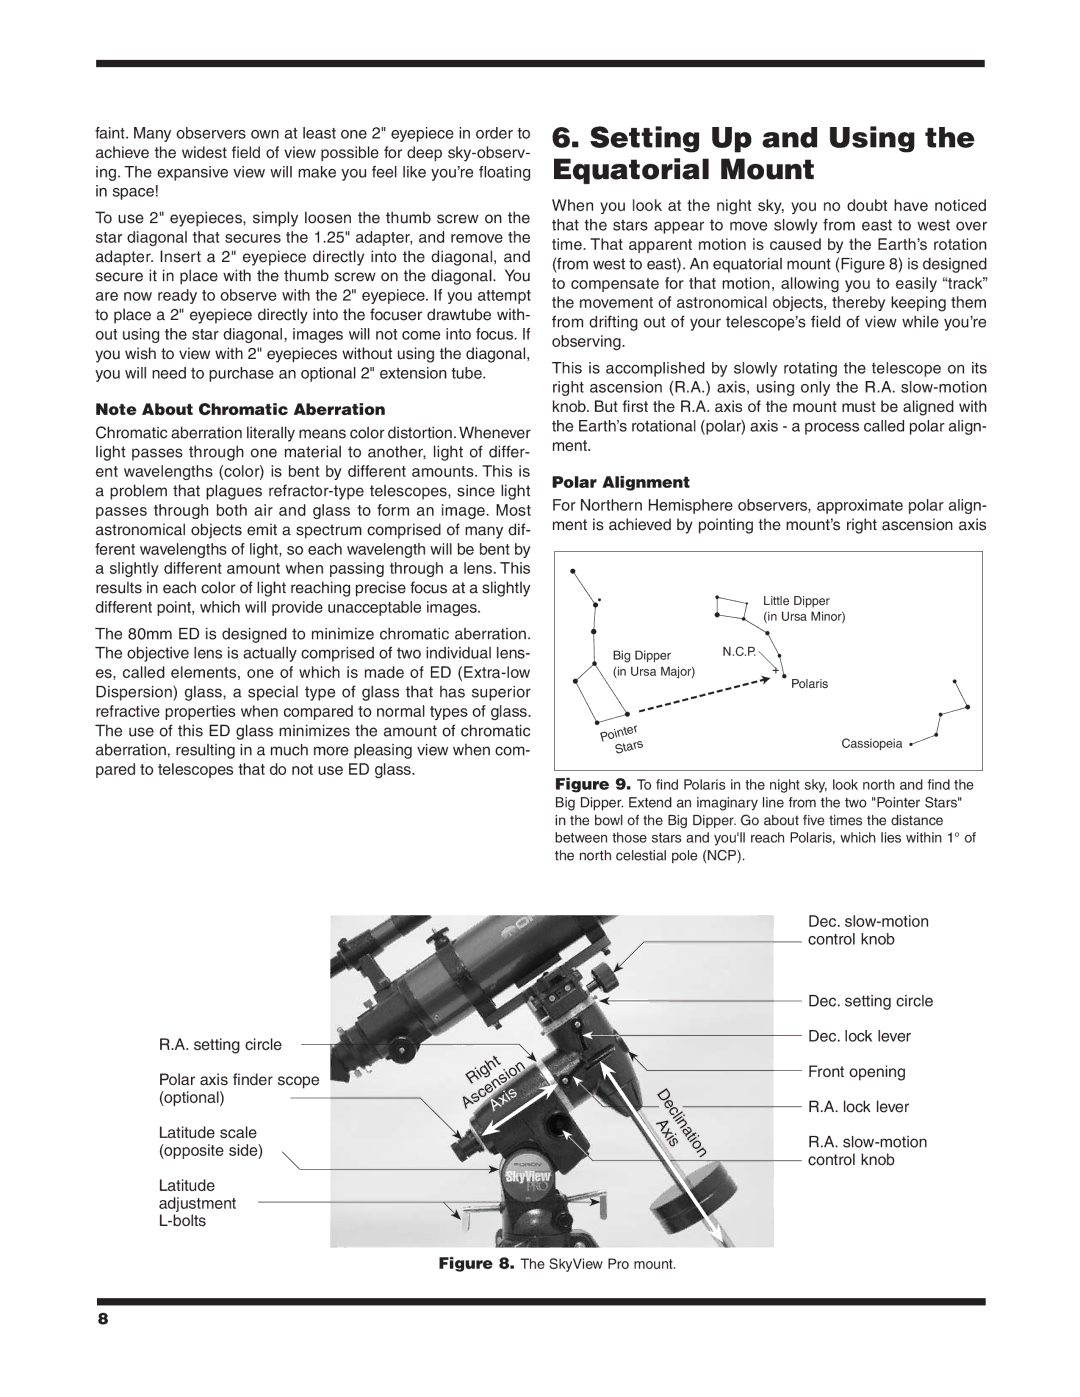
R.A. setting circle
Polar axis finder scope (optional)
Latitude scale (opposite side)
Latitude adjustment
AscensionRight
Axis
Declination
Axis
Figure 8. The SkyView Pro mount.
Dec.
Dec. setting circle
Dec. lock lever
Front opening
R.A. lock lever
R.A.
8