Oster 6646, 6640, 6642 Tightening The Container, Ass E M B L I N G Yo U R Bl E N D E R, Cover

Models: 6642 6640 6646

1 22
Download 22 pages 29.28 Kb
Page 3
Image 3
OST E R I Z E R ® BL E N D E R PA R T S A N D C A R E

OST E R I Z E R ® BL E N D E R PA R T S A N D C A R E

COVER

The cover for your OSTERIZER® BLENDER consists of two parts, the plastic feeder cap and the vinyl cover. The cover is self-sealing, and is made of vinyl which is resistant to absorption of odors and stains. The feeder cap is removable for use as a measuring cup and provides an opening for the addition of other ingredients.

CONTAINER

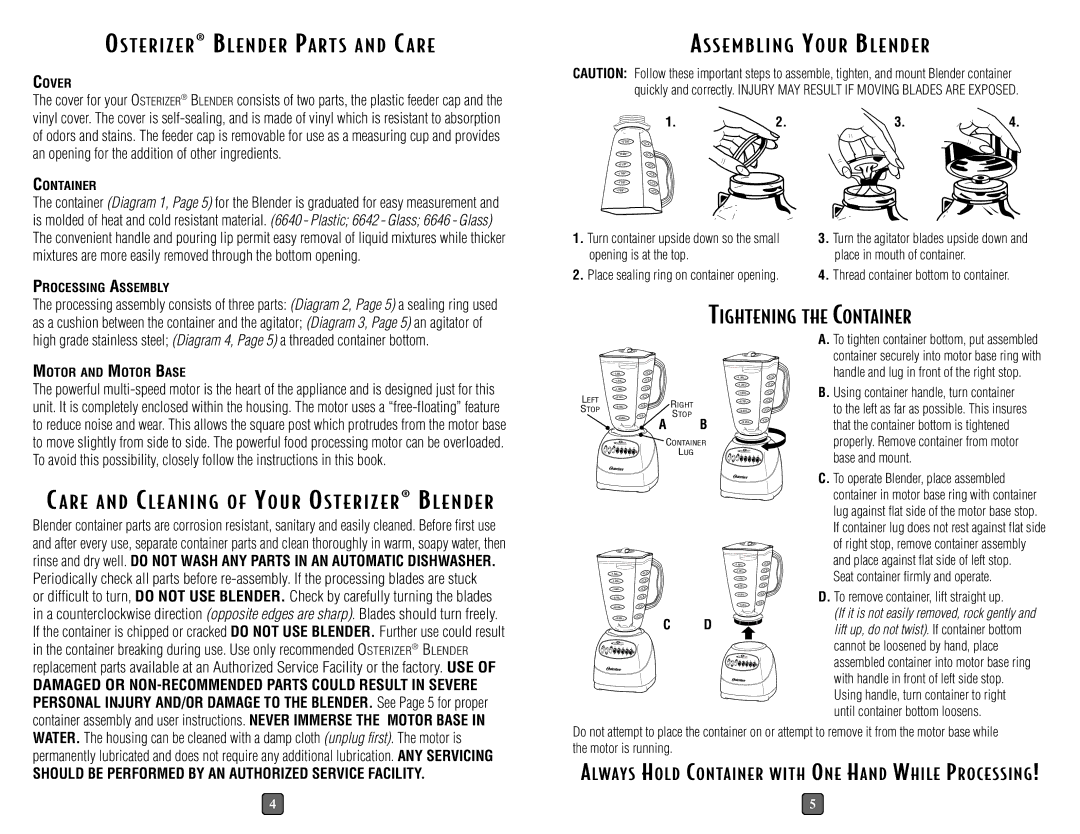
The container (Diagram 1, Page 5) for the Blender is graduated for easy measurement and is molded of heat and cold resistant material. (6640 - Plastic; 6642 - Glass; 6646 - Glass) The convenient handle and pouring lip permit easy removal of liquid mixtures while thicker mixtures are more easily removed through the bottom opening.

PROCESSING ASSEMBLY

The processing assembly consists of three parts: (Diagram 2, Page 5) a sealing ring used as a cushion between the container and the agitator; (Diagram 3, Page 5) an agitator of

ASS E M B L I N G YO U R BL E N D E R

CAUTION: Follow these important steps to assemble, tighten, and mount Blender container quickly and correctly. INJURY MAY RESULT IF MOVING BLADES ARE EXPOSED.


1.

2.

3.

4.

–0.25L–

–1


–0.50L–

–2


–0.75L–

–3


–1.00L–


–4


–1.25L–


–5


–1.50L–


–6


1. Turn container upside down so the small

3. Turn the agitator blades upside down and

opening is at the top.


place in mouth of container.


2. Place sealing ring on container opening.4. Thread container bottom to container.

TIGHTENING THE CONTAINER

high grade stainless steel; (Diagram 4, Page 5) a threaded container bottom.

MOTOR AND MOTOR BASE

The powerful multi-speed motor is the heart of the appliance and is designed just for this unit. It is completely enclosed within the housing. The motor uses a “free-floating” feature to reduce noise and wear. This allows the square post which protrudes from the motor base to move slightly from side to side. The powerful food processing motor can be overloaded. To avoid this possibility, closely follow the instructions in this book.

LEFT

STOP

–1.50L–

–1.25L–

–1.00L–

–0.75L–

–0.50L–

–0.25L–

0Speed


–6


–5


–4

–3

–2


–1


RIGHT

STOP

A B

CONTAINER

LUG

–1.50 L–

–1.25 L–

–1.00 L–

–0.75 L–

–0.50 L–

–0.25 L–

0Speed


–6


–5


–4

–3

–2


–1


A. To tighten container bottom, put assembled container securely into motor base ring with handle and lug in front of the right stop.

B. Using container handle, turn container to the left as far as possible. This insures that the container bottom is tightened properly. Remove container from motor base and mount.

C A R E A N D CL E A N I N G O F YO U R OST E R I Z E R ® BL E N D E R

Blender container parts are corrosion resistant, sanitary and easily cleaned. Before first use and after every use, separate container parts and clean thoroughly in warm, soapy water, then rinse and dry well. DO NOT WASH ANY PARTS IN AN AUTOMATIC DISHWASHER. Periodically check all parts before re-assembly. If the processing blades are stuck

or difficult to turn, DO NOT USE BLENDER. Check by carefully turning the blades in a counterclockwise direction (opposite edges are sharp). Blades should turn freely. If the container is chipped or cracked DO NOT USE BLENDER. Further use could result in the container breaking during use. Use only recommended OSTERIZER® BLENDER replacement parts available at an Authorized Service Facility or the factory. USE OF

DAMAGED OR NON-RECOMMENDED PARTS COULD RESULT IN SEVERE PERSONAL INJURY AND/OR DAMAGE TO THE BLENDER. See Page 5 for proper container assembly and user instructions. NEVER IMMERSE THE MOTOR BASE IN

–1.50L–

–1.25L–

–1.00L–

–0.75L–

–0.50L–

–0.25L–

0Speed


–6


–5


–4

–3

–2


–1


–1.50 L–


–6


–1.25 L–


–5


–1.00 L–


–4


–0.75 L–

–3


–0.50 L–

–2


–0.25 L–

–1


C

D


0Speed


C. To operate Blender, place assembled container in motor base ring with container lug against flat side of the motor base stop. If container lug does not rest against flat side of right stop, remove container assembly and place against flat side of left stop.

Seat container firmly and operate.

D. To remove container, lift straight up.

(If it is not easily removed, rock gently and lift up, do not twist). If container bottom cannot be loosened by hand, place assembled container into motor base ring with handle in front of left side stop. Using handle, turn container to right until container bottom loosens.

WATER. The housing can be cleaned with a damp cloth (unplug first). The motor is permanently lubricated and does not require any additional lubrication. ANY SERVICING

SHOULD BE PERFORMED BY AN AUTHORIZED SERVICE FACILITY.

Do not attempt to place the container on or attempt to remove it from the motor base while the motor is running.

ALWAYS HOLD CONTAINER WITH ONE HAND WHILE PROCESSING!

4

5

Page 3
Image 3
Oster 6646, 6640, 6642 Tightening The Container, Ass E M B L I N G Yo U R Bl E N D E R, Cover, Processing Assembly