NOTES
DIN CONNECTORS (AXD)
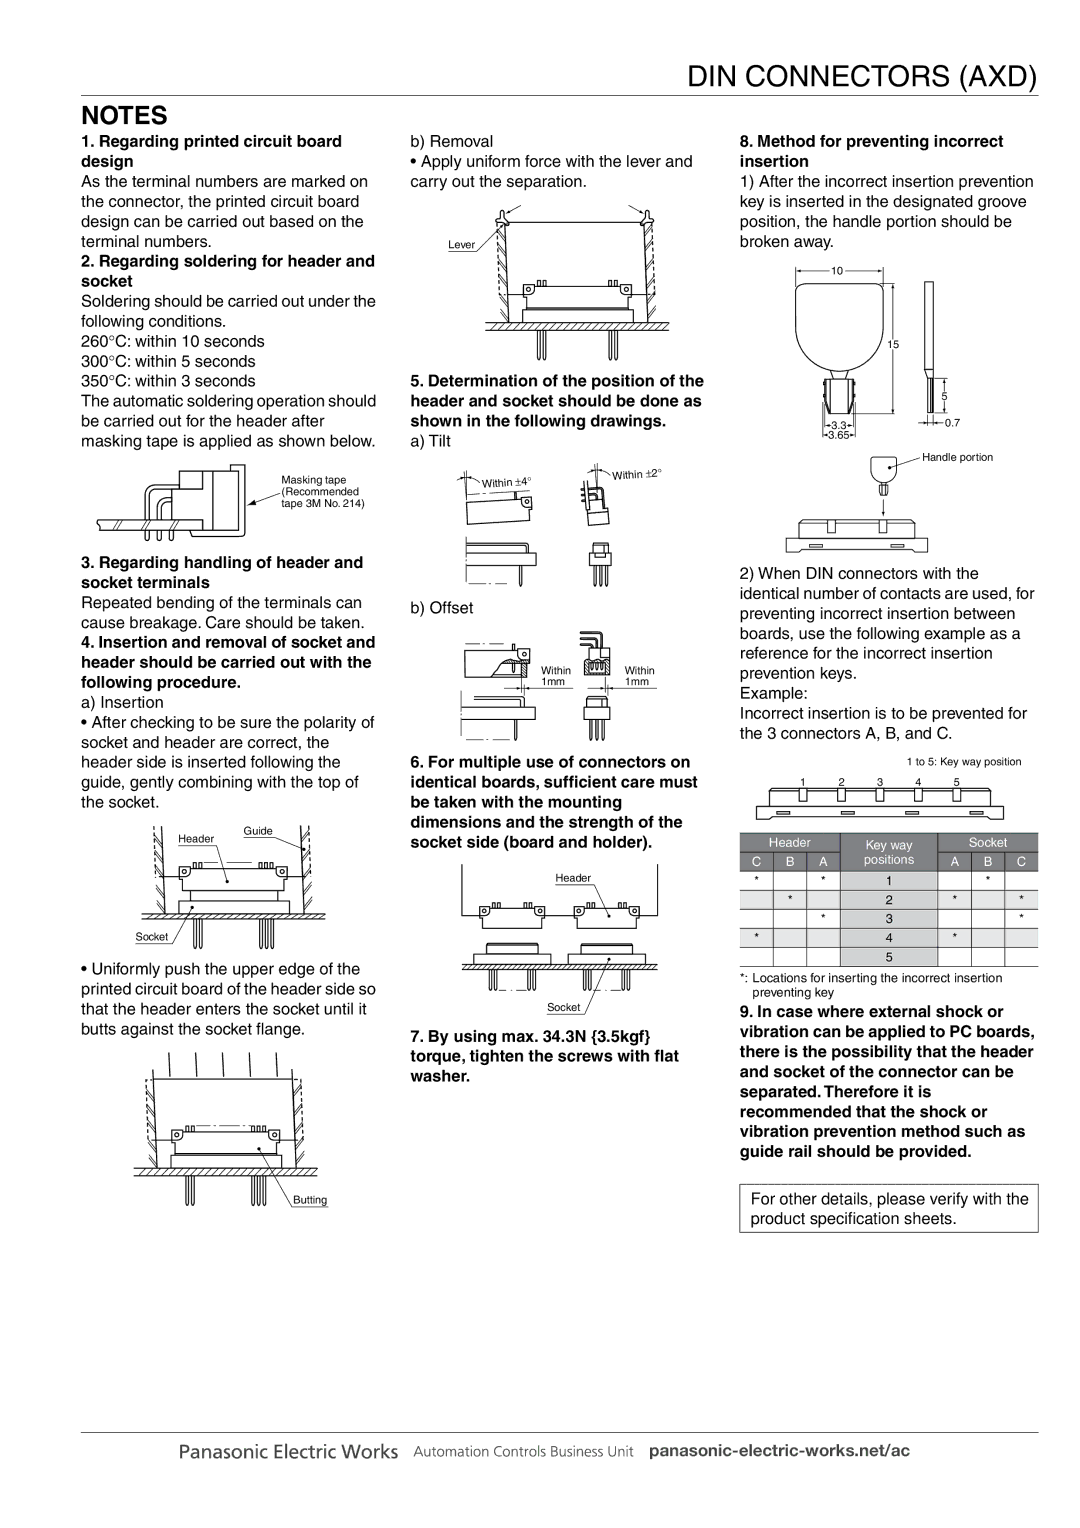
1.Regarding printed circuit board design
As the terminal numbers are marked on the connector, the printed circuit board design can be carried out based on the terminal numbers.
2.Regarding soldering for header and socket
Soldering should be carried out under the
following conditions.
260°C: within 10 seconds
300°C: within 5 seconds
350°C: within 3 seconds
The automatic soldering operation should be carried out for the header after masking tape is applied as shown below.
Masking tape (Recommended tape 3M No. 214)
b) Removal
•Apply uniform force with the lever and carry out the separation.
Lever
5.Determination of the position of the header and socket should be done as shown in the following drawings.
a) Tilt
Within | ±4° | Within | ±2° |
| |||
|
| ||
|
|
|
8.Method for preventing incorrect insertion
1) After the incorrect insertion prevention key is inserted in the designated groove position, the handle portion should be broken away.
10 |
|
| 15 |
| 5 |
3.3 | 0.7 |
3.65 |
|
| Handle portion |
3.Regarding handling of header and socket terminals
Repeated bending of the terminals can cause breakage. Care should be taken.
4.Insertion and removal of socket and header should be carried out with the following procedure.
a) Insertion
• After checking to be sure the polarity of socket and header are correct, the header side is inserted following the guide, gently combining with the top of the socket.
Guide
Header
Socket
•Uniformly push the upper edge of the printed circuit board of the header side so that the header enters the socket until it butts against the socket flange.
Butting
b) Offset
Within | Within |
1mm | 1mm |
6.For multiple use of connectors on identical boards, sufficient care must be taken with the mounting dimensions and the strength of the socket side (board and holder).
Header |
Socket
7.By using max. 34.3N {3.5kgf} torque, tighten the screws with flat washer.
2)When DIN connectors with the identical number of contacts are used, for preventing incorrect insertion between boards, use the following example as a reference for the incorrect insertion prevention keys.
Example:
Incorrect insertion is to be prevented for the 3 connectors A, B, and C.
|
|
|
|
|
|
| 1 to 5: Key way position | ||||||||
| 1 |
| 2 | 3 |
| 4 |
| 5 |
|
|
|
| |||
|
|
|
|
|
|
|
|
|
|
|
|
|
|
|
|
|
|
|
|
|
|
|
|
|
|
|
|
|
|
|
|
| Header |
| Key way |
|
|
|
| Socket |
| ||||||
C | B |
| A | positions |
|
| A |
| B |
| C | ||||
* |
|
|
| * | 1 |
|
|
|
|
| * |
|
| ||
| * |
|
|
| 2 |
|
| * |
|
|
| * | |||
|
|
|
| * | 3 |
|
|
|
|
|
|
| * | ||
* |
|
|
|
| 4 |
|
| * |
|
|
|
| |||
|
|
|
|
| 5 |
|
|
|
|
|
|
|
| ||
*: Locations for inserting the incorrect insertion preventing key
9.In case where external shock or vibration can be applied to PC boards, there is the possibility that the header and socket of the connector can be separated. Therefore it is recommended that the shock or vibration prevention method such as guide rail should be provided.
For other details, please verify with the product specification sheets.
