Timer Recording
Timer Recording
1 1) Press PROG*.
Location of Controls
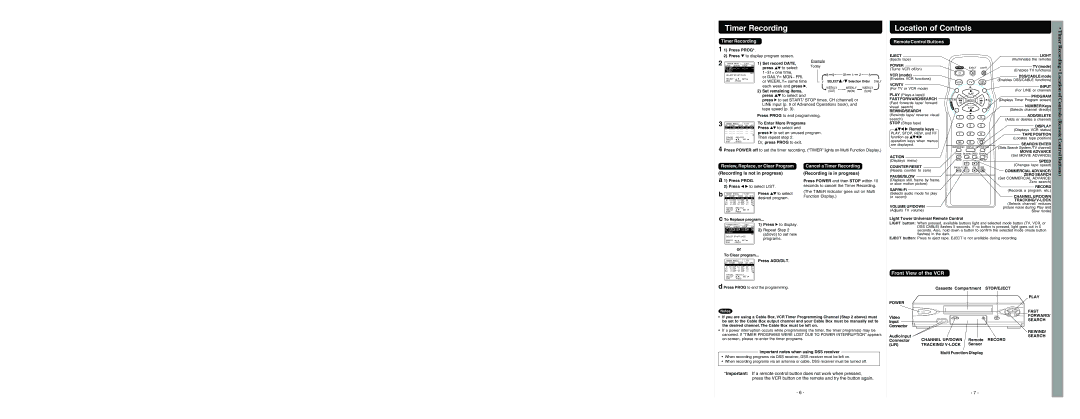
Remote Control Buttons
• Timer
2)Press ![]() to display program screen.
to display program screen.
2 DATE | START | STOP | CH | 1) Set record DATE, | Example |
|
|
|
|
|
|
| ||
TIMER PROG. |
| LIST |
|
|
| Today |
|
|
|
|
|
|
| |
13 SAT | press | to select: |
|
|
|
|
|
|
| |||||
|
|
|
|
|
|
|
| |||||||
TODAY |
|
|
| SLP | 1~31= one time, |
|
|
|
|
|
|
|
| |
SELECT START DATE |
| 8 | 9 | 31 | 1 | 2 | 6 |
| ||||||
| or DAILY= MON~ FRI, |
|
| |||||||||||
SELECT : | SET: |
|
|
|
|
|
|
|
|
| ||||
| or WEEKLY= same time | 7 | SELECT | / | Selection Order | DAILY | ||||||||
END | : PROG |
|
|
| ||||||||||
|
|
|
|
|
|
|
|
|
|
|
|
| ||
|
|
|
|
| each week and press . |
| WEEKLY | WEEKLY |
| WEEKLY |
| |||
|
|
|
|
| 2) Set remaining items, |
|
|
| ||||||
|
|
|
|
|
|
| (SAT) |
| (MON) |
| (SUN) |
| ||
|
|
|
|
| press | to select and |
|
|
|
|
|
|
|
|
|
|
|
|
| press to set START/ STOP times, CH (channel) or |
|
|
| ||||||
|
|
|
|
| LINE input (p. 9 of Advanced Operations book), and |
|
|
| ||||||
|
|
|
|
| tape speed (p. 3). |
|
|
|
|
|
|
|
| |
3 DT START STOP |
|
| Press PROG to end programming. |
|
|
|
|
|
|
| ||||
CH | SPD | To Enter More Programs |
|
|
|
|
|
|
|
| ||||
TIMER PROG. |
| L I ST |
| Press | to select and |
|
|
|
|
|
|
|
| |
13 2 : 00P 3 : 20P | 02 | SLP |
|
|
|
|
|
|
|
| ||||
press to set an unused program. |
|
|
|
|
|
|
| |||||||
|
|
|
|
|
|
| ||||||||
|
|
|
|
|
|
| ||||||||
CANCEL : ADD / DLT |
|
| Then repeat step 2. |
|
|
|
|
|
|
|
| |||
SELECT : | SET : |
| Or, press PROG to exit. |
|
|
|
|
|
|
|
| |||
EXIT | : PROG |
|
|
|
|
|
|
|
|
|
|
| ||
|
|
|
|
|
|
|
|
|
|
|
|
| ||
4 Press POWER off to set the timer recording. (“TIMER” lights on Multi Function Display.)
EJECT
(Ejects tape)
POWER
(Turns VCR off/on)
VCR (mode)
(Enables VCR functions)
VCR/TV
(For TV or VCR mode)
PLAY (Plays a tape)/
FAST FORWARD/SEARCH
(Fast forwards tape/ forward visual search)
REWIND/SEARCH
(Rewinds tape/ reverse visual search)
STOP (Stops tape)


 Remote keys
PLAY, STOP, REW, and FF function as ![]()
![]()
![]()
![]() operation keys when menus are displayed.
operation keys when menus are displayed.
ACTION
(Displays menu)
LIGHT
(Illuminates the remote)
TV (mode)
(Enables TV functions)
DSS/CABLE mode
(Enables DSS/CABLE functions)
INPUT
(For LINE or channel)
PROGRAM
(Displays Timer Program screen)
NUMBER Keys
(Selects channel directly)
ADD/DELETE
(Adds or deletes a channel)
DISPLAY
(Displays VCR status)
TAPE POSITION
(Locates tape position)
SEARCH/ ENTER
(Sets Search System /TV channel)
MOVIE ADVANCE
(Set MOVIE ADVANCE)
SPEED
Recording • Location of Controls (Remote Control
Review, Replace, or Clear Program
(Recording is not in progress)
a 1) Press PROG. |
|
| ||||||
| 2) Press |
| to select LIST. |
| ||||
b | TIMER PROG. | L I ST |
| Press | to select | |||
DT | START | STOP | CH | SPD | ||||
| 7 | 9 : 00A 12 : 00A | 08 | SP | desired program. | |||
| 8 | 10 : 00P 12 : 00P | 02 | SP |
|
| ||
| 10 | 8 : 00P | 9 : 00P | 10 | SP |
|
| |
| SU |
| 9 : 00P 10 : 00P | L1 | LP |
|
| |
| CANCEL : ADD / DLT |
|
|
|
| |||
| SELECT : | SET : |
|
|
| |||
| EXIT | : PROG |
|
|
|
| ||
c To Replace program... |
| |||||||
Cancel a Timer Recording
(Recording is in progress)
Press POWER and then STOP within 10 seconds to cancel the Timer Recording.
(The TIMER indicator goes out on Multi Function Display.)
COUNTER RESET
(Resets counter to zero)
PAUSE/SLOW
(Displays still, frame by frame, or slow motion picture)
(Selects audio mode for play or record)
VOLUME UP/DOWN
(Adjusts TV volume)
Light Tower Universal Remote Control
(Changes tape speed)
COMMERCIAL ADVANCE/ ZERO SEARCH
(Set COMMERCIAL ADVANCE/ Zero search)
RECORD
(Records a program, etc.)
CHANNEL UP/DOWN
TRACKING/
(Selects channel/ reduces picture noise during Play and Slow mode)
Buttons)
TIMER PROG. | LIST |
| 1) Press | to display. | |
DATE | START | STOP | CH |
|
|
7 SUN 9:00A 12:00A | 08 | 2) Repeat Step 2 | |||
TODAY |
|
| SP | (above) to set new | |
|
|
| |||
SELECT START DATE |
| programs. | |||
SELECT : | SET: |
| |||
|
|
| |||
END | : PROG |
|
|
|
|
LIGHT button: When pressed, available buttons light and selected mode button (TV, VCR, or DSS CABLE) flashes 5 seconds. If no button is pressed, light goes out in 5 seconds. Also, hold down a button to confirm the selected mode (mode button flashes) in the dark.
EJECT button: Press to eject tape. EJECT is not available during recording.
|
|
| or |
|
|
To Clear program... | |||||
TIMER PROG. | L I ST | Press ADD/DLT. | |||
DT | START | STOP | CH | SPD | |
8 | 10 : 00P 12 : 00P | 02 | SP | ||
10 | 8 : 00P | 9 : 00P | 10 | SP | |
SU |
| 9 : 00P 10 : 00P | L1 | LP | |
CANCEL : ADD / DLT |
|
| |||
SELECT : | SET : |
| |||
EXIT | : PROG |
|
| ||
d Press PROG to end the programming.
Notes
•If you are using a Cable Box, VCR Timer Programming Channel (Step 2 above) must be set to the Cable Box output channel and your Cable Box must be manually set to the desired channel. The Cable Box must be left on.
•If a power interruption occurs while programming the timer, the timer program(s) may be canceled. If “TIMER PROGRAMS WERE LOST DUE TO POWER INTERRUPTION” appears
Important notes when using DSS receiver
•When recording programs via DSS receiver, DSS receiver must be left on.
•When recording programs via an antenna or cable, DSS receiver must be turned off.
*Important: If a remote control button does not work when pressed, press the VCR button on the remote and try the button again.
Front View of the VCR
| Cassette Compartment | STOP/EJECT | |
|
|
| PLAY |
POWER |
|
|
|
|
|
| FAST |
Video |
|
| FORWARD/ |
|
| SEARCH | |
Input |
|
| |
|
|
| |
Connector |
|
|
|
|
|
| REWIND/ |
Audio Input |
|
| SEARCH |
Connector | CHANNEL UP/DOWN | Remote | RECORD |
(L/R) | TRACKING/ | Sensor |
|
Multi Function Display
- 6 - | - 7 - |