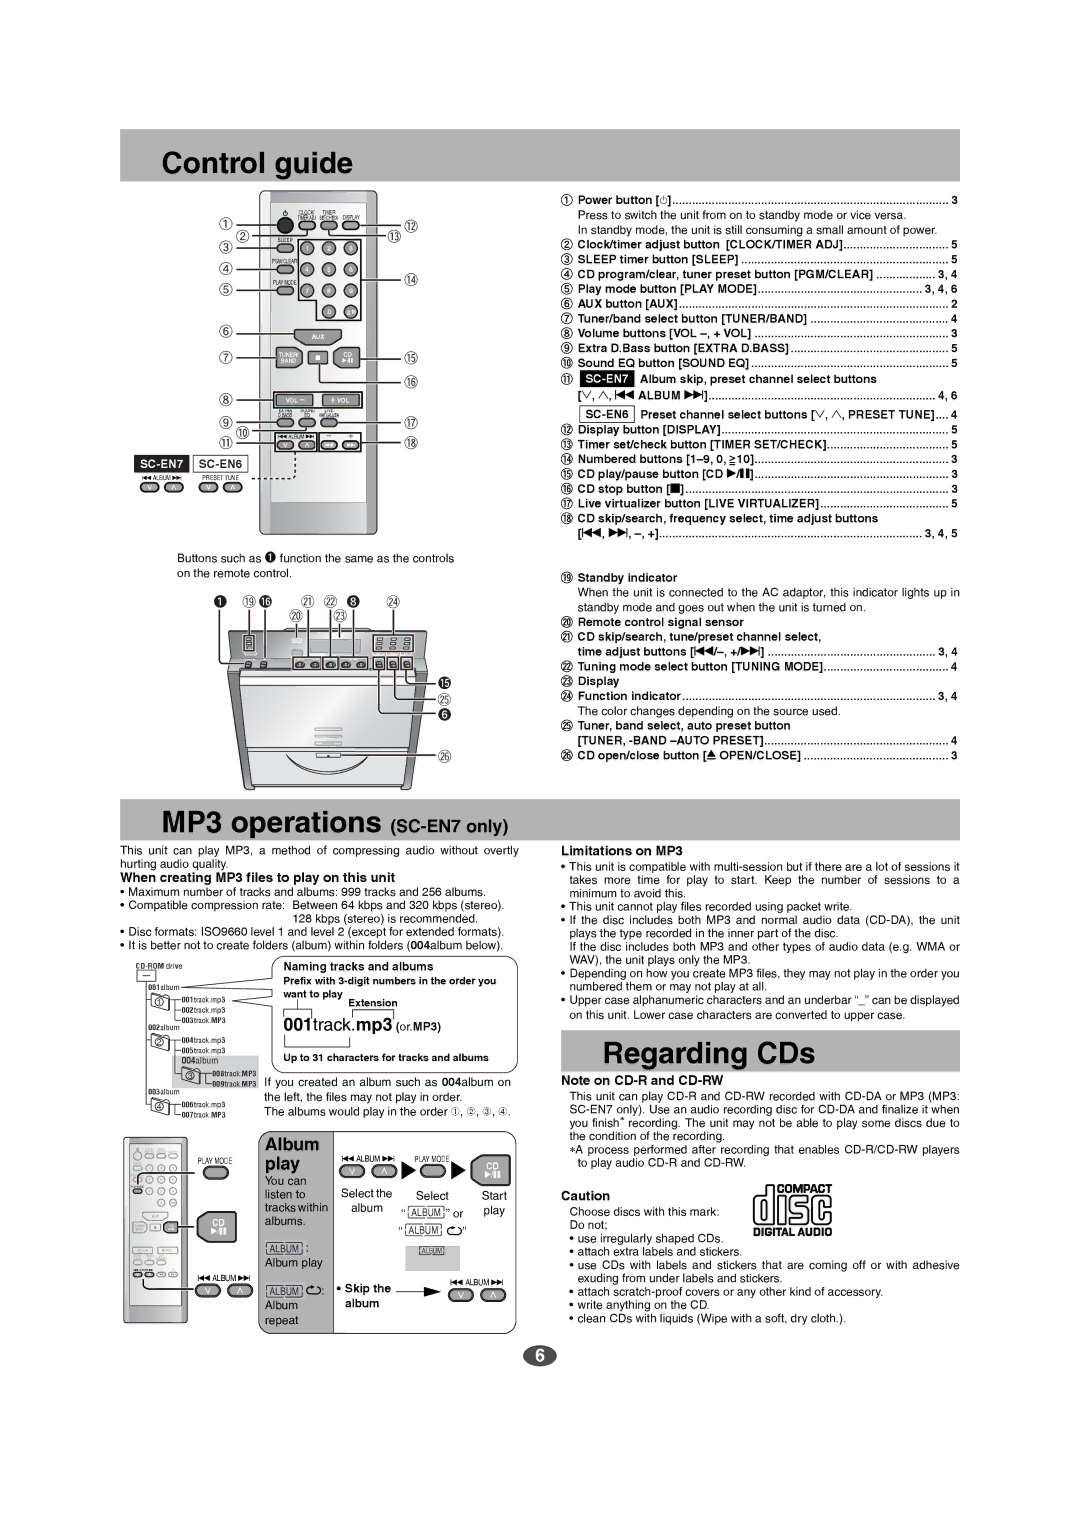
6
Power button [^].................................................................................... 3
Press to switch the unit from on to standby mode or vice versa.
In standby mode, the unit is still consuming a small amount of power.
Clock/timer adjust button [CLOCK/TIMER ADJ]................................ 5
SLEEP timer button [SLEEP] ............................................................... 5
CD program/clear, tuner preset button [PGM/CLEAR] .................. 3, 4
Play mode button [PLAY MODE].................................................. 3, 4, 6
AUX button [AUX].................................................................................. 2
Tuner/band select button [TUNER/BAND] .......................................... 4
Volume buttons [VOL –, + VOL] ........................................................... 3
Extra D.Bass button [EXTRA D.BASS] ................................................ 5
Sound EQ button [SOUND EQ] ............................................................ 5
Album skip, preset channel select buttons
[2, 1, u ALBUM i]..................................................................... 4, 6
Preset channel select buttons [2, 1, PRESET TUNE].... 4
Display button [DISPLAY]..................................................................... 5
Timer set/check button [TIMER SET/CHECK]..................................... 5
Numbered buttons [1–9, 0, 10]........................................................... 3
CD play/pause button [CD q/h]........................................................... 3
CD stop button [g]................................................................................ 3
Live virtualizer button [LIVE VIRTUALIZER]....................................... 5
CD skip/search, frequency select, time adjust buttons
[u, i, –, +]................................................................................ 3, 4, 5
Standby indicator
When the unit is connected to the AC adaptor, this indicator lights up in
standby mode and goes out when the unit is turned on.
Remote control signal sensor
CD skip/search, tune/preset channel select,
time adjust buttons [u/–, +/i] ................................................... 3, 4
Tuning mode select button [TUNING MODE]...................................... 4
Display
Function indicator............................................................................. 3, 4
The color changes depending on the source used.
Tuner, band select, auto preset button
[TUNER, -BAND –AUTO PRESET]........................................................ 4
CD open/close button [; OPEN/CLOSE] ............................................ 3
This unit can play MP3, a method of compressing audio without overtly
hurting audio quality.
When creating MP3 files to play on this unit
Maximum number of tracks and albums: 999 tracks and 256 albums.
Compatible compression rate: Between 64 kbps and 320 kbps (stereo).
128 kbps (stereo) is recommended.
Disc formats: ISO9660 level 1 and level 2 (except for extended formats).
It is better not to create folders (album) within folders (004album below).
Limitations on MP3
This unit is compatible with multi-session but if there are a lot of sessions it
takes more time for play to start. Keep the number of sessions to a
minimum to avoid this.
This unit cannot play files recorded using packet write.
If the disc includes both MP3 and normal audio data (CD-DA), the unit
plays the type recorded in the inner part of the disc.
If the disc includes both MP3 and other types of audio data (e.g. WMA or
WAV), the unit plays only the MP3.
Depending on how you create MP3 files, they may not play in the order you
numbered them or may not play at all.
Upper case alphanumeric characters and an underbar “_” can be displayed
on this unit. Lower case characters are converted to upper case.
Note on CD-R and CD-RW
This unit can play CD-R and CD-RW recorded with CD-DA or MP3 (MP3:
SC-EN7 only). Use an audio recording disc for CD-DA and finalize it when
you finish recording. The unit may not be able to play some discs due to
the condition of the recording.
A process performed after recording that enables CD-R/CD-RW players
to play audio CD-R and CD-RW.
Caution
Choose discs with this mark:
Do not;
use irregularly shaped CDs.
attach extra labels and stickers.
use CDs with labels and stickers that are coming off or with adhesive
exuding from under labels and stickers.
attach scratch-proof covers or any other kind of accessory.
write anything on the CD.
clean CDs with liquids (Wipe with a soft, dry cloth.).

Control guide

CLOCK/
TIMER ADJ
SLEEP
PGM/CLEAR
PLAY MODE
ui
3
4
TIMER
SET/CHECK
DISPLAY
123
456
78
0
9
>
=
10
AUX
TUNER/
BAND g
CD
q/h
EXTRA
D.BASS SOUND
EQ LIVE
VIRTUALIZER
u
ALBUM
i
4 VOL
VOL
3
SC-EN6SC-EN7
PRESET TUNE
u
ALBUM
i
Buttons such as Ê function the same as the controls
on the remote control.

′″

⇩⇸

SC-EN7
SC-EN6
>
=
MP3 operations (SC-EN7 only)
001album
001track.mp3
002track.mp3
003track.MP3
008track.MP3
009track.MP3
002album
004track.mp3
005track.mp3
004album
003album
006track.mp3
007track.MP3
CD-ROM drive
1
2
4
3If you created an album such as 004album on
the left, the files may not play in order.
The albums would play in the order À, Á, Â, Ã.
Naming tracks and albums
Prefix with 3-digit numbers in the order you
want to play

001track.mp3 (or.MP3)

Up to 31 characters for tracks and albums
Extension
CLOCK/
TIMER ADJ
SLEEP
PGM/CLEAR
PLAY MODE
ui
3
4
TIMER
SET/CHECK
DISPLAY
123
456
78
0
9
>
=
10
AUX
TUNER/
BAND g
CD
q/h
EXTRA
D.BASS SOUND
EQ LIVE
VIRTUALIZER
u
ALBUM
i
4 VOL
VOL
3
u
ALBUM
i
PLAY MODE
CD
q/h
Select
“” or
&
ALBUM
ALBUM
Select the
album
Skip the
album
u
ALBUM
i
PLAY MODE
CD
q/h
u
ALBUM
i
ALBUM

Album

play
You can
listen to
tracks within
albums.
:
Album play
&:
Album
repeat
ALBUM
ALBUM
Start
play

Regarding CDs

SC-EN7-6(RQT7316-P).fm 6 ページ 2003年11月28日 金曜日 午後8時10分