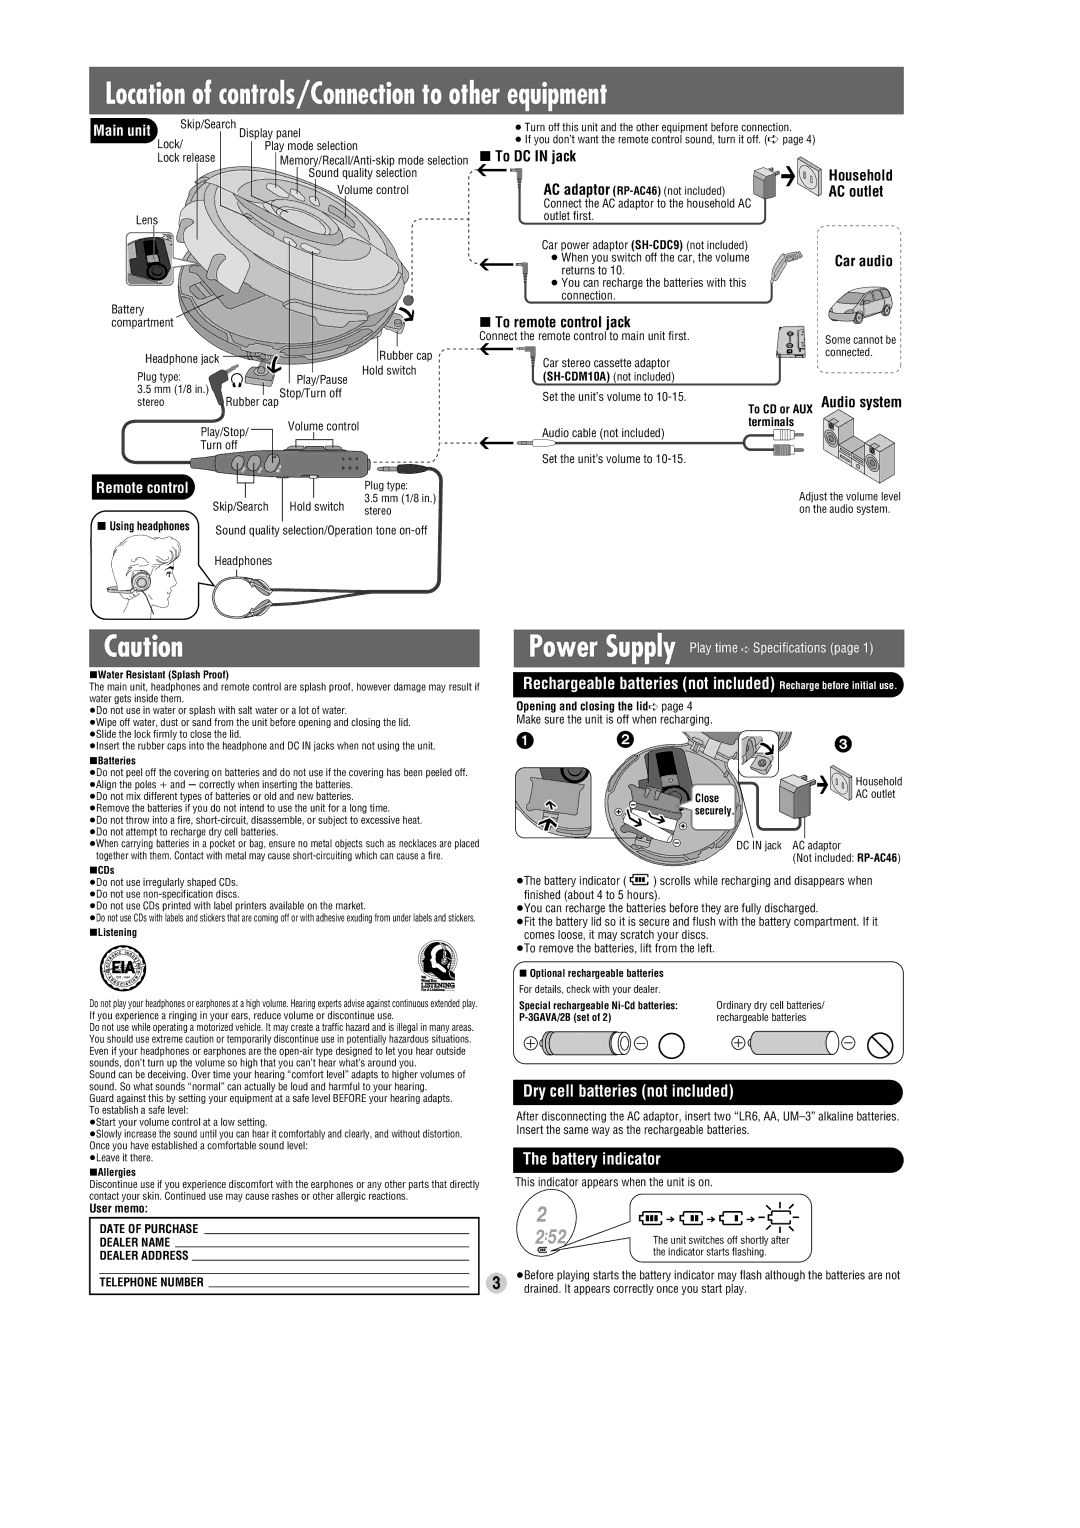
Location of controls/Connection to other equipment
Main uni | t | Skip/Search Display panel | |
|
| Lock/ | Play mode selection |
|
| ||
|
| Lock release | |
Sound quality selection
Volume control
Lens
≥Turn off this unit and the other equipment before connection.
≥If you don’t want the remote control sound, turn it off. (➪ page 4)
∫To DC IN jack
AC adaptor
Connect the AC adaptor to the household AC outlet first.
Household AC outlet
Car power adaptor |
|
≥ When you switch off the car, the volume | Car audio |
returns to 10. |
|
≥ You can recharge the batteries with this |
|
connection. |
|
Battery compartment
Headphone jack |
| Rubber cap |
Plug type: |
| Hold switch |
| Play/Pause | |
3.5 mm (1/8 in.) | Rubber capStop/Turn off | |
stereo | ||
Play/Stop/ | Volume control | |
| ||
Turn off |
| |
Remote control |
|
| Plug type: |
| Skip/Search | Hold switch | 3.5 mm (1/8 in.) |
| stereo | ||
|
|
| |
∫ Using headphones | Sound quality selection/Operation tone | ||
| |||
∫To remote control jack
Connect the remote control to main unit first.
Car stereo cassette adaptor
Set the unit’s volume to
Audio cable (not included)
Set the unit’s volume to
| Some cannot be |
A | connected. |
To CD or AUX Audio system terminals 
Adjust the volume level on the audio system.
Headphones
Caution
∫Water Resistant (Splash Proof)
The main unit, headphones and remote control are splash proof, however damage may result if water gets inside them.
≥Do not use in water or splash with salt water or a lot of water.
≥Wipe off water, dust or sand from the unit before opening and closing the lid. ≥Slide the lock firmly to close the lid.
≥Insert the rubber caps into the headphone and DC IN jacks when not using the unit.
∫Batteries
≥Do not peel off the covering on batteries and do not use if the covering has been peeled off. ≥Align the poles i and s correctly when inserting the batteries.
≥Do not mix different types of batteries or old and new batteries.
≥Remove the batteries if you do not intend to use the unit for a long time.
≥Do not throw into a fire,
≥When carrying batteries in a pocket or bag, ensure no metal objects such as necklaces are placed together with them. Contact with metal may cause
∫CDs
≥Do not use irregularly shaped CDs. ≥Do not use
≥Do not use CDs printed with label printers available on the market.
≥Do not use CDs with labels and stickers that are coming off or with adhesive exuding from under labels and stickers.
∫Listening
EST. 1924
Do not play your headphones or earphones at a high volume. Hearing experts advise against continuous extended play. If you experience a ringing in your ears, reduce volume or discontinue use.
Do not use while operating a motorized vehicle. It may create a traffic hazard and is illegal in many areas. You should use extreme caution or temporarily discontinue use in potentially hazardous situations. Even if your headphones or earphones are the
Sound can be deceiving. Over time your hearing “comfort level” adapts to higher volumes of sound. So what sounds “normal” can actually be loud and harmful to your hearing.
Guard against this by setting your equipment at a safe level BEFORE your hearing adapts. To establish a safe level:
≥Start your volume control at a low setting.
≥Slowly increase the sound until you can hear it comfortably and clearly, and without distortion. Once you have established a comfortable sound level:
≥Leave it there.
∫Allergies
Discontinue use if you experience discomfort with the earphones or any other parts that directly contact your skin. Continued use may cause rashes or other allergic reactions.
User memo:
DATE OF PURCHASE
DEALER NAME
DEALER ADDRESS
TELEPHONE NUMBER
Power Supply Play time ➪ Specifications (page 1)
Rechargeable batteries (not included) Recharge before initial use.
Opening and closing the lid➪ page 4
Make sure the unit is off when recharging.
12 ![]()
![]()
![]()
![]() 3
3
Household
CloseAC outlet securely.
DC IN jack AC adaptor
(Not included:
≥The battery indicator (![]() ) scrolls while recharging and disappears when finished (about 4 to 5 hours).
) scrolls while recharging and disappears when finished (about 4 to 5 hours).
≥You can recharge the batteries before they are fully discharged.
≥Fit the battery lid so it is secure and flush with the battery compartment. If it comes loose, it may scratch your discs.
≥To remove the batteries, lift from the left.
∫ Optional rechargeable batteries |
|
|
|
|
| |
|
|
|
|
|
|
|
For details, check with your dealer. |
|
|
|
|
| |
Special rechargeable | Ordinary dry cell batteries/ | |||||
rechargeable batteries | ||||||
|
|
|
|
|
|
|
|
|
|
|
|
|
|
Dry cell batteries (not included)
After disconnecting the AC adaptor, insert two “LR6, AA,
The battery indicator
This indicator appears when the unit is on.
| 2 |
|
|
|
|
|
|
|
|
|
|
| |
|
|
|
|
|
| |
| : | The unit switches off shortly after | ||||
| 2 52 | |||||
|
| the indicator starts flashing. | ||||
3 | ≥Before playing starts the battery indicator may flash although the batteries are not | |||||
drained. It appears correctly once you start play. | ||||||
