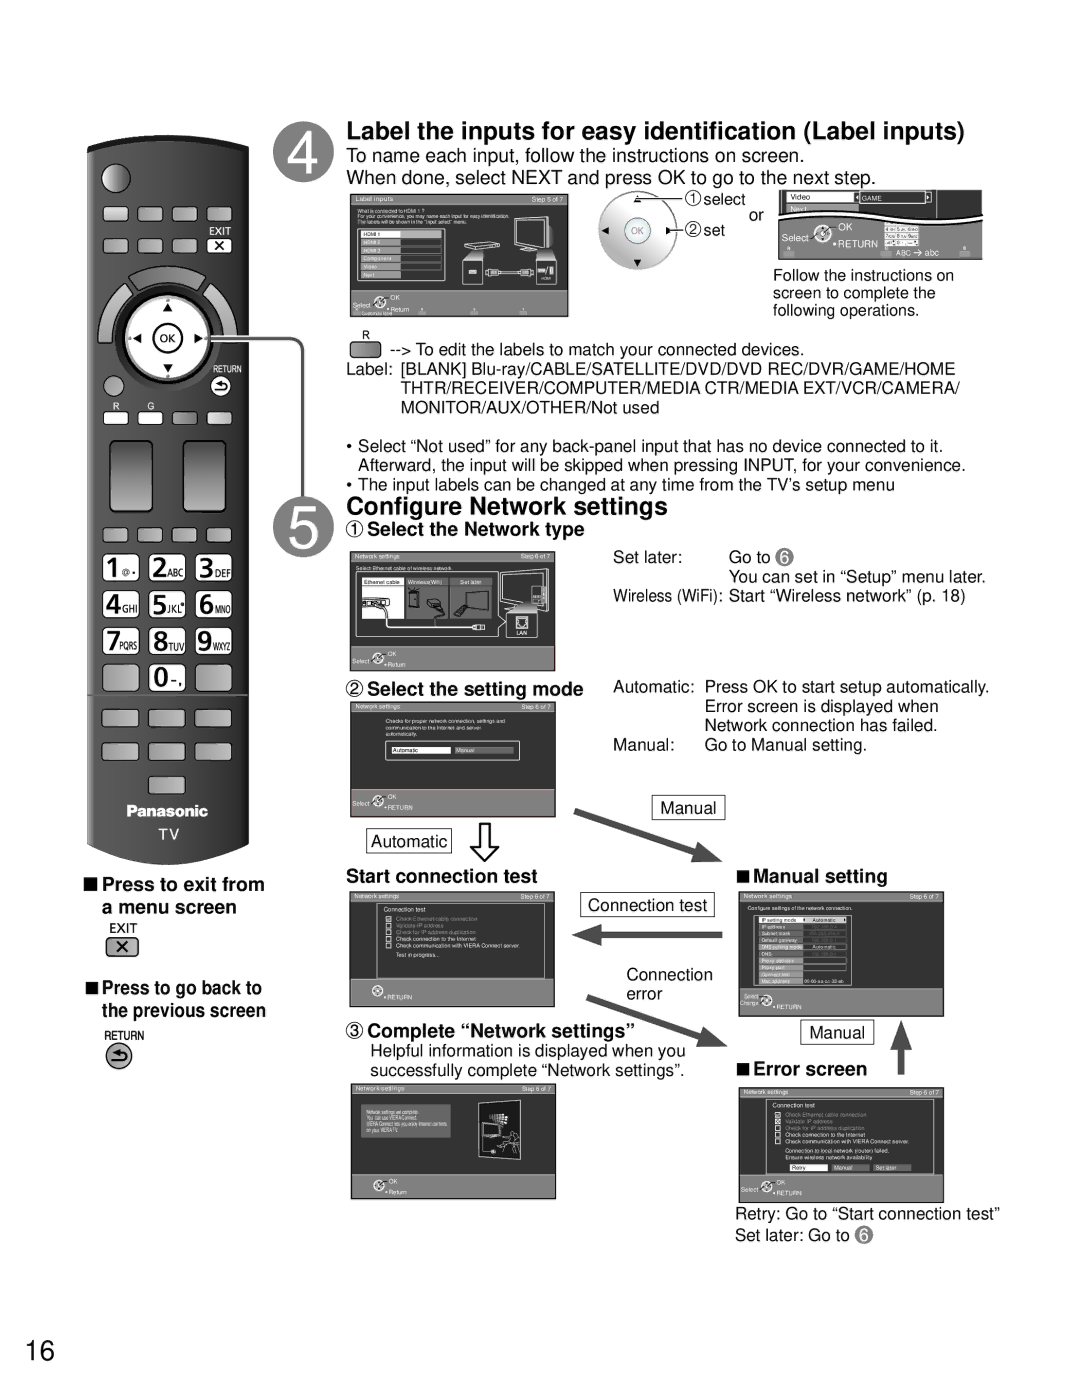
Label the inputs for easy identification (Label inputs)

To name each input, follow the instructions on screen.

When done, select NEXT and press OK to go to the next step.


select


Label inputs

Step 5 of 7


Video


GAME


What is connected to HDMI 1 ?


or


Next


For your convenience, you may name each input for easy identification.


The labels will be shown in the “Input select” menu.


set


OK

1 @.

2 ABC

3 DEF


HDMI 1


Select

4 GHI

5 JKL

6MNO


RETURN

7PQRS

8 TUV

9WXYZ


HDMI 2


LAST

0 - ,


ABC abc


HDMI 3


Component


Video


Follow the instructions on


Next


HDMI


screen to complete the


OK


Customize label


following operations.

Select

Return


--> To edit the labels to match your connected devices.

Label: [BLANK] Blu-ray/CABLE/SATELLITE/DVD/DVD REC/DVR/GAME/HOME THTR/RECEIVER/COMPUTER/MEDIA CTR/MEDIA EXT/VCR/CAMERA/ MONITOR/AUX/OTHER/Not used

Select “Not used” for any back-panel input that has no device connected to it. Afterward, the input will be skipped when pressing INPUT, for your convenience.

The input labels can be changed at any time from the TV’s setup menu

Configure Network settings

Select the Network type

Network settings


Step 6 of 7

Set later:

Go to

Select Ethernet cable of wireless network.


You can set in “Setup” menu later.

Ethernet cable

Wireless(Wifi)

Set later


Wireless (WiFi): Start “Wireless network” (p. 18)

Select

OK


Return


Press to exit from

Select the setting mode

Network settingsStep 6 of 7

Checks for proper network connection, settings and communication to the Internet and server automatically.

AutomaticManual

OK

Select RETURN

Automatic

Start connection test

Automatic: Press OK to start setup automatically. Error screen is displayed when Network connection has failed.

Manual: Go to Manual setting.

Manual

Manual setting

a menu screen

Press to go back to the previous screen

Network settings

Step 6 of 7


Connection test


Connection test


Check Ethernet cable connection


Validate IP address


Check for IP address duplication


Check connection to the Internet


Check communication with VIERA Connect server.


Test in progress...


Connection


RETURN


error


Complete “Network settings”

Helpful information is displayed when you successfully complete “Network settings”.

Network settings

Step 6 of 7

Network settings are complete. You can use VIERA Connect.

VIERA Connect lets you enjoy Internet contents on your VIERA TV.

OK

Return

Network settings


Step 6 of 7

Configure settings of the network connection.


IP setting mode

Automatic


IP address

192.168.0.4


Subnet mask

255.255.255.0


Default gateway

192.168.0.1


DNS setting mode

Automatic


DNS

192.168.0.1


Proxy address


Proxy port


Connect test


Mac address

00-00-aa-cc-33-ab


Select


Change

RETURN


Manual

Error screen

Network settings


Step 6 of 7


Connection test


Check Ethernet cable connection


Validate IP address


Check for IP address duplication


Check connection to the Internet


Check communication with VIERA Connect server.


Connection to local network (router) failed.


Ensure wireless network availability


Retry


Manual

Set later


OK

Select RETURN

Retry: Go to “Start connection test”

Set later: Go to

16

Page 16
Image 16
Panasonic TC-P65ST30, TC-P60ST30 Label the inputs for easy identification Label inputs, Configure Network settings

TC-P65ST30, TC-P60ST30 specifications

The Panasonic TC-P60ST30 and TC-P65ST30 are part of Panasonic’s renowned line of VIERA plasma televisions, celebrated for their exceptional picture quality and advanced features. These models, featuring a 60-inch and 65-inch screen size respectively, are ideal for home theater enthusiasts seeking a cinematic experience in the comfort of their living rooms.

One of the standout features of the TC-P60ST30 and TC-P65ST30 is their use of 1080p Full HD resolution, delivering stunning clarity and vibrant colors. With a native contrast ratio that enhances black levels, these models provide deep, rich images that are particularly apparent in dark scenes, making them suitable for various viewing environments. The plasma technology employed allows for an impressive viewing angle; colors and brightness remain consistent even when viewed from the side, ensuring a great experience for all viewers in the room.

These televisions are equipped with Panasonic's NeoPlasma technology, which optimizes image performance. This includes the Infinite Black technology, contributing to superior black levels by expanding the range of shades displayed, especially in low-light conditions. Furthermore, the VIERA Connect feature offers a gateway to various streaming services and applications, providing viewers with the ability to access content from platforms like Netflix and YouTube easily.

Another notable characteristic is the television's ability to support 3D content. With the inclusion of high-speed 600Hz sub-field drive, the TC-P60ST30 and TC-P65ST30 are capable of presenting smooth, lifelike 3D images. This feature is complemented by the inclusion of active shutter glasses, which are sold separately, allowing users to dive into an immersive 3D viewing experience.

The integrated VIERA Image Viewer allows users to easily view their photos and videos directly from USB devices, enhancing the multimedia capabilities of these models. Moreover, with multiple HDMI ports, users can connect various devices such as gaming consoles, Blu-ray players, and sound systems seamlessly.

In terms of design, both models exhibit a sleek and modern aesthetic with a slim profile and minimalist bezels, making them an attractive addition to any home decor. The combination of advanced technology, user-friendly features, and beautiful design makes the Panasonic TC-P60ST30 and TC-P65ST30 stand out as exceptional choices for anyone seeking high-quality home entertainment solutions.