Installation to Solid Concrete or Cinder Block

WARNING

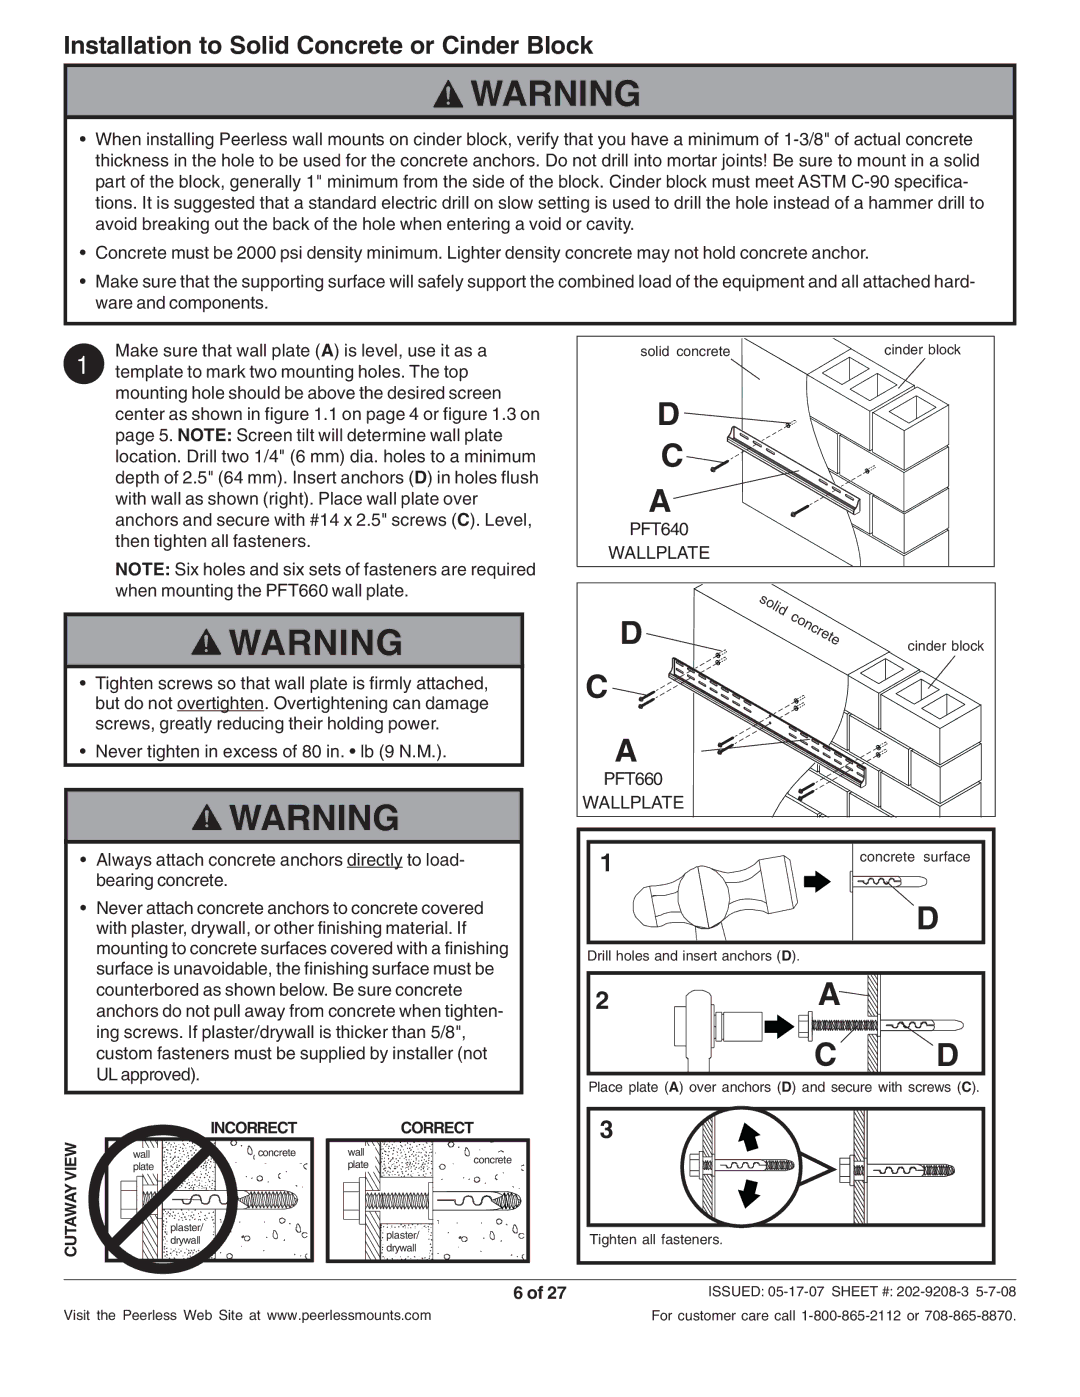
When installing Peerless wall mounts on cinder block, verify that you have a minimum of 1-3/8" of actual concrete thickness in the hole to be used for the concrete anchors. Do not drill into mortar joints! Be sure to mount in a solid part of the block, generally 1" minimum from the side of the block. Cinder block must meet ASTM C-90 specifica- tions. It is suggested that a standard electric drill on slow setting is used to drill the hole instead of a hammer drill to avoid breaking out the back of the hole when entering a void or cavity.

Concrete must be 2000 psi density minimum. Lighter density concrete may not hold concrete anchor.

Make sure that the supporting surface will safely support the combined load of the equipment and all attached hard- ware and components.

1

Make sure that wall plate (A) is level, use it as a

solid

concrete

cinder block


template to mark two mounting holes. The top


mounting hole should be above the desired screen

D


center as shown in figure 1.1 on page 4 or figure 1.3 on


page 5. NOTE: Screen tilt will determine wall plate

C


location. Drill two 1/4" (6 mm) dia. holes to a minimum


depth of 2.5" (64 mm). Insert anchors (D) in holes flush

A


with wall as shown (right). Place wall plate over


anchors and secure with #14 x 2.5" screws (C). Level,

PFT640


then tighten all fasteners.


WALLPLATE


NOTE: Six holes and six sets of fasteners are required


when mounting the PFT660 wall plate.


WARNING


D


cinder block

Tighten screws so that wall plate is firmly attached,

C


but do not overtighten. Overtightening can damage


screws, greatly reducing their holding power.


A


Never tighten in excess of 80 in. • lb (9 N.M.).


PFT660


WARNING


WALLPLATE


• Always attach concrete anchors directly to load-


1


concrete

surface


bearing concrete.


• Never attach concrete anchors to concrete covered


D


with plaster, drywall, or other finishing material. If


mounting to concrete surfaces covered with a finishing

Drill holes and insert anchors (D).


surface is unavoidable, the finishing surface must be


2


A


counterbored as shown below. Be sure concrete


anchors do not pull away from concrete when tighten-


ing screws. If plaster/drywall is thicker than 5/8",


C

D


custom fasteners must be supplied by installer (not


UL approved).


Place plate (A) over anchors (D) and secure with screws (C).


VIEW


INCORRECT

CORRECT

3


wall

concrete

wall

concrete


plate


plate


CUTAWAY


plaster/


plaster/


Tighten all fasteners.


drywall


drywall


6 of 27


ISSUED: 05-17-07 SHEET #: 202-9208-3 5-7-08

Visit the Peerless Web Site at www.peerlessmounts.com


For customer care call 1-800-865-2112 or 708-865-8870.

Page 6
Image 6
Peerless Industries PFT660, PFT640 manual Installation to Solid Concrete or Cinder Block, View Incorrect Correct

PFT640, PFT660 specifications

Peerless Industries has established itself as a prominent provider of mounting solutions, particularly revered for its innovative products tailored to enhance the display experience in various settings. Among their noteworthy offerings are the Peerless PFT660 and PFT640, two versatile mounting solutions designed to meet the dynamic needs of commercial spaces, classrooms, and home entertainment environments.

The Peerless PFT660 is a full-featured floor stand that accommodates larger displays, making it ideal for modern conference rooms and public presentations. One of its standout features is its sleek, contemporary design that seamlessly integrates into any décor. The PFT660 supports a wide range of display sizes, from 50 to 80 inches, and has a robust weight capacity, ensuring stability and reliability even for heavier screens. Its adjustable height feature provides flexibility for various viewing preferences, allowing users to customize the screen's position for optimal visibility.

In contrast, the Peerless PFT640 offers a more compact solution suitable for medium-sized displays of 32 to 55 inches. This model is designed with portability in mind, making it easy to relocate as needed. The lightweight construction of the PFT640 does not compromise durability, as it is built from high-quality materials that ensure long-lasting performance. Similar to the PFT660, the PFT640 features a sleek and modern design, but with a smaller footprint that makes it perfect for smaller venues or spaces.

Both mounts leverage advanced engineering technologies to facilitate quick installation and easy setup. The cable management system integrated into both models allows for a clean and organized appearance, reducing clutter and improving aesthetics. Furthermore, both the PFT660 and PFT640 are designed to accommodate various media devices, including streaming players and laptops, catering to the needs of diverse users.

In summary, the Peerless PFT660 and PFT640 are exemplary mounting solutions that embody functionality, style, and versatility. With their user-friendly features, sturdy construction, and adaptability to a range of display sizes and environments, both models contribute significantly to the enhancement of visual engagement in any setting, ensuring that they meet the demands of today's technology-driven world effectively.