SAFETY BELT
9• A: Make sure that the brace is properly inserted by pushing as shown in the figure. B: Fasten the belt as shown in the figure.
10• To unfasten the belt, press on the buckle sides and pull out the waist strap.
11• The new safety belt is now easier to fasten thanks to the
ADJUSTING THE BACKRESTS
12• The backrests are separate; it is not necessary to lower both of them at the same time. To lower the backrest, press the backrest button and pull the backrest downwards.
13• To lift the backrest, push upwards as shown in the figure.
SWIVELING WHEELS
14• Lower the lever as shown in the figure to allow the front wheels to swivel. Lift the lever for fixed wheels.
FRONT BAR-CHILD TRAYS
The front
15• The front
16• To remove the front
REPLACING THE BASKET
17• If it is necessary to replace the basket, fasten the front of the new basket to the hooks as shown in the figure.
18• Fasten the back of the basket, closing the buttons as shown in the figure.
REMOVING THE WHEELS
The wheels on the stroller are removable.
19• To remove the front wheels, set them to swivel, press the levers and push the wheel until it comes off, as shown in the figure.
CLOSING THE STROLLER
If the hood is attached, close it before folding up the stroller.
20• To close the stroller, lift the buttons on the sides of the handlebar, and swing the handlebar forward until it clicks.
21• Push the backrest and the hoods towards the stroller, while lowering the handlebar into its housing. Check to make sure the stroller is fastened securely with the safety hook. The
TRANSPORT
22• When the stroller is closed it can be easily carried by its handle.
REMOVABLE LINING
23• To remove the lining from the stroller, take the little covers off the sides and the center. Push the pin upwards and
24• then outwards. Take the pin out of the opening in the sack.
25• To detach the sack from the seat, pull the leg divider out from the bottom and unbutton it, as shown in the figure.
26• Loosen the safety belt from both sides, and slip the sack off the stroller.
GANCIOMATIC SYSTEM
Ganciomatic is the practical, fast system for attaching the Primo Viaggio car seat to the stroller. The car seat comes with its own Ganciomatic System, and is sold separately.
•The Primo Viaggio car seat can only be mounted on the right side of the stroller, which is fitted with Ganciomatic connections.
STROLLER GANCIOMATIC HOOKS
27• To raise the Ganciomatic hooks on the stroller,
pull the sack up in the seat corners and lift the two hooks. They will automatically move outwards.
28• To lower the Ganciomatic hooks on the stroller, push them inwards and then downward, as shown in the figure.
STROLLER + CAR SEAT
29• To fasten the car seat to the stroller:
-set the brake on the stroller,
-remove the hood from the stroller,
-completely lower the backrest on the stroller,
-raise the Ganciomatic hooks on the stroller.
-Place the car seat, turned towards the adult, on the stroller and push downward until it clicks into place.
-Do not remove the front bar from the stroller when attaching the car seat.
•See the userʼs manual for instructions on how to detach the car seat from the stroller.
LINE OF ACCESSORIES
30•
31• Cover All: Transparent rain canopy for Aria Twin double stroller. The rain canopy is designed for use also with the Primo Viaggio car seat attached to the stroller, guaranteeing total protection.
CLEANING & MAINTENANCE
Your product requires only minimal maintenance. Cleaning and maintenance operations must be performed only by adults.
•Be sure to keep all moving parts clean, lubricating them with light oil if necessary.
•Dry off metal parts to prevent rusting.
•Regularly clean the plastic parts with a damp cloth. Do not use solvents or similar products.
•Brush the fabric parts to remove dust.
•Remove any dust and sand from the wheels.
•Protect the product against smog, water, rain and snow. Continued and extended exposure to sunlight can change the colours of many materials.
•Store the product in a dry area.
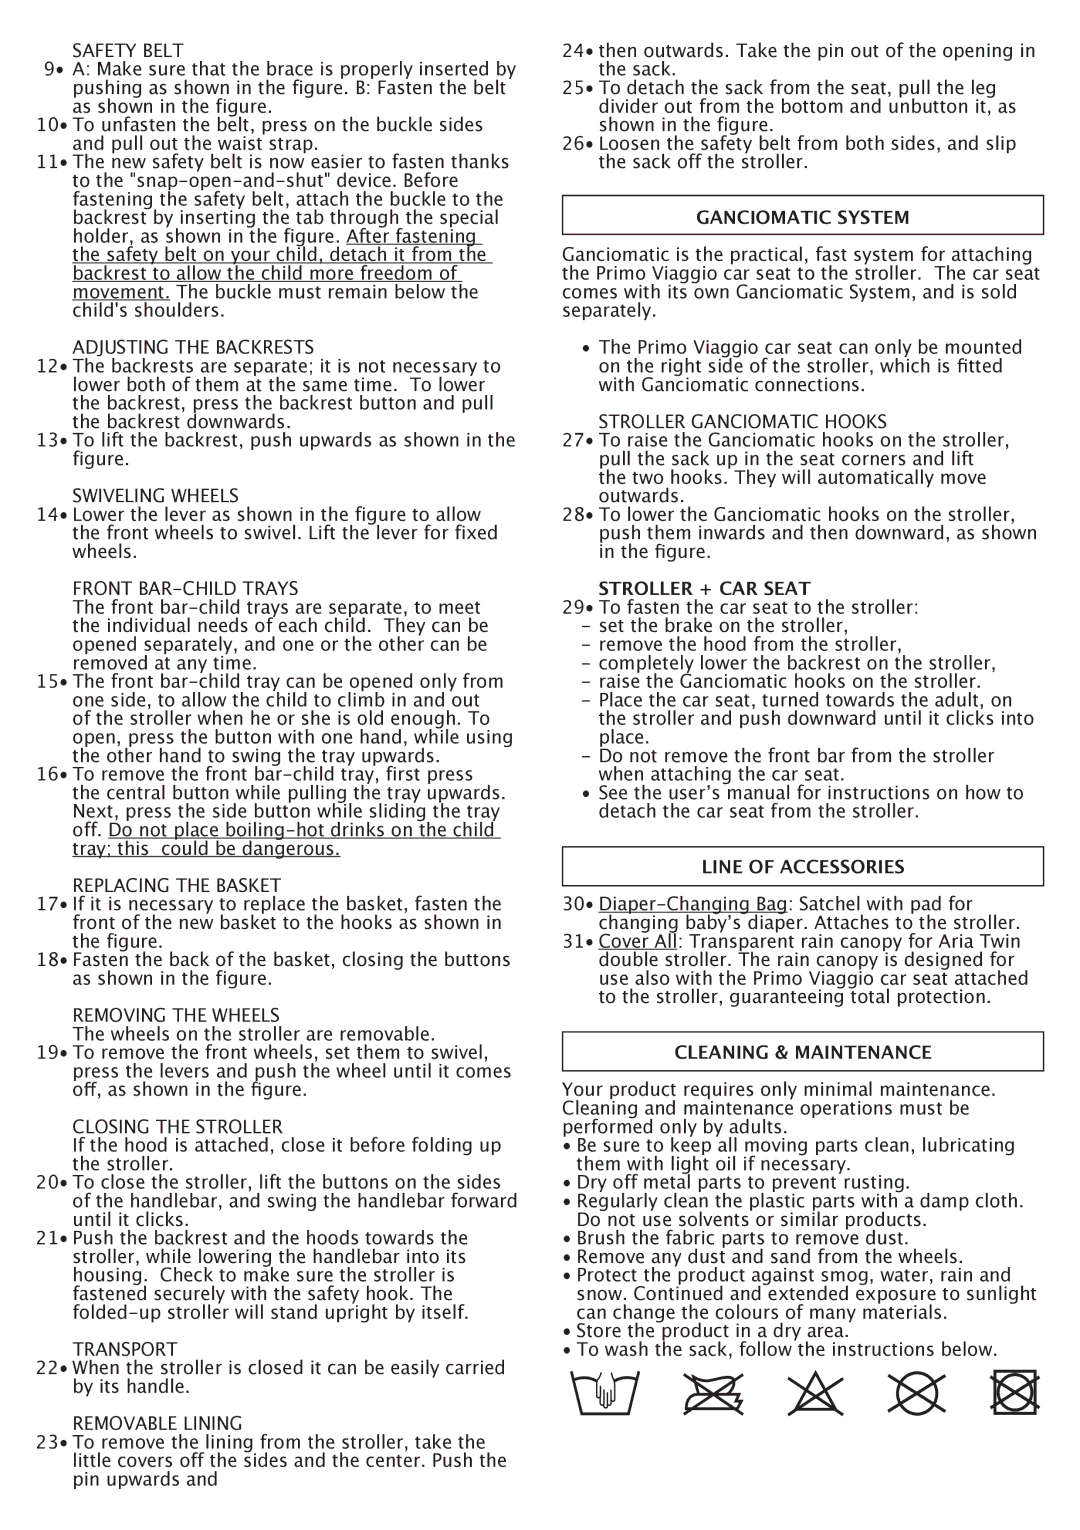
•To wash the sack, follow the instructions below.