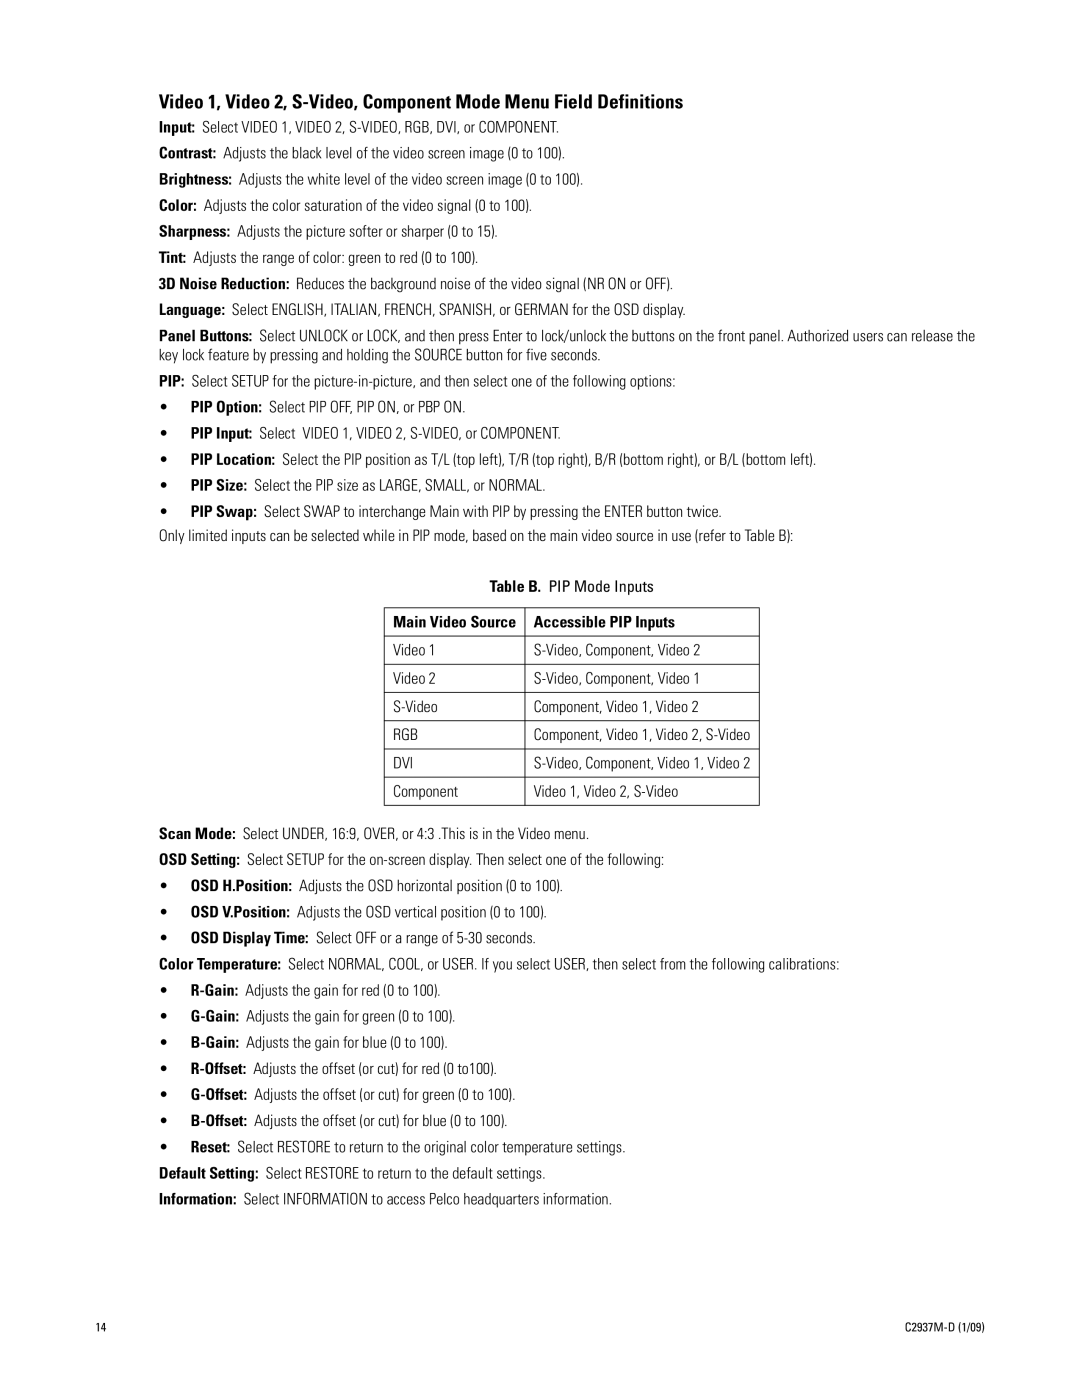
Video 1, Video 2, S-Video, Component Mode Menu Field Definitions

Input: Select VIDEO 1, VIDEO 2, S-VIDEO, RGB, DVI, or COMPONENT.

Contrast: Adjusts the black level of the video screen image (0 to 100).

Brightness: Adjusts the white level of the video screen image (0 to 100).

Color: Adjusts the color saturation of the video signal (0 to 100).

Sharpness: Adjusts the picture softer or sharper (0 to 15).

Tint: Adjusts the range of color: green to red (0 to 100).

3D Noise Reduction: Reduces the background noise of the video signal (NR ON or OFF).

Language: Select ENGLISH, ITALIAN, FRENCH, SPANISH, or GERMAN for the OSD display.

Panel Buttons: Select UNLOCK or LOCK, and then press Enter to lock/unlock the buttons on the front panel. Authorized users can release the key lock feature by pressing and holding the SOURCE button for five seconds.

PIP: Select SETUP for the picture-in-picture, and then select one of the following options:

PIP Option: Select PIP OFF, PIP ON, or PBP ON.

PIP Input: Select VIDEO 1, VIDEO 2, S-VIDEO, or COMPONENT.

PIP Location: Select the PIP position as T/L (top left), T/R (top right), B/R (bottom right), or B/L (bottom left).

PIP Size: Select the PIP size as LARGE, SMALL, or NORMAL.

PIP Swap: Select SWAP to interchange Main with PIP by pressing the ENTER button twice.

Only limited inputs can be selected while in PIP mode, based on the main video source in use (refer to Table B):

Table B. PIP Mode Inputs

Main Video Source

Accessible PIP Inputs


Video 1

S-Video, Component, Video 2


Video 2

S-Video, Component, Video 1


S-Video

Component, Video 1, Video 2


RGB

Component, Video 1, Video 2, S-Video


DVI

S-Video, Component, Video 1, Video 2


Component

Video 1, Video 2, S-Video


Scan Mode: Select UNDER, 16:9, OVER, or 4:3 .This is in the Video menu.

OSD Setting: Select SETUP for the on-screen display. Then select one of the following:

OSD H.Position: Adjusts the OSD horizontal position (0 to 100).

OSD V.Position: Adjusts the OSD vertical position (0 to 100).

OSD Display Time: Select OFF or a range of 5-30 seconds.

Color Temperature: Select NORMAL, COOL, or USER. If you select USER, then select from the following calibrations:

R-Gain:Adjusts the gain for red (0 to 100).

G-Gain:Adjusts the gain for green (0 to 100).

B-Gain:Adjusts the gain for blue (0 to 100).

R-Offset:Adjusts the offset (or cut) for red (0 to100).

G-Offset:Adjusts the offset (or cut) for green (0 to 100).

B-Offset:Adjusts the offset (or cut) for blue (0 to 100).

Reset: Select RESTORE to return to the original color temperature settings.

Default Setting: Select RESTORE to return to the default settings.

Information: Select INFORMATION to access Pelco headquarters information.

14

C2937M-D (1/09)

Page 14
Image 14
Pelco PMCL537A, PMCL526A, PMCL542A, PMCL532A manual Accessible PIP Inputs, Dvi

PMCL532A, PMCL537A, PMCL542A, PMCL526A specifications

The Pelco PMCL537A, PMCL542A, PMCL532A, and PMCL526A models are part of Pelco's advanced line of monitors designed for professional surveillance and security applications. These monitors are ideal for video management systems and control rooms, providing high-quality visuals and exceptional performance.

One of the standout features of these models is their high-resolution display capabilities. Each model supports Full HD resolution, ensuring that users receive sharp images with clear details. This is particularly vital in security applications where identifying individuals or reading license plates can be critical. The colors are vibrant, and the contrast ratios are optimized to enhance the viewing experience.

These monitors utilize LED backlighting technology, which not only improves brightness and energy efficiency but also contributes to a longer lifespan compared to traditional monitors. The LED panels provide consistent light distribution across the screen, making it easier to monitor multiple camera feeds simultaneously without any loss in image quality.

Another essential characteristic of Pelco's monitors is their versatility in terms of input connectivity. The PMCL series supports various video input formats, including HDMI, VGA, and composite video, ensuring compatibility with a wide range of security cameras and systems. This adaptability allows users to integrate the monitors seamlessly into their existing setups without worrying about connectivity issues.

In addition to their technical specifications, the Pelco PMCL series is designed with user convenience in mind. They come equipped with intuitive on-screen displays and control buttons, making it easy for operators to navigate settings and adjust preferences. The monitors also feature a robust build and can be mounted in various configurations, including wall mounts and desktop stands, to suit the needs of different environments.

These monitors are engineered to minimize fatigue during extended periods of use. The ergonomic design and anti-glare screen technology help reduce reflections and improve viewing comfort, which is particularly beneficial in control room scenarios where operators may need to monitor feeds for several hours at a stretch.

Overall, the Pelco PMCL537A, PMCL542A, PMCL532A, and PMCL526A models represent a solid investment for any professional surveillance operation. With their high-quality display, versatile connectivity options, and user-friendly features, they are well-equipped to meet the demands of today's advanced security environments. Whether it’s for monitoring live feeds or displaying recorded footage, these monitors deliver reliable performance that security professionals can trust.